
Group 25 — VAHN
Vivian (equ@), Alan (athorne@), Harvest (hlzhang@), Neil (neilc@)
1. MISSION STATEMENT
Our mission is to create a recording software solution by combining the true-to-life sound quality of live performance with the ease of gesture-control. The project will give a capella singers quick, fun, and easy-to-use interface to make music complete songs themselves.
- Vivian: the artistic guru of the group. She directed most of the design efforts of the prototyping process, drawing and cutting the prototype.
- Alan: made sure the group has all the necessary tools to get the job done, and wrote the majority of the blog post.
- Harvest: the resident music expert and he formulated the interactions (gestures) with and helped build the prototype.
- Neil: the hardware specialist and gave insight on how the kinect would interface with the user, as well as recorded the videos and took photos.
2. PROTOTYPE
We hope to uncover any inconsistencies in our ideas about how the software should behave and features we want to implement. In the prototyping process we hope to refine the interface so that:
- Our core functionality is immediately recognizable and intuitive.
- We achieve a “minimalist” look and feel.
- Secondary and advanced functionality is still accessible.
- The learning curve is not so steep
Here’s a video of a girl using a complicated hardware sequencer to make an a capella song. We’d like to make this process easier — http://www.youtube.com/watch?v=syw1L7_JYf0
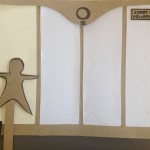
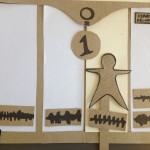
Our prototype consists of a paper screen (which would be the projector/TV). The user data (taken by the kinect) is shown as a paper puppet which can be moved around from panel to panel. Each panel represents a horizontal span of space. Users can move from between panels by moving horizontally in front of the kinect.
The following gestures manipulate the prototype:
- Raise both hands: start/stop the master recording
- Raise right hand: record a clip which will be saved in the panel that the user is standing in
- Move side-to-side: switch between panels in the direction of movement
- Both arms drag down: bring down settings screen
- Both arms drag up: close the settings screen up
- Touch elbow and drag horizontally: remove a sound clip on screen.
-
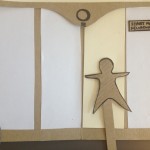
- User is standing in one panel
-
- Status for the recording.
-

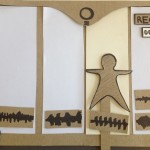
- User can move between panels and record clips which automatically overlay
3. 3 TASKS
Task #1: Recording a simple master track.
This task is similar to hitting “record” on a traditional recording application — it just records one sound clip. The following video shows how the user would interact with the prototype:
The user raises both arms to start the recording. The user then sings the song into a microphone or directly to some sound-recording device. To finish recording, the user raises both arms again. Then a menu drops down which asks if the user wishes to save their recording. The user would indicate with their arm the choice to save or cancel the recording.
-
- User is standing in one panel
-
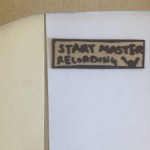
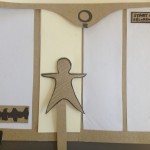
- User raises both arms to start master recording
-
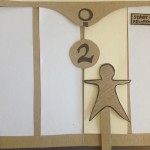
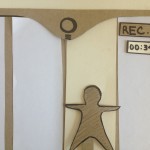
- Count down to show when the recording starts
-
- Status for the recording.
-

- Raise both arms to stop recording. A dialog box appears to ask whether to save.
This task worked well with our paper prototype we built.
Task #2: Recording multiple clips and overlaying them.
This task involves the user moving between panels and recording clips of a specified length (ex. 16 beats). The bar on the bottom of the screen will indicate the user how much time they have left in the sound clip. After the clip is recorded in one panel, it will repeatedly play. The user can record multiple clips in each panel. All the clips will be playing at the same time.
The user raises their right arm to start the recording in one panel. The user then sings the song into a microphone or directly to some sound-recording device. The bar at the bottom of the screen shows how much time is left in the sound clip (ex. 16 beats total, 5 beats left). When time runs out, recording stops and a track appears in the panel. To switch between screens, the user moves horizontally into another panel. All the recorded clips are being played back repeatedly at the same time.
-
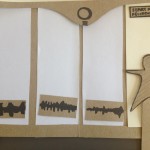
- Standing and recording. Raise right hand to start clip recording.
-

- Bottom bar shows how much time is left.
-
- Success! Clip is recorded. Move to the right in order to switch panels.
-

- Repeat process for more panels.
-
- Repeat process for more panels.
-

- User can record multiple clips in one panel by following same process (step into panel, raise right arm, watch bottom bar while recording)
This task was hard to show because in our final project, once a sound clip is recorded it will continually loop and play back. When users add additional sound clips, they will simultaneously play back. This was hard to show because we had no sound playback in our paper prototype!
One issue we realized we had to consider after making this prototype is how to sync recording for each individual sound clip. We may have to add a countdown similar to the master recording, but for each sound clip.
Task #3: Recording multiple clips and combining them into one master recording.
The user may have no clips or some clips already recorded in each panel. The user starts recording the master track and all the clips on screen (currently repeating together). The user can also add more clips into the panel they are standing in. The user can remove clips from the panel they are standing in. Settings can also be adjusted by bringing down the menu and changing EQ and overall recording volume.
User raises both arms to start master recording. User can now move between panels and record individual clips (adding extra clips to the sound) like in Task #2. Point arm to elbow and drag horizontally outwards to remove the sound clip in current panel. User can also use both arms, dragging down, to pull down the settings menu. When users are finished they can drag both arms up to close the settings menu.
-
- User has already recorded some sound clips. Raise both arms to start master track recording.
-
- Master recording countdown.
-
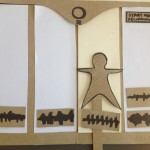
- Recording starts. Users can now move around and add sound clips even when completing master recording.
-
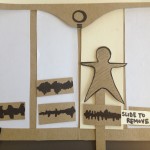
- User points to elbow and moves arm horizontally to remove sound clips in current panel.
-

- Raise both arms to stop recording. Save or cancel recording by pointing to either option.
-
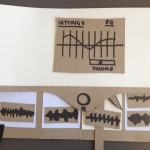
- Drag both arms down to reveal settings menu. Drag both arms upward to cancel menu.
Similar difficulties as in task #2.
4. DISCUSSION
We made our prototype with paper, glue, cardboard, and markers. Since our system is gesture based, we also made little paper puppets to simulate usage in a more streamlined way than jumping around ourselves and panning a camera back and forth. The only real difficulty we encountered was determining precisely how to realize our conceptual ideas about the software, especially because paper does not express screen position (of the person) like we would like the kinect to do. To fix this, we created a little “puppet” which represented the user’s position on the screen. We think we were moderately successful at capturing the user-screen interaction, however in the future we would like to reflect gestures on screen to better teach users how to use our interface.
The main thing which the paper prototype could not show was the audio feedback, since the sound clips would be playing repeat after the user records it. In this way, paper prototyping was not good at giving an accurate representation of the overall feel of our system. However, it was paper prototyping was good at forcing us to simplify and streamline our interface and figure out the best gestures to interact with it. Paper prototyping forced us to answer the following questions precisely: what should and should not be on the screen? Should we prototype every single little scenario or just a representative cross-section? For which functions should we switch to mouse control? We ended up prototyping representative actions and did not show some of the settings (such as beat count, represented by the bar on the bottom of the screen) which we assumed in the current prototype would already be set. Showing the separate screens for each standing position of the user worked really well. The status for recording the master track could be more visible (by having the screen turning a different color, for example), so we would improve on this in the future.