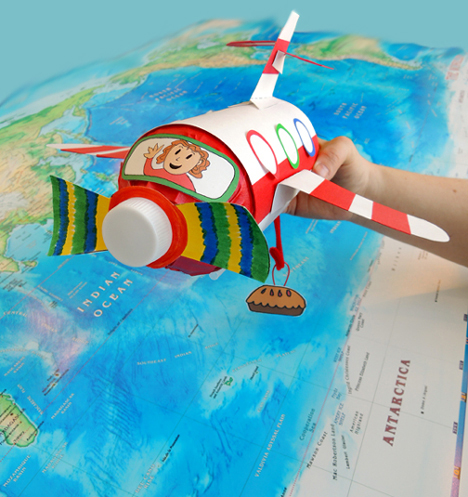
 Baking an apple pie that requires ingredients from exotic locales? This cute plastic bottle airplane will get you there! The plane is equipped with a “pie hook” to carry home the perfect pie to share with your friends. Apple pie not your favorite? No problem. We have two other flavors ready for take off!
We read How to Make an Apple Pie and See the World by Marjorie Priceman (Alfred A. Knopf, 1994). Apple pie is a simple enough to make. Just grab some basic ingredients from the market…uh oh…the market is closed. No problem! Dash to Italy for semolina wheat, France for eggs, Sri Lanka for cinnamon, England for milk, Jamaica for sugar cane, and Vermont for apples. After milling, grinding, boiling, cracking, churning, mixing, and cooking, the pie is finally ready to eat. Invite some friends over, and dig in. But wait! Wouldn’t the pie be extra tasty with some ice cream? Just nip out and pick some up at the market. Uh oh. The market is closed….might be best to eat it plain!
You’ll need:
- A 1 liter plastic soda or water bottle, with cap
- An 8.5″ x 11″ piece of white card stock
- A selection of color masking tape
- 2 drinking straws
- 1 airplane parts template, printed on 8.5″ x 11″ white card stock
- A selection of dot stickers, round labels, or construction paper circles
- 1 pie template, printed on 8.5″ x 11″ white card stock
- 3 twisteez wires, each approximately 4.5″ long (pipe cleaner pieces work too)
- 3 small paperclips (mine were 1.25″ long)
- 1 pipe cleaner
- 1 world map for a “Pie Fly” activity (more on this later!)
- Tape and scissors for construction
- Markers for decorating
- Hot glue
My plane project is a modified version of an airplane bank Katie spotted online (if you’d like to see the original inspiration, it’s pinned on my “Ideas & Inspirations” Pinterest board). My version isn’t a bank, doesn’t have jet engines, and I created a template of airplane parts that would be easy for 3-5 year-old to cut and attach to the plane. I also added a windshield, and of course, a pie hook.
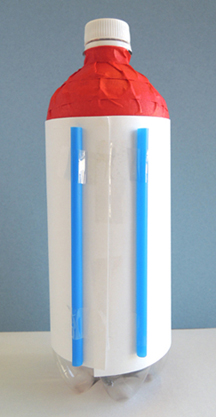
Ready to get started? Empty a plastic bottle and allow the inside to dry out. Wrap color masking tape around the top portion of the bottle. Make sure you don’t tape the cap to the bottle! You’ll need to remove it later when you attach your propeller. Wrap a piece of white card stock around the bottle. You’ll most likely need to trim off a portion of the card stock so it doesn’t extend past the bottom of the bottle.
 Turn the bottle around so the paper seam is facing you. Tape 2 drinking straws on either side of the seam (again, trim the straws if they extend past the bottom of the bottle). The 2 straws should be about 1.5″ apart. The straws will keep the plane steady when it’s sitting on a table.
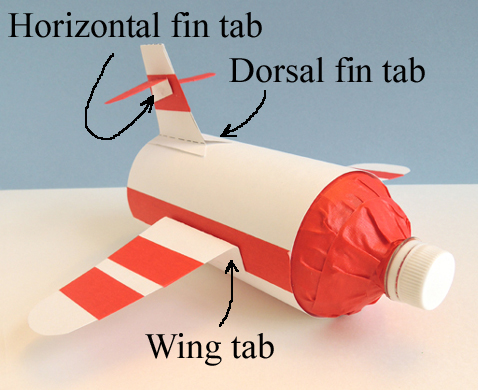
 Rest the bottle on top of the taped straws. Cut and decorate the plane’s tail, horizontal tail fins, and wings from the template. You can use markers or color tape to decorate. If you use color masking tape on the wings, don’t use more than 2 pieces per wing. Otherwise, the tape makes the wings heavy and they start to droop. Feel free to decorate the body of the plane as well!
The tail, horizontal fin, and wing pieces all have dotted lines to indicate where to fold them to create tabs. Later, you’ll use the tabs to attach the pieces to the plane’s body.
The tail piece, however, requires one extra fold. First, fold it downward on the center dotted line, then fold the little side tabs upwards. Hot glue (or tape) to attach it to the plane. The horizontal fins attach on the sides of the tail, the wings attach to the sides of the plane’s body:
 The windshield is on the airplane part template too. Draw yourself in the pilot’s seat, and attach to the plane with hot glue. For the round windows of the plane, I used these 1.25″ color coding labels from Avery. They worked great!
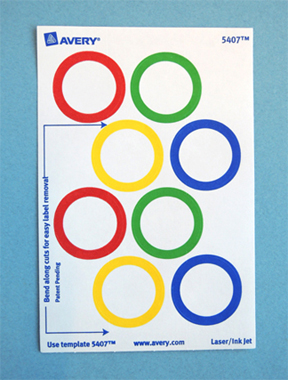 If you can’t find the Avery stickers (I purchased mine at Office Max), use dot stickers or simple construction paper circles.
 Cut and color the propeller from the template, then use scissors to cut out the gray circle in its center. Remove the cap from the bottle, and slide the propeller onto the bottle’s neck. Screw the cap back into place. If you want your propeller to spin, play with the tightness of the cap a little.
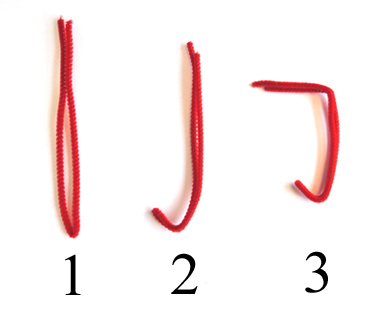
 The final step for the plane is the pie hook. Bend a pipe cleaner in half, forming a tight “V.” Make a small hook at the bottom, then bend the top of the pipe cleaner forward, so it forms a right angle.
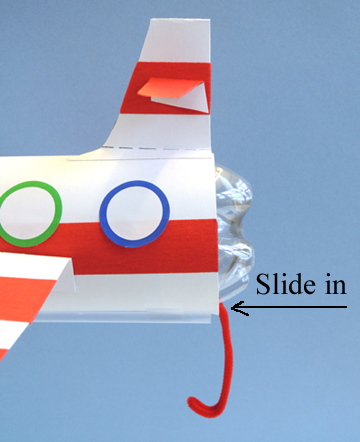
 Slide the angled part of the pipe cleaner into the back of the plane, right between the bottle and the paper. You could also tape the hook to the bottom of the plane.
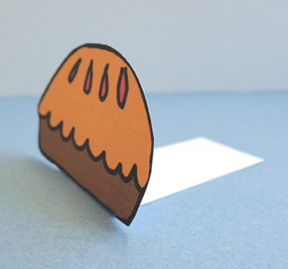
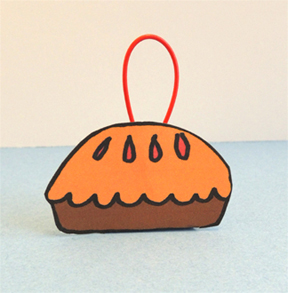
 The airplane’s done, now for your pies! The pies in the template have built-in triangular bases. Like the airplane parts, there are dotted lines to show you how to fold the pie bases. First, cut and color a pie from the template. Then, fold its tab backwards, right where it attaches to the bottom of the pie like so:
 Bend the ends of a piece of twisteez wire downward, then twist the ends together. This creates a “pie loop.” Attach the loop to the back of the pie with tape. Now fold the pie tab upwards along the dotted line, and tape the bottom of the tab to the back of the pie.
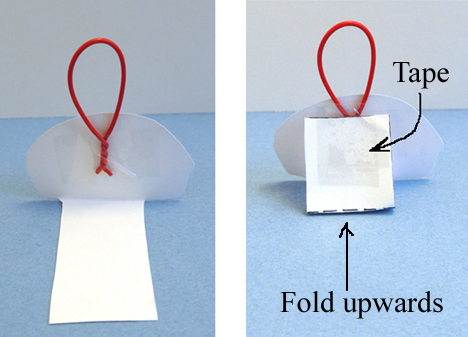 Slide a paperclip onto the base of the triangle to keep the pie from tipping over. Done!
 Repeat the above steps with the remaining 2 pies on the template. If you don’t have twisteez wire handy, you can use pipe cleaner pieces to make your pie loops. However, if you go with pipe cleaners, consider using larger paperclips on the base of your pies (pipe cleaners are heavier than twisteez wire).
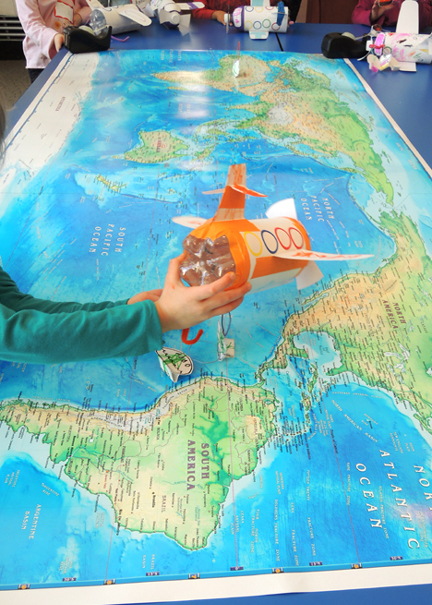
On to the Pie Fly activity! Katie borrowed a HUGE map from her husband’s office (and by huge I mean 3′ x 6′). We spread it on a couple of tables and weighed the corners down with tape dispensors. Kids lined up at one end of the map. One by one, we placed their pies on various locations on the map. Then they “flew” their planes over the different countries, hooking the pies with their planes!
 We had a lot of fun with this story time. However, if I was to do it again, I might change two things:
- Use a paperclip pie hook instead of a pipe cleaner. Because of the age of my story time kids (3-5 years-old), I went with the soft pipe cleaner option. But for some kids, the floppiness of the pipe cleaner made it hard to hook their pies. Something sharper, like an unfolded jumbo paper clip, might work better.
- Raw ingredients. Instead of picking up pies, have the plane pick up the different ingredients for the pie, just like the book instructs (wheat, sugar cane, eggs, apples, etc.). You could even match the ingredients to the different countries they come from!

 We read Pilot Pups, written by Michelle Meadows, and illustrated by Dan Andreasen (Simon & Schuster, 2008). Join a pair of enthusiastic stuffed dogs as they fly through the house in a toy plane. Dodging mountaintops (Dad’s head), encountering fog (tea kettle), and careening past the creek (kitchen sink), and returning to the bed before anyone notices their daring adventures.
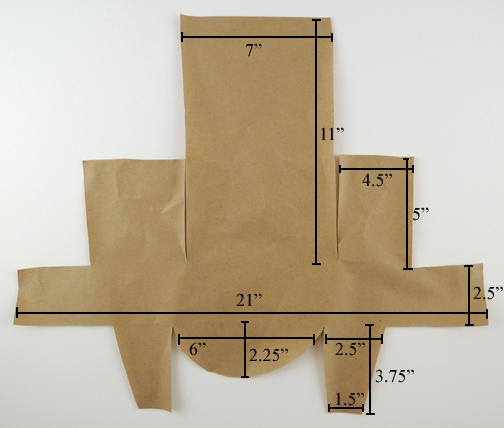
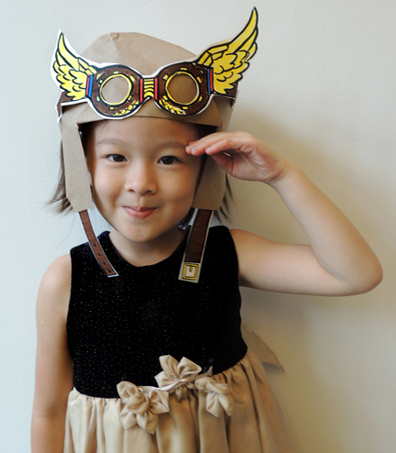
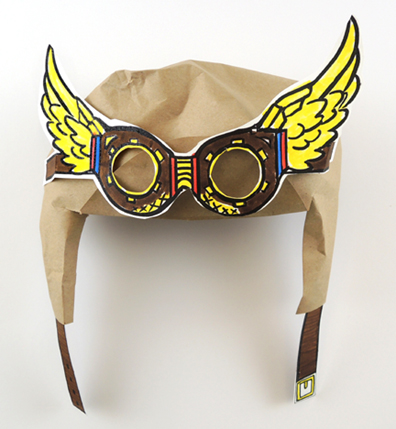
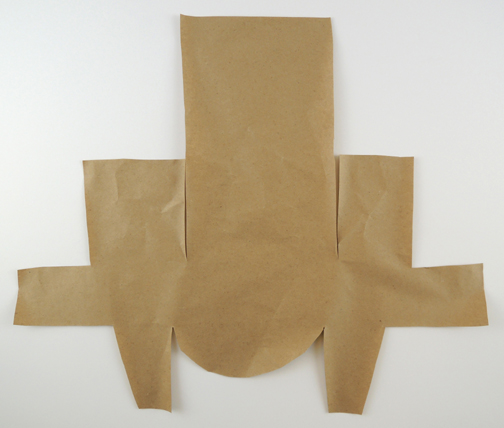 First, fold the rounded part of the template upwards and inwards, so it tucks under the back of the template. Later, this will be the bill of your aviator hat.
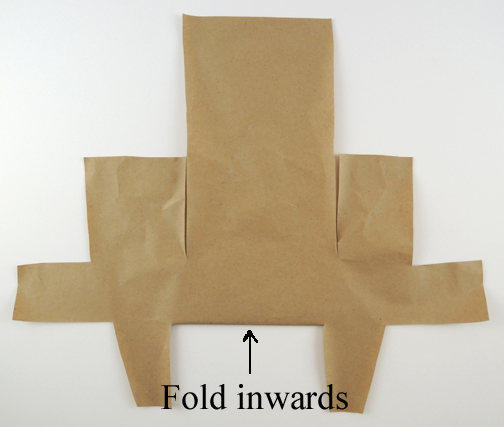 Hold the template to your forehead and curve the long ends around your head. Secure the ends together with staples. This is the headband of your hat (and, if the template band doesn’t go all the way around your head, just add a little extender piece in the back).
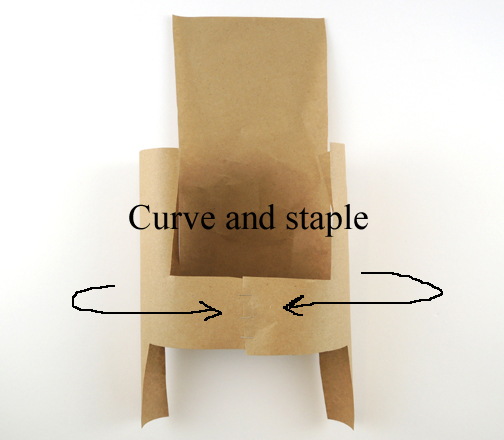 Next, fold the right and left flaps over the top of your head. Secure them together with staples. Note: you want the flaps to form a bit of a “dome” over your head, not fit super tight on top of your skull.
 Fold the the center flap down over the top of your head, gently tucking it into the back of the hat brim. Trim off any excess flap sticking out from under the brim.
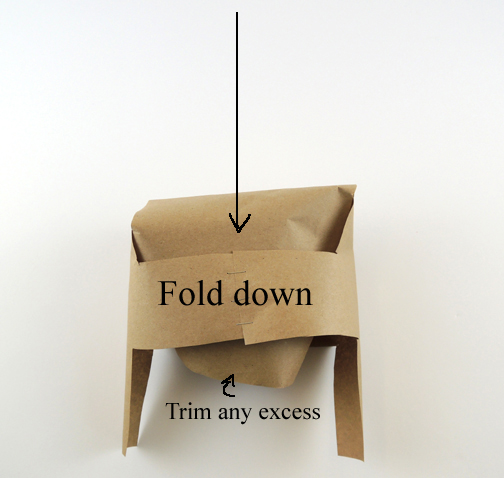
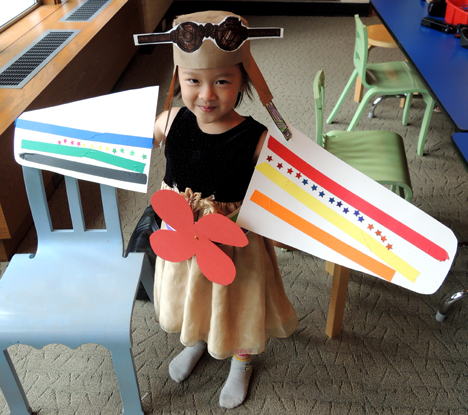
 That’s your hat, now for the rest of the costume! The wings are super simple. We cut pairs of 9.5″ x 16″ wings from white poster board, which the kids decorated with markers, color masking tape, and star stickers. Add poster board wrist and shoulder loops to the undersides of the wings. You can see the placement of the loops in the photo below (most kids chose to grasp the wrist loops in their fists while “flying”):
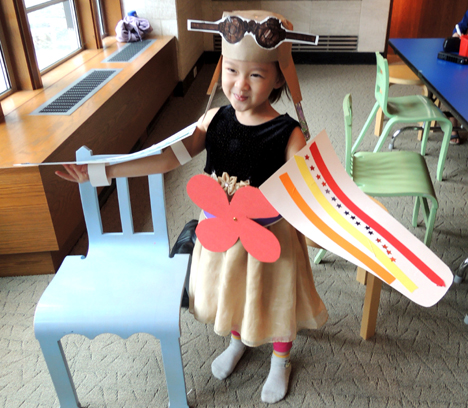 The propeller belt is a strip of poster board with holes punched in each end. Wrap the belt around your waist and secure it in place with a snippet of ribbon (decorate with markers and color masking tape of you like to) threaded through the belt holes. You can simply attach a poster board propeller to the front, or you can make it spin by using a brass fastener.