I used to be one of the many people who believed online privacy is not really an issue. After all, as long as I think before I post, how can my privacy ever be compromised? Then, a few months ago, I read an article about how Facebook tracks its users off the site. My immediate thought? “Not cool, Facebook.” As much as I enjoy using Facebook, I do not appreciate the idea that Facebook knows exactly what I am doing outside of Facebook site. My first thought was to log out every time, but it turns out that Facebook is capable of tracking even logged-out users. I’m sorry, Facebook, but this is officially creepy. If you are like me and would like what you do outside of Facebook to stay outside of Facebook, here are a few easy steps you can take. Note that I will be focusing primarily on Facebook, but many of these tips are applicable to any online entities.
Step 1: Set aside a different browser just for Facebook (and other social networks)
Note: If you are on a mobile device, you can simply use the default Facebook app and not log in using Safari. You may also follow the steps here with a secondary browser, like Google Chrome.
The only way to stop Facebook from tracking your browsing history is to cut off the social network from the rest of the web. One very easy method of doing so is to have a separate web browser just for Facebook. Note that I meant browser, not browser window. Clicking “new page” in Internet Explorer brings up a new browser window, not a different browser. If you do not have another browser installed, I would recommend getting either Google Chrome or Mozilla Firefox. Remember to use this alternative browser only for Facebook.
You are not yet done. Even though you have shifted your Facebook browsing experience to a different browser, as long as Facebook’s cookies still exist on your default browser, Facebook can still spy on you. Therefore, we have to first clear all the cookies from your browser. This will not result in any data lost, but you may be logged out of sites that you have opted to stay “signed in.”
If you are on Internet Explorer: Follow this tutorial from Microsoft.
If you are on Google Chrome:
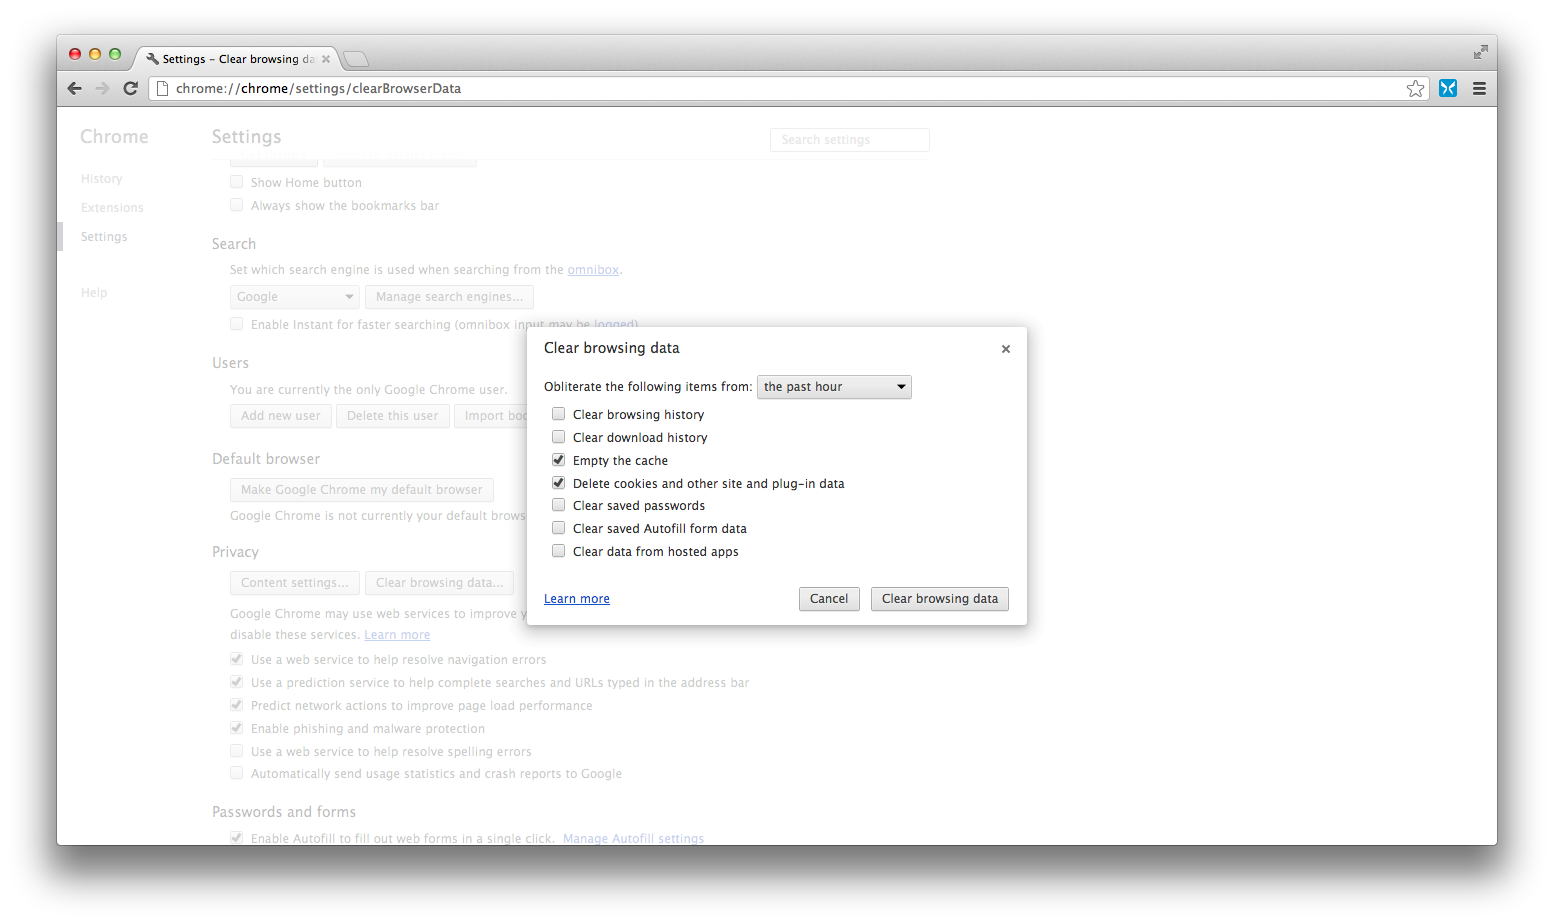
To access the settings page, either click on the three bars icon on the top right and choose “Settings” or paste “chrome://chrome/settings/” into the URL bar. Scroll down, and click on “Show advanced settings…” Scroll down until you see “Privacy,” and click on “Clear browsing data.” Check only the third and the fourth boxes (cache and cookies), and proceed to clearing the data.
If you are on Mozilla Firefox:

Click on “Tools,” and then “Clear recent history.” Choose “Everything” for time to clear, and click the “Details” button. Go ahead and uncheck everything except for “Caches” and “Cookies.” Clear your data.
If you are on Safari:

Click on the “Safari” button and choose “Preferences.” Go to “Privacy.” Click on “Remove All Website Data…”
Your default browser is now officially uncontaminated. You can continue using the browser normally and switch to the secondary one when using Facebook. Note that this method actually kills two birds with one stone by breaking all the Facebook apps that track your actions on other sites (i.e. Yahoo Reader, Spotify).
Step 2: Do NOT Connect with Facebook
We’ve all seen the virtually omnipresent “Connect with Facebook” button. Clicking on the button allows one to use his Facebook account on a third-party website instead of creating new account. It also allows easy sharing on the website’s content (for example, an article) to Facebook. Unfortunately, in return, Facebook will know exactly what one does on that website. If you value your privacy, do NOT click on the button. If you already made the Facebook connection, stop it immediately. Go through the hassle of creating a new account. If you see something you really must share, copy and paste the URL to your Facebook (on the alternate browser). This little inconvenience is a small price to pay for privacy.
Step 3: Dislike the “Like” button
Similar to the “Connect with Facebook” button, many websites, especially news websites, have a Facebook “like” button next to their contents. The purpose is to allow the user to easily indicate interests in that particular content. Under the same logic as the previous point, this action is to be avoided. Instead, if you are really interested in an article and want to share it, paste the URL into your status update.
Step 4: Create a Public Email
One of the reasons why some would prefer to use their Facebook account in place of making a new account on a third-party site is that they do not want to give out their emails. After all, nobody wants to deal with spams in their inboxes. However, as mentioned in Step 2, this method brings too much compromise. Instead, make a new email for public use. This will be the email that you are not afraid to give out to any random strangers. Whenever you sign up for an account anywhere, use this email. If you already have several accounts associated with your current email address, consider making it your public email and create a new private one. This way, your personal inbox is automatically segregated from the spams you receive when signing up for accounts.
In selecting which email provider to use, remember that your public email is naturally more prone to cyber attacks. Consider using Gmail and enabling two-steps verification for the best security.
By following these four simple steps, you have already taken a huge step in protecting your privacy on the Internet. You may also want to take a look at your privacy settings on Facebook for added protection. If you have any suggestions, feel free to comment here or hit me up on Twitter.
Of course, these steps are by no means perfect. There are other ways for Facebook and other Internet entities to spy on you. For this very reason, the best defense is to be careful what you post on the Internet. The Golden rule to remember is that once something goes on the Internet, including Facebook, it is no longer private.