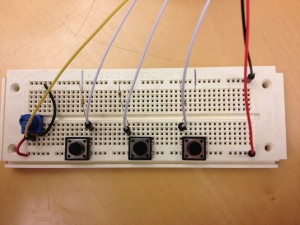
Group Number 1: Kuni (nagakura@), Yaared (kyal@), Avneesh (asarwate@), John (subosits@), Joe (jturchia@)
We built a sound looping system for our final result. The interface is three buttons and a potentiometer, where each button corresponds to a different pitch and the potentiometer determines the tempo. When the system starts, there is a constant stream of 16th notes on top of which the user builds the loop. Once the loop begins, the user can add different notes to the loop and it will keep playing it. Over a couple of loops, any user can make a beat! We built this, because we thought looping was cool and also accesible to non-musical users. We are very happy with our final result. The interface is intuitive and easy to use and pretty much anyone can make some sort of simple beat/rhythm using our system. For future improvements, we would add more buttons to provide more diversity in the looping sounds. We could also add a switch to change instruments.
Prototypes:
Prototype 1:
For our first prototype, we made a simple button to chord mapping using ChucK and three buttons on the Arduino. Every combination of buttons creates a unique chord.
Prototype 2:
We used a SoftPot and FSR for our second prototype and built a system where the amount of pressure on the FSR determines the volume of the note, and the SoftPot controls the pitch. The prototype plays the sound of a mandolin and the interface is intuitive even for non-musical users.
Prototype 3:
For the last prototype, made a sound looping system. We have three buttons and a constant stream of 16th notes, where each button corresponds to an instrument and the user can create samples and loops using the 3 buttons.
Final System:
Avneesh makes beats, speeds up the tempo, and has a great time:
Parts List:
- Arduino
- 3 buttons
- Jumper wires
- 3 resistors (10k pulldown)
- Breadboard
- Potentiometer
Instructions (image attached):
- Attach three buttons to breadboard, spaced comfortably apart.
- Attach a pulldown resistor between each of the buttons and ground.
- Connect ground to Arduino.
- Attach 5V line to the other side of the buttons.
- Attach signal lines between the resistors and buttons and run to digital pins 6, 8, and 10 on the Arduino.
- Attach potentiometer to Analog 0, ground, and 5V
Source Code:
buttons.ino
#include

int b1 = 6;
int b2 = 8;
int b3 = 10;
int b1Reading;
int b2Reading;
int b3Reading;
int curReading;
int lastReading;
int potPin = 0;
int fixed;

void setup(void) {
  MIDI.begin(0);
  Serial.begin(9600);
  pinMode(b1, INPUT);
  pinMode(b2, INPUT);
  pinMode(b3, INPUT);
}

boolean b1Last = false;
boolean b1New = false;
boolean b2Last = false;
boolean b2New = false;
boolean b3Last = false;
boolean b3New = false;

void loop(void) {

curReading = analogRead(potPin);
if (abs(curReading - lastReading) > 2) {
  fixed = map(curReading, 0, 1023, 0, 250);
  Serial.print("p");
  Serial.print(fixed);
   Serial.println(" ");
}

lastReading = curReading;
b1Reading = digitalRead(b1);
if (b1Reading == HIGH) {
  b1New = true;
}
else {b1New = false;}

b2Reading = digitalRead(b2);
if (b2Reading == HIGH) {
  b2New = true;
}
else {b2New = false;}

b3Reading = digitalRead(b3);
if (b3Reading == HIGH) {
  b3New = true;
}
else {b3New = false;}

if( !b1Last && b1New) {
  Serial.println("1 ");
}
if( !b2Last && b2New) {
  Serial.println("2 ");
}
if( !b3Last && b3New) {
  Serial.println("3 ");
}
b1Last = b1New;
b2Last = b2New;
b3Last = b3New;

delay(5);
}
beatlooper.ck
Shakers inst[16];
int filled[16];
0 => int count;
.125::second => dur step;
for(0 => int i;i  dac;
}
// create our OSC receiver
OscRecv recv;
// use port 6449
6449 => recv.port;
// start listening (launch thread)
recv.listen();
recv.event( "set, i" ) @=> OscEvent set;
<<>>;
fun void play() {
    while(true){

        if(filled[count] == 1) {
            .9 => inst[count].energy;
            .8 => inst[count].noteOn;
            <<>>;
        }
        step => now;
        if(filled[count] == 1) {
            .8 => inst[count].noteOff;
        }
        (count + 1) % 16 => count;
    }
}
spork~ play();
while(true) {

    set => now;
    set.nextMsg();  //loop thing?
    1 => filled[count];
    set.getInt() => inst[count].preset;

    <<>>;
}
looperknob.py
import serial
import OSC
import time

ser = serial.Serial('/dev/tty.usbmodemfa141', 9600)

client = OSC.OSCClient()
client.connect( ('127.0.0.1', 6449) )
iset = OSC.OSCMessage()
iset.setAddress("set")
knob = OSC.OSCMessage()
knob.setAddress("knob")


while 1:
    line = ser.readline()
    if " " in line:
        if("p" in line):
            s = line.replace("p", "")
            print int(s)
            knob.append(int(s))
            client.send(knob)
            knob.clearData()
        else:
            print int(line)
            iset.append(int(line))
            client.send(iset)
            iset.clearData()

