Winter is Coming

winter is comingIt’s a diorama, a keepsake box, a mini exhibit, AND a lesson in ecology! Open the lid of this winter landscape and you’ll find the creatures that hibernate, burrow underground, and tunnel underneath the snow, complete with an information card!

open woodland boxWe read Over and Under the Snow, written by Kate Messner, and illustrated by Christopher Silas Neal (Chronicle Books, 2011). A father and child ski over the deep snow in the woods. Even though it’s a world of white, signs of life are everywhere – squirrel, owl, deer, snowshoe hare, and fox. But under the snow is yet another world. Shrews and voles run in tunnels. Bullfrogs burrow in the mud, bears hibernate, and a queen bee sleeps, waiting for the first signs of spring. The book ends with the child in a cozy bed, dreaming of nature. An absolutely beautiful book, with gorgeous, bold illustrations set against snowy white.

You’ll need:

  • 1 box with a lid
  • Brown construction paper
  • 1 woodland template, printed on 8.5″ x 11″ white card stock
  • An oval of blue construction paper (approximately 2.5″ x 4.5″)
  • An oval of silver mirror board (approximately 2.5″ x 4.5″)
  • A rectangle of brown wrapping paper (approximately 7.5″ x 10.5″)
  • A smaller rectangle of brown wrapping paper (approximately 3.75″ x 4.5″)
  • White cotton balls
  • 4 small clear plastic small gemstones (optional)
  • Scissors, tape, and glue for construction
  • Metallic markers for decorating
  • Hot glue

First, find a box with a lid. I used white cardboard pencil boxes with hinged lids from Discount School Supply (a dozen cost $17 so a bit of a splurge). To give the outside of the box a little pop of color, we put a strip of patterned tape around the perimeter, but this is optional (or, just use markers to decorate!).

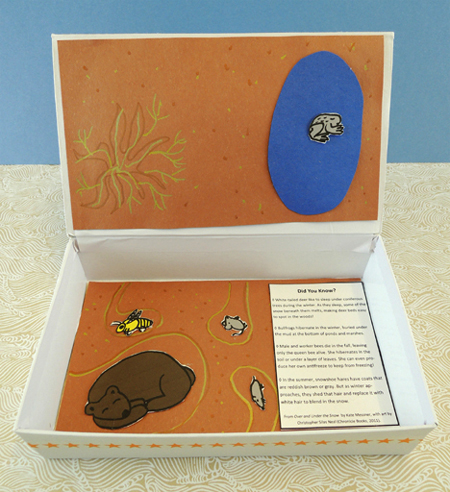
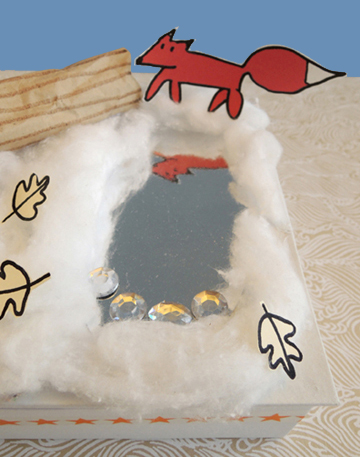
Line the inside of the box (including the underside of the lid) with brown construction paper. Glue an oval of blue construction paper on the right side of the box lid. Cut and color the bear, bee, vole, shrew, and bullfrog from the template, and glue them inside the box. Use markers to draw burrows, dirt specks, and tree roots (we used metallic markers, and they looked great on the brown paper!). Glue the information card to the inside of the box as well.

open woodland boxClose the lid of the box, and glue an oval of silver mirror board to the right of the box, directly above the blue construction paper oval. If you don’t have mirror board, use tin foil.

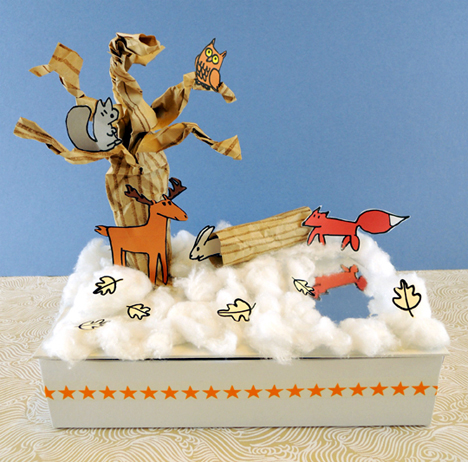
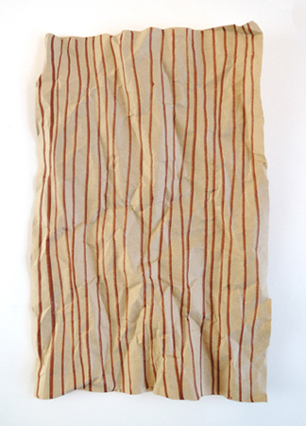
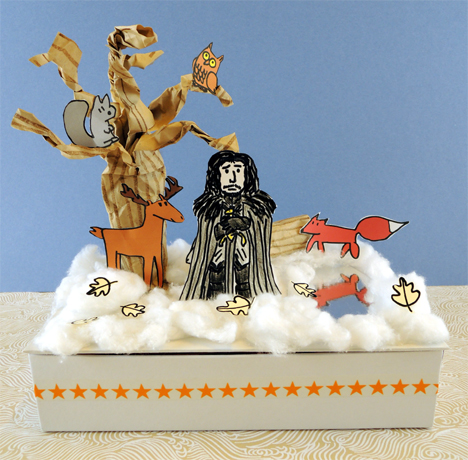
Now for the tree! Use a brown marker to draw vertical lines on a tall, 7.5″ x 10.5″ rectangle of brown wrapping paper. Then squish, crinkle, and wrinkle the paper. The more wrinkly it gets, the better!

woodland tree step 1Roll the paper into a tube and secure it with tape. Cut 4 tabs in the bottom of the tube (each tab should be about 1.5″ long). Fold the tabs outwards. Later, you’ll use these tabs to attach the tree to the box lid:

woodland tree step 2Cut 5-6 tabs in the opposite end of the tube (these tabs are much longer, about 5″). Fold them out gently, then twist them to create the branches of your tree.

final steps woodland treeHot glue (or tape) the tree to the lid of the box. If you’d like to add a log to your landscape, use a brown marker to draw horizontal lines on a 3.75″ x 4.5″ rectangle of brown wrapping paper. Crinkle the paper, then roll the paper into a tube and secure it with tape. The final length of the log should be 3.75″. Set the finished log aside for a moment.

Glue white cotton ball “snow” to the lid of the box. Then cut and color the squirrel, owl, deer, snowshoe hare, fox, and tree leaves from the template. Glue these items, plus the log, to your winter landscape.

winter is comingFor some extra sparkle, I hot glued 4 small clear plastic gemstones to the edge of the lake. But this, of course, is optional.

frozen lakeYour winter landscape is complete! Well, maybe not quite complete…

jon snowBet you a 33 pound chocolate dragon egg he’s coming back in season six.

A Little Batty

a little battyThis terrific poster board bat can hang just about anywhere, thanks to its paper clip foot. The bat is a little science lesson too – open its wings and discover a mini exhibition of bat information!

bat wings openYou’ll need:

  • 1 rectangle of brown poster board (approximately 6″ x 13.25″)
  • 1 bat template, printed on 8.5″ x 11″ card stock
  • 1 jumbo paperclip (mine was 2″ long)
  • 1 bug template, printed on 8.5″ x 11″ paper
  • Bat facts templates (more on those below)
  • Scissors, tape, and glue stick  for construction
  • Black marker

Fold a rectangle of brown poster board in half (we used brown because brown (and red) bats are the most common bats in NJ). Use the template to trace 1/2 of a bat onto the folded poster board. Use a black marker to draw eyes, a nose, and a mouth. Next, fold each wing inward, across the bat’s body.

bat stepsUnfold the wings and glue bat facts and bugs to the bat’s body. Two important things to remember: 1) Since the bat hangs upside down, you’ll want to attach the facts and bugs upside down as well; and 2) Keep the things you are gluing out of the creases in the wings. Otherwise, your bat’s wings will not fold as nicely.

We offered 4 different types of bugs (here’s the bug template again) and 6 different bat facts. Kids could pick and choose which bugs and facts they wanted to add to their bats. The facts are listed below, along with their templates.

I’m not blind, but I don’t use my eyes,
to navigate through the dark night skies. ECHO! Echo! echo!
bat fact 1 template

If life is fair and food is plenty,
I’ll live to the ripe old age of 20!
bat fact 2 template

Nature’s #1 bug zapper!
bat fact 3 template

“Flying mice?” That’s not very nice.
What’s more true?
Bats are more like YOU!
bat fact 4 template

I’m a bug muncher all right,
I eat half my weight every night!
bat fact 5 template

See me swoop and spin and fetch?
I grab some bugs with a one-arm catch!
bat fact 6 template

Once your facts and bugs are glued, grab a jumbo paperclip. Bend the inner part upwards until the paperclip forms a 90 degree angle.

paper clip footTape 1/2 of the paper clip to the back of your bat, right at the very bottom:

taped paper clipOK, your bat is ready to hang! Place the free end of the paperclip onto a shelf or tabletop. If you’d like to hang the bat on your shirt, on a nail, or on a garland with other bats, adjust the paperclip accordingly.

I designed this project for a “Bats in Your Backyard” table at a library event in 2013. The table was hosted by the Conserve Wildlife Foundation of New Jersey. The foundation put together an amazing table packed with information about bats. And check out the bat houses on display!

conserve wildlife foundation of nj That’s MacKenzie Hall in the above photo. She’s a researcher, conservationist, wildlife educator, and author of the fabulous rhyming bat facts. This month, along with two other women, she won the Conserve Wildlife’s Foundation’s “Women and Wildlife” Inspiration Award. You go MacKenzie!

Buzz Worthy

buzz worthyPut on your splendid beekeeping hat and follow an oatmeal container bee to a flower! Today, we’re collecting nectar, taking it back to the hive, and turning it into something delicious!

We read A Taste of Honey by Nancy Elizabeth Wallace (Winslow Press, 2001). A golden jar of honey prompts Lily the bear to ask her Poppy a series of questions about its origins. Where does honey come from? Well, where does it come from before it’s put in a jar? Where does it come from before it’s purchased at the store? And before that? And before that? In addition to being a clever succession of questions and answers, this book is stocked with facts about beekeeping equipment, protective clothing, honey harvesting, beehives, varieties of wildflowers, and more!You’ll need:

  • 1 large oatmeal container
  • Yellow construction paper
  • 2 long strips of black construction paper (approximately 2.25″ x 18″ each)
  • A 5.25″ circle of yellow construction paper
  • 2, 1.5″ circles of black construction paper
  • 2 yellow dot stickers
  • 6 pipe cleaners (2 black, 4 any color you’d like)
  • 1 bee wings template, printed on 8.5″ x 11″ white card stock
  • 1 plastic fedora (I purchased mine from Oriental Trading Company)
  • A 1.5″ x 22″ strip of white poster board for hat band
  • 1 little bees template, color printed on 8.5″ x 11″ white card stock
  • A 12″ x 32″ piece of white tulle
  • 1 “Find the Nectar” game (more on this later!)
  • Scissors, glue, and tape for construction
  • Markers for decorating

finished beeWe’ll start with the bee! Wrap a large oatmeal container with yellow construction paper, then wrap two strips of black construction paper around the container to create stripes.

Next, stick 2 yellow dot stickers onto 2 circles of black construction paper. These are your bee’s eyes. Tape (or glue) the eyes onto a large circle of yellow construction paper. Draw a pointy nose and smiley mouth on the circle, then tape (or hot glue) it to the lid of the oatmeal container. Curl both ends of a pipe cleaner and tape it onto the container to create your bee’s antennae.

bee faceTo make the legs, cut 2 black pipe cleaners into thirds and bend each piece into a loose, inverted “Z.”

bent pipe cleanerAttach the pieces to the sides of the oatmeal container with tape.

bee legsCut the wings from the bee wings template, fold each wing upwards along the dotted line, then tape the middle of the wings to the back of your bee. Done!

wingsSet the bee aside for a moment, it’s time for the hat! Use markers to decorate a strip of white poster board, then wrap it around the hat like a hat band. Cut some bees from the little bee template (at our story time, each kid got 6 bees). Attach 3 of the bees to the ends of curled pipe cleaners, then tuck the bottom of the pipe cleaners into the hat band. The remaining 3 bees can be taped directly to the plastic hat. The final touch is to wrap a long piece of white tulle around the hat. Secure the fabric to the back of the hat with tape.

hatYou can stop here, or you can proceed to the “Find the Nectar” game! First, Katie made 4 amazing flowers (2 blue, 2 red) out of poster board, tissue paper, construction paper, and pipe cleaners.

flowersThe flowers were taped (using nice strong packing tape) onto 40.5″ pieces of PVC pipe. Later, the PVC was wrapped with green masking tape and adorned with green poster board leaves. At the center of each flower was a plastic cup to hold nectar. Because little hands would be repeatedly bumping into the cups, Katie secured each cup to the poster board with a brass fastener.

flower with brass tackFor the beehive, Katie raided her basement (nicknamed “The Magic Basement” for all the unusual and useful things she unearths from it) and found this 13.5″ x 17″ styrofoam block used to ship wine.

wine shipping styrofoamKatie was already coloring the front of the styrofoam with yellow highlighters when I snapped this picture. The highlighter pens worked a treat, but there were lots of squeaky, scratchy, pens-on-styrofoam sounds. Eeeee! Next, Katie added a yellow poster board facade to the hive, lined the holes with rolls of yellow construction paper, and added 6 little bees to the front.

beehiveDuring story time, I placed the hive at one end of the gallery, and “planted” the flowers at the other end of the gallery. Each flower cup was loaded with a single yellow cotton ball to represent “nectar.”

nectarI split the kids into two teams – Red Flower Team and Blue Flower Team. Each kid on the team had to fly his/her bee to the flowers, find the 2 flowers that corresponded with his/her team color, remove a ball of nectar from each flower cup…

bee game collectionAnd then zoom back to the hive and deposit the nectar inside!

bee game drop offGranted, you could way simplify this game with a set of cups representing the flowers and a shoe box covered with yellow paper representing the hive. But sometimes, you just get a hankering to make giant flowers.

Two important things about the game:

  1. Just put one cotton ball into a cup at a time. If you stuff the cups full of nectar, some kids will be tempted to grab everything, leaving nothing for the other bees! During our game, we had Miss Joani next to the flowers, patiently reloading the cups with nectar.
  2. Make sure to emphasize that this is not a race. It’s all the bees working together to collect nectar for the hive!