Jack-O’-Lantern

jack o lanternThis plump little pumpkin is made out of a roll of toilet paper! I spotted this project in FamilyFun magazine years ago. Their version was undecorated, and they used fabric and felt for the body and leaves. I needed to use cheaper materials, so my version is made with a piece of plastic tablecloth and construction paper. I also went a step further and decorated the front with a grinning jack-o’-lantern face!

You’ll need:

  • 1 roll of toilet paper
  • A piece of orange plastic table cloth (approximately 20″ x 22″)
  • Brown and green construction paper
  • 1 green pipe cleaner
  • 4 pieces of black self-adhesive foam
  • Scissors and tape for construction
  • Green marker (optional)

Place the toilet paper roll in the center of the plastic tablecloth, and tuck the tablecloth into the hole in the top of the roll. Next, curl a 5″ x 9″ piece of brown construction paper into a tube and tape it. This is your pumpkin’s stem. Stick the stem in the hole in the top of the roll.

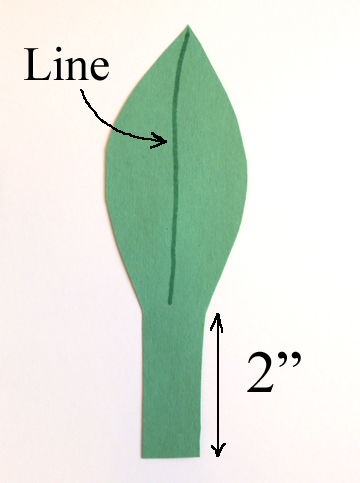
Cut a leaf shape out of a piece of green construction paper. Make sure to leave a 2″ stem at the bottom of the leaf (because the stem needs to firmly anchor the leaf in the toilet paper roll). You can use a green marker to draw a little line on the leaf if you’d like.

pumpkin leafTuck the stem of the leaf into the hole. Curl a green pipe cleaner around a pencil, pen, or marker to make a corkscrew, then tuck it into the hole as well.

Finally, cut your jack-o’-lantern’s eyes, nose, and mouth out of black self-adhesive foam and stick them on your pumpkin (or use black construction paper pieces and tape). You can cut the foam pieces in advance, or the kids can “carve” the pieces on their own. I found a little friend in the gallery who was more than happy to demonstrate her carving skills! Awesome.

decorated jackThe nice thing about this project is that when you are done with it, you can remove the plastic and re-purpose the roll of toilet paper. Now that’s a very useful pumpkin!

Ship in a Bottle

ship in a bottleAhoy! Don’t toss that little plastic water bottle! This simple ship can be put together with supplies laying around any pirate den.

You’ll need:

  • An empty 8 oz plastic water bottle
  • A 4″ x 4″ square of standard white paper
  • 2 pennies
  • Scissors and tape for construction
  • Markers for decorating

Remove the label from the water bottle. I used Poland Springs brand because it has a paper label that comes off easily. There was still some adhesive stuck to the bottle…

adhesiveBut it came off right away with some scotch tape. Press the tape to the adhesive, and then rip it off! Repeat until all the adhesive is gone and you have a nice clean bottle.

Now for the ship! For the step-by-step folding instructions below, I used marbled origami paper to better illustrate the folds. But you can definitely use plain old white paper for your ship. Start with a 4″ x 4″ square of paper.

ship step 1Now cut the paper in half, forming 2 triangles.

ship step 2Moving forward, you’ll just be using one of the triangles (give the other to yer shipmate). Orient your triangle like so…

ship step 3Then fold the lower right point up to the top of the triangle.

ship step 4Repeat with the left point. Your paper will now look like this:

ship step 5Open your triangle like so…

ship step 6Then fold the top point down to the base of the triangle like this:

ship step 7Fold the right point up again…

ship step 8Then repeat with the left point.

ship step 9Fold the bottom point up…

ship step 10Then gentle push it back down again. This creates the base that props up your ship.

ship step 11Your ship is done!

ship step 12Since you’ll be folding a ship using standard white paper, your ship will of course be all white. Therefore, your next step is to color the base of the ship with markers (and the sails too if you like).

colored ship baseThen turn the ship around and tape two stacked pennies to the base. The pennies are important. Not only do they keep the ship upright, they also anchor the bottle on its side  AND act as a counterbalance for the bottle’s cap.

pennies on baseReady to get that ship in the bottle? Gently fold the base upwards, and curl the sails loosely around it. Try not to pinch the ship too tightly.

rolled shipInsert the rolled ship through the mouth and neck of the bottle. Use your finger or a pencil to gently unroll the ship and straighten the sails. Twist the cap on your bottle, and you’re done!

finished ship in bottleThis project was a bit hit at a large-scale Treasure Island event we hosted. Even though the origami fold is relatively easy, we folded a fleet of ships in advance for very young children, who were able to jump right into decorating them. We also developed this extremely popular (and inexpensive) pom-pom cannon  for another event table.

We had a real cannon too, courtesy of the Pennsylvania State Navy historical reenactors.

cannonThese folks were amazing. The history, artifacts, and knowledge they brought to the event were absolutely top rate.

pa navyAnother amazing educator was this gentleman from the Trenton Old Barracks Museum, who portrayed Dr. Livesey. He brought all of his period medical implements and described them in great detail. And yes, before you ask – he did bring leeches.

dr livesey

Draw Like an Old Master

draw like an old masterMove over Leonardo! You too can draw like an Old Master. And you don’t need a studio, an aristocratic benefactor, or an artistic temperament. You just need one of these…

overhead projectorYup, it’s an overhead projector. Remember these things? They used to be a fixture in classrooms. Now, you can probably find one in a forgotten corner of a school storage closet, or buried in the back of a library office, its head peeking out from a pile of mimeograph sheets like the Loch Ness of the office realm.

I rescued this overhead projector from the surplus pile at my library and am proud to house it in my stable of useful outreach tools. Among other things, I’ve used it to make inexpensive event signs, salvage presentations when PowerPoint went kaput, light up shadow puppet shows, and replicate iconic pieces of Renaissance art. Here’s how it works.

First, select the image you want to replicate (we used Leonardo da Vinci’s helicopter sketch). Then, print the image on transparency film made specifically for printers…

transparancy filmLoad the transparency film into a computer’s printer like a regular piece of paper, and lo! It comes out with the image printed on it.

transfered drawingFire up the overhead projector, drop the transparency film in place, aim the projected image at a piece of paper, poster board, foam board, or wall and…start tracing!

katie tracesWhen you’re finished tracing, simply fill in the outlines with markers or paint.

katie drawsVoila! You now have a lovely image that requires zero artistic ability.

finished artTo make inexpensive event signs, simply print the titles of the signs on transparency film, trace them onto the top of a piece of foam board or poster board, and fill the outlines in with paint. Once I had the title, I’d use computer print outs to create the images and/or copy I needed for the rest of the sign. Our most popular event sign ever was created this way (and you can see it here).

If I hired a professional printer to have the titles of the sign printed on foam board, it would have cost between $15 – $25 per sign. Since I would typically create 10-15 signs for a large event, it added up pretty quick. On Amazon, transparency film is about $20 per pack of 100, 8.5″ x 11″ sheets. Vinyl letters and/or stencils are another option for creating signs, but they don’t always come with the widest variety of fonts (and they can get a little pricey too).

The overheard projector tracing method does require some time. If you have an event with a small budget and volunteers looking for work, however, you might just consider trying this method. It also works for theater sets and/or murals. Or you can just, you know, whip yourself up some classic art for the fun of it.

katieThis person featured in this post, by the way, is my new part-time assistant Katie! You actually already met her foot in this post, when she was operating a skeleton marionette. Katie was my temporary event assistant for 2 years before I managed to reel her in to work for me on a permanent basis.

So she’s way used to my odd requests and strange job requirements. Such as selecting hundreds of specifically-sized rocks at a local quarry, folding 500 origami hats, helping me shove University students into 8′ cardboard tubes to install archery targets, developing a tax game for kids, locating an Etsy artist who could make a cuddly Ichthyosaur, and dressing up as a Victorian Steampunk spelunker at a Journey to the Centre of the Earth event.

So she was totally game for throwing on a doublet, taping on some construction paper facial hair, and posing as an Old Master. No problemo.


Special thanks to the Lewis Center for the Arts’ costume shop for the doublet and hat loan! Thou rock!