These Royals? Totally Rocked It

these royals rocked it

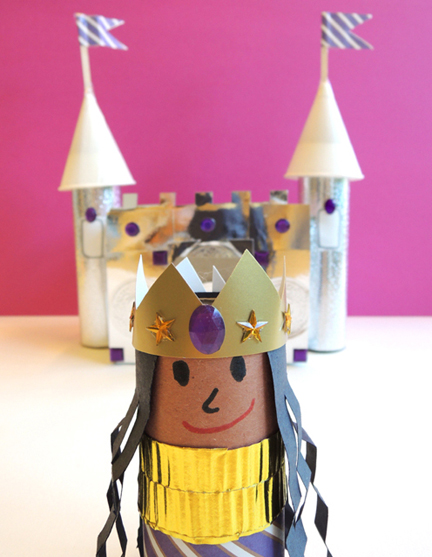
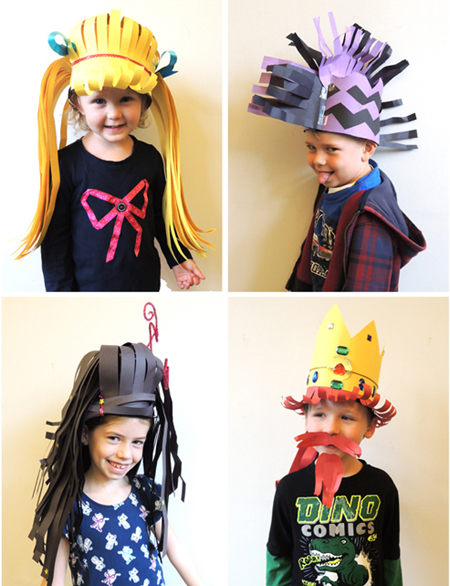
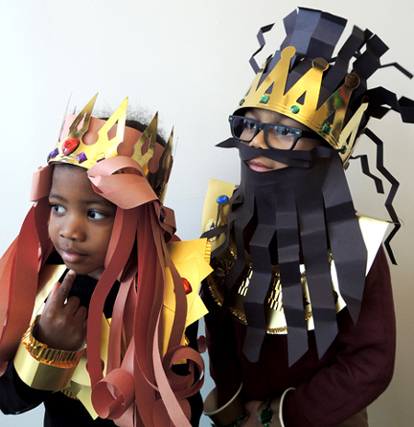
You don’t need to wait until coronation day to rock the royal look…be bold, resplendent you EVERY day!

We read Princess Hair by Sharee Miller (Little, Brown, 2014). Princesses of course wear crowns, but what about the hair underneath that sparkling circlet? In this fun rhyming book, a number of different hair styles are paired with various principals of princess positivity…puffs play pretend, twist outs twirl about, kinks love to think, curls wear pearls, bantu knots bake a lot, braids throw parades, and so on!

You’ll need:

  • 1 crown
  • An assortment of construction paper
  • 2 paper cups
  • Poster board (ours was 15″ in diameter)
  • Scissors, tape, and glue for construction
  • Markers for decorating

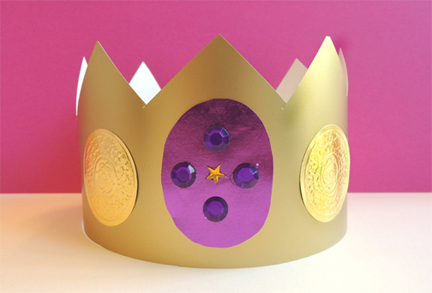
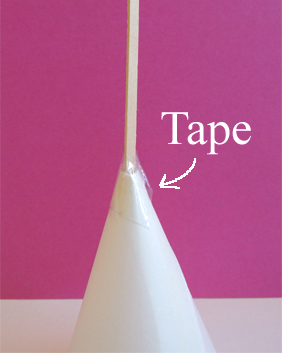
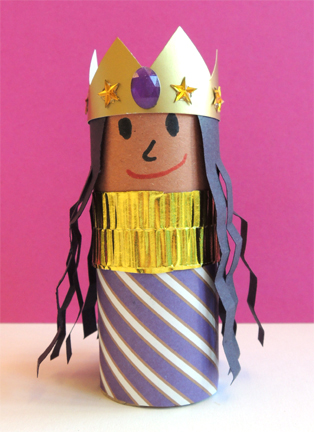
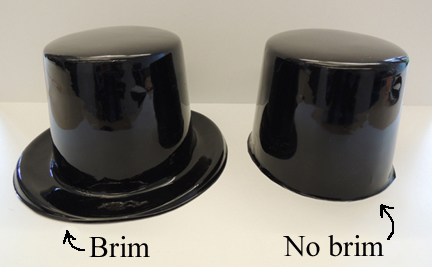
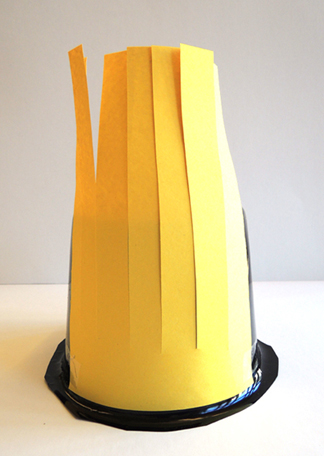
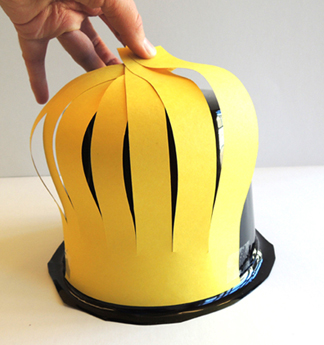
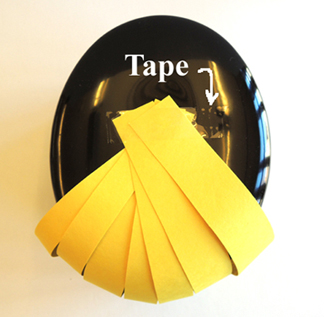
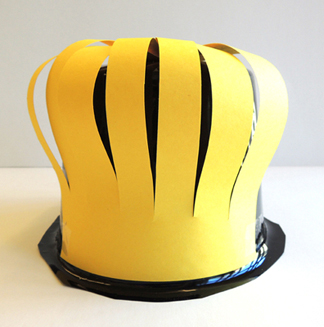
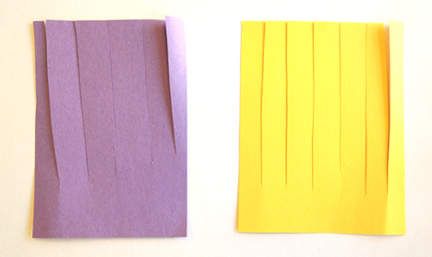
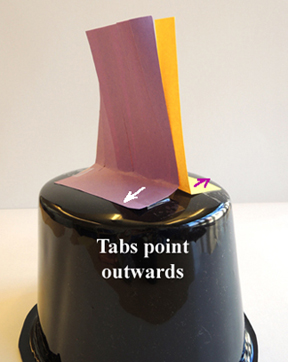
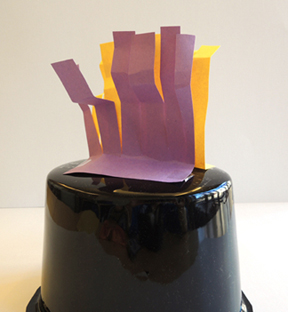
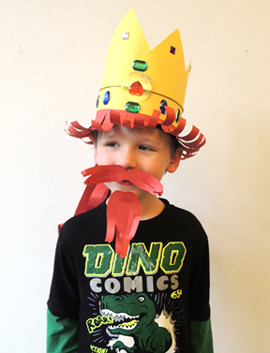
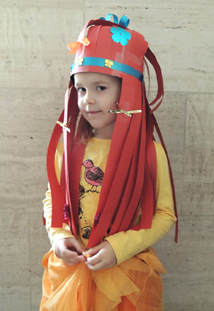
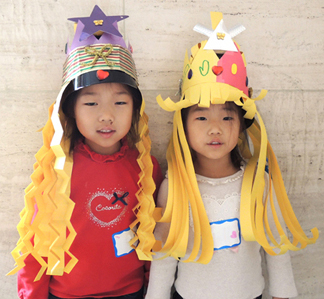
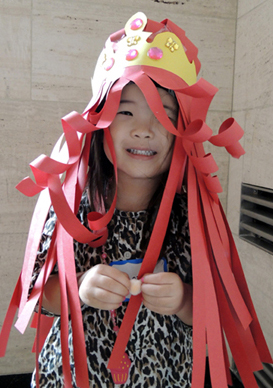
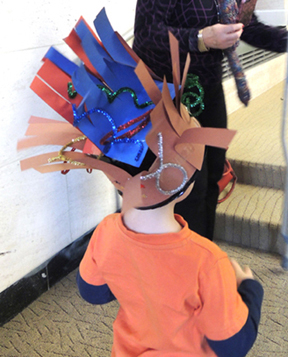
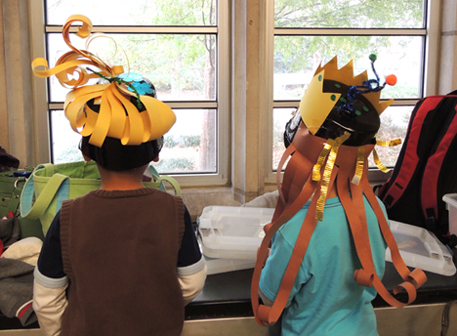
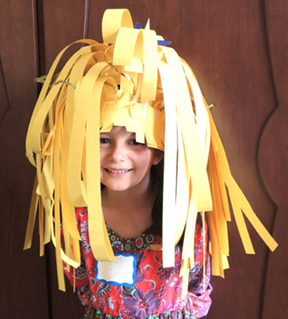
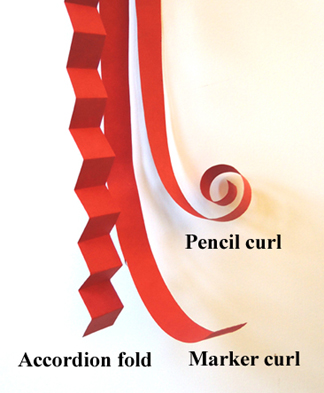
First, the crown! We purchased “Gold Foil Crowns” from Oriental Trading Company ($5 a dozen), and provided both large and small sheets of construction paper to craft hair. If you desire texture to your locks, here are our 3 favorites…the accordion fold, and 2 types of curls achieved by wrapping the construction paper fringe around a marker or pencil:

crimp & curl 
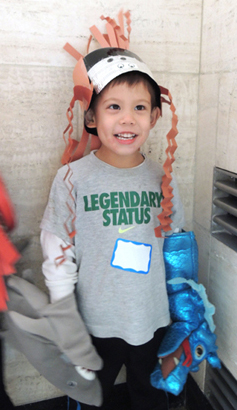
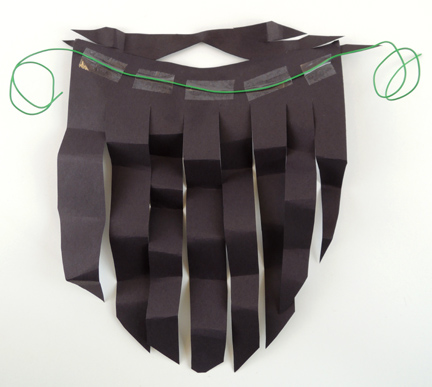
If you’d like to make a beard, fringe a sheet of construction paper and attach a mustache. Tape a piece of twisteez wire to the back, then loop the wire around your ears to secure the beard in place.

beard construction
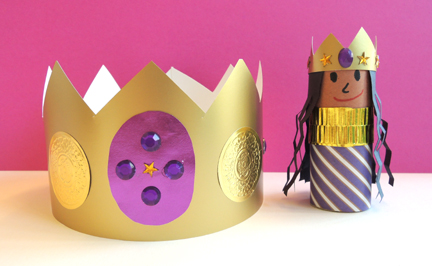
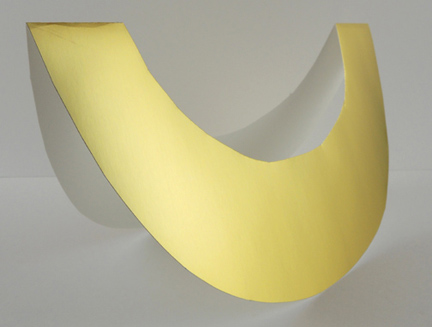
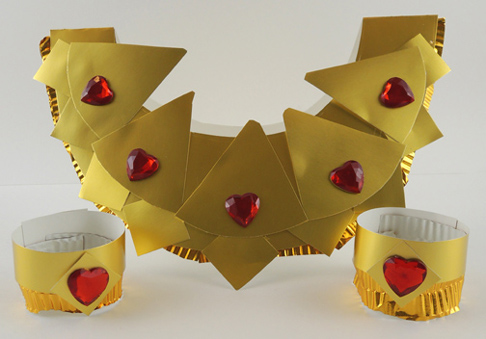
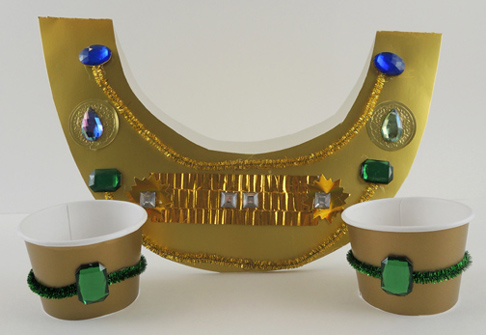
That takes care of the crown and hair, but we wanted to go big with the bling…so we also made bejeweled collars and bracelets! The collar is a folded circle of poster board (we used gold) with the center cut out so kids can slide the collar over their heads.

royal collarThe bracelets are paper cups (again, we used gold) cut to fit the kids’ wrists. We decorated everything with large gemstones, sparkle stems, textured metallic paper, gold embossed foil seals, and scrap pieces of gold poster board. I went with a textured neckline for my design…

collar with red jewels   And Katie went with a bold metal block for hers…

collar with green jewelsResplendent, indeed!

Running with the Royals

running with the royalsA princess or prince to pal around with? Check! Gleaming castle with banners flying? Check! Bejeweled crown to wear upon thy head?

crownCheck! You’re ready to run with the royals!

We read Princess Me, written by Karma Wilson and illustrated by Christa Unzner (Margaret K. McElderry Books, 2007). This sweet rhyming book describes all the qualities of “Princess Me,” a kind, gentle, mannerly, and just princess who benevolently reigns over her land of toys and dolls. The twist comes at the end, after the princess is tucked into bed with a kiss from the king and queen. That’s when we learn that Princess Me is, in fact, Princess You!

You’ll need:

First, use the box cutter to cut a drawbridge out of the front of the box. Make sure, however, that the door’s “hinge” remains attached to the bottom of the box.

drawbridge step 1Next, hot glue a rectangle of tagboard to the outside of the door.

drawbridge step 2The tagboard will give the drawbridge some some heft and weight as it opens and shuts.

drawbridge step 3Use scissors to cut the paper towel tube “towers” to the desired height for your castle  (my tubes were 7″ tall). Now decorate the tubes and your castle with metallic paper, construction paper, aluminum foil, mirror board, foil seals – whatever you like! When you’re finished decorating, hot glue the towers to the sides of the castle.

Wrap a piece of patterned paper around the top of each coffee stirrer, then secure with glue or tape. Trim one edge to create a banner-style flag.

bannersIf you’re looking for an easier flag to assemble, use color masking tape to make a banner flag (as seen from this mini circus tent project).

circus tent flagTo make “turrets” for your castle towers, snip the top off a cone water cup like so:

flag stepsThen drop the flag’s pole into the top of the cup. Center it, then wrap it with tape to attach it to the cone cup. Repeat with the other cup and flag.

taped flagpoleHot glue the turrets to the tops of the castle towers. Ta da! Your castle is complete!

castleTo make your princess or prince, wrap the top of a toilet paper tube with multicultural construction paper, then use markers to draw a face. Wrap the remainder of the tube with a piece of patterned paper and add a fancy collar if you like. Attach construction paper hair and a gold poster board crown. This project definitely cried out for gemstones, which we attached to the crown (and castle) with hot glue.

princessNow it’s time for your crown! Cut a crown pattern out of a large rectangle of gold poster board, wrap around your head, remove, then staple. Decorate your crown with the remaining art supplies on the table. We encouraged kids to have their crowns somewhat match their tube counterparts. Finished!

crown and friendNeed a little entertainment at your castle? Perhaps this post would be of some assistance!

Good Hair Day

wig montageBecause if you don’t look good…we don’t look good.

We read The Hair Scare by Jeffrey Fisher (Bloomsbury Children’s Books, 2006). Radbert has a talent for cutting hair, and his styles are simply amazing. Soon, the king comes knocking, demanding the best haircut of all time. Radbert delivers, but it is NOT to the king’s liking. He royally decrees that there will be no more haircuts, triggering a slew of shaggy dos, unkempt tresses, and general hair sadness. The king once again seeks out Radbert. Once again he asks for a haircut. But when the haircut is revealed and the moment of truth arrives, the haircut takes matters into its own hands!

You’ll need:

  • 1 plastic top hat (I bought mine from Oriental Trading Company).
  • A selection of 12″ x 18″ construction paper
  • A selection of 9″ x 12″ construction paper
  • A selection of craft ties
  • A selection of sparkle stems
  • A selection of foil star stickers (optional)
  • A selection of ribbon
  • Markers and unsharpened pencils for curling.
  • Scissors and tape for construction

We prepped the 12″ x 18″ construction paper in advance by fringing it lengthwise to create long locks. We used “natural” hair colors: black, brown, red and yellow. For more daring dos, I stocked up on smaller sheets of construction paper in multiple colors.

In addition to the construction paper, I offered craft ties, sparkle stems, ribbons, and star stickers to add flair. The craft ties worked especially well as barrettes and headbands. I also brought out the Bling Bin for extra touches.

To make your hair more wig-like, I would recommend cutting the brim off your plastic hat. This does, however, make it more wobbly. If the wobble is going to be a problem, leave the brim on (or wait until the very end to cut it off).

hat brimsBefore we got started the project, I gave the kids four quick “style” tutorials. Namely, the hair poof, the mohawk, the crimp & curl, and the crown.

1) THE HAIR POOF

Fringe a length of construction paper, and tape it to the front of the hat.

hair poof 1Bunch the ends together at the top…

hair poof 2Then tape it on the top of the hat.

hair poof 3Your hair poof is complete!

finished hair poof2) THE MOHAWK

Fringe two pieces of construction paper (I used contrasting colors to make it easier to see in the example).

mohawk step 1Tab the bottom of each fringe, then tape the tab to the top of the hat. The tab of both fringes should be pointing outward, causing the fringes to lean in and support each other.

mohawk step 2Finish by crimping the hair!

mohawk finished3) THE CRIMP & CURL

To add body and texture, employ the crimp & curl! Basically, this involves folding or curling the fringe strands. An accordion fold (i.e. folding the paper back and forth in squares) produces a nice crimp. Curls are produced by wrapping the fringe around a marker or pencil. Markers create long curls, pencils create tight curls.

crimp & curl4) THE CROWN

Since there was a king in the book, I offered a construction paper crown option with large gemstones available through the magic of hot glue. Attach optional mustaches, beards, and goatees to face with foam mounting tape.

model 4After the tutorials concluded, the kids took off running…or styling really. Check out some of these amazing dos!

The sleek “Band with Bows”

hairstyle 1The “Side Spider Surprise”

hairstyle 2The “Absolutely Adorable Duo”

hairstyle 3The “Crimped and Casual” (very popular with shark and dragon wranglers this year).

hairstyle 4The “Little Mermaid”

hairstyle 5The “Stacked Sparkler”

hairstyle 6The “Straight Up Sassy”

hairstyle 9The “Gravity-Defying Ponytail” and “King Gleaming Locks”

hairstyle 8The “Rapunzel Updo”

hairstyle 7