© Thomas Jefferson Foundation at Monticello, photo by Jack Looney.
For me, literacy education encompasses both fiction and non-fiction subjects. I’ve already chronicled some of my adventures in science (check out these posts on chemistry and Rube Goldberg engineering, these projects on butterflies, buoyancy, and creative construction, and this science kit review by our kid tester). Today, however, I want to focus on history and relate a fantastic hands-on experience that inspired me over 14 years ago.
In 2001, I was a graduate student at the University of Virginia, happily enrolled in a “Museums and Education” class taught by Professor John Bunch. Part of the class was lecture-based, but another part class involved field trips to various museums and historic sites to get a tour and learn more about their educational programs. Once such field trip was to Monticello, Thomas Jefferson’s home in the beautiful mountains surrounding Charlottesville, Virginia.

© Thomas Jefferson Foundation at Monticello.
Monticello has a very active roster of programs for adults and children alike, but I want to share one ingenious activity my class was invited to experience during our tour. The activity is intended for elementary school group visitors to Monticello.
The activity begins with the students sitting in groups at tables. Each table is given a recreated “historic pocket” (it could be a leather wallet, a burlap bag, an embroidered linen pouch, a basket, etc.). Inside each pocket are various objects representing items that the pocket’s owner would have used in his or her daily life at Monticello. Students are invited to examine the objects (touching is not just permitted, it’s encouraged!). Then they engage in a discussion with a Monticello staff member to determine: 1) What the objects are; 2) How they were used; and 3) What the objects tell about the person who owned them.
Here’s an image of Jefferson’s recreated historic pocket:
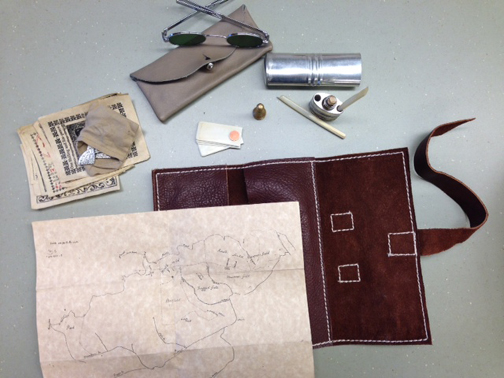
© Thomas Jefferson Foundation at Monticello.
Pocket contents include:
Brass sealing stamp
Money (both paper and coin)
Ivory Notecards
Folding spectacles
Map of land holdings
Traveling quill set
From examining these objects, the students learn that Jefferson was literate, wealthy, and the owner of the plantation. They’ve learned it by touching and exploring the objects – holding a quill pen, looking at a map, jingling replica coins in their hands.
Even better, the educators at Monticello don’t just offer one pocket. They have several! In addition to Thomas Jefferson’s pocket, students explore recreated pockets representing members of Thomas Jefferson’s family, including his children and grandchildren, and members of the enslaved plantation community, such as Edith Fossett and her husband, Joseph Fossett. By exploring a variety of pockets, students can compare and contrast the lives of different individuals, and the various roles they played at Monticello.
Here, for example, is the Fossett Family pocket, which represents Edith Fossett, Joseph Fossett, and their children:
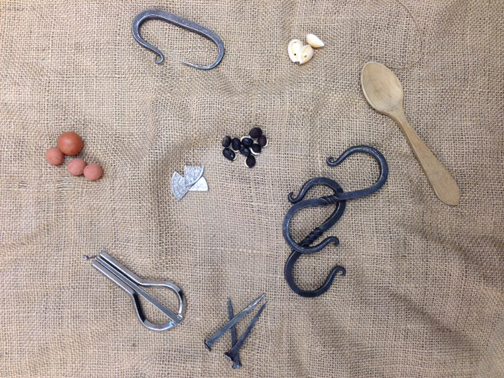
© Thomas Jefferson Foundation at Monticello.
Pocket contents include:
Clay marbles
Metal s-hooks
Steel striker (use with flint)
Jaw harp
Coin money pieces
Spoon
Nails
Beans
Cowry Shells
Students learn that Edith and Joseph Fossett were slaves at Monticello – Edith was chief cook, trained in French cookery at the President’s House in Washington D.C., and Joseph was foreman of the blacksmith shop. Being slaves, they were not paid for their work. So why are there some small coin pieces in the pocket?
Interestingly, Joseph Fossett received a small portion of the blacksmith shop’s profits, and sometimes took paid work on the side. Joseph Fossett was one of only five slaves freed in Thomas Jefferson’s will and started a business in Charlottesville. Using money he earned, he was eventually able to buy his wife and some of their eight children out of slavery and move with them to the free state of Ohio.
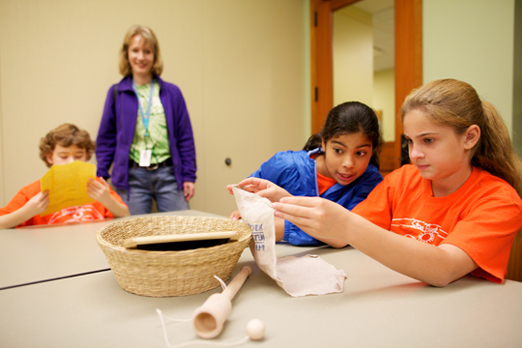
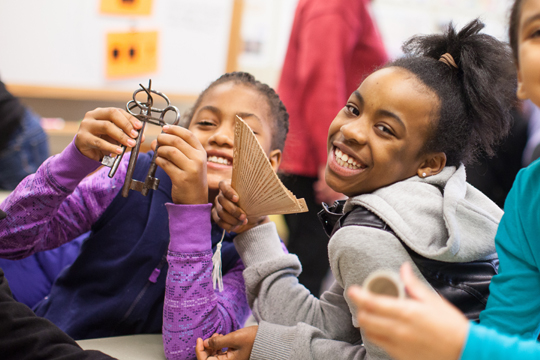
Students examine objects in the Grandchildren’s basket, including a family letter, sewing sampler, slate, and ball and cup toy. © Thomas Jefferson Foundation at Monticello.
The pocket activity is only the beginning of the students’ experience at Monticello. Next, they proceed to the house and grounds, often hearing the names of the people whose pockets they explored. The activity is very flexible and portable. Staff have taken it off site to schools and teacher training sessions.
Depending on class size and time constraints, classes will rotate to different spaces within the Education Center, exploring a different pocket—and new individual—in every room. Currently, the educational staff are taking the pocket idea and experimenting with applying its hands-on, minds-on concept to entire rooms of their Education Center and Griffin Discovery Room.
It would be interesting to apply the pocket activity to literary figures. What would Jane Austin carry in her pocket? Charles Dickens? J.K. Rowling? Why not apply this concept to the sciences? What would Einstein have in his pocket? Marie Curie?
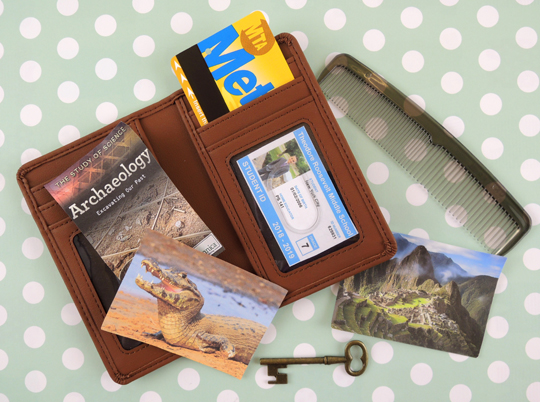
And what about fictitious characters? I designed a modified version of the pocket activity for Cotsen Critix, our literary society for kids ages 9-12. The kids put together character wallets that included non-obvious photos, small objects, curious clues…but NOT the character’s name! Can you guess this one?
 I love everything about the pocket activity. Intriguing students with a bit of mystery, handling and exploring objects, allowing time for the students to postulate the answers for themselves, comparing objects across individuals, and using the objects to launch an educational dialogue about the people, places, and experiences at Monticello. It’s a powerful lesson in history, right in your hands.
This post has made me realize that I’m long overdue in writing about the other ways in which I incorporate history into my literacy programs. For example, we had a series of 6 classroom programs that featured our library’s special collections (you can read more about that here). I’ve also found ways to bring history to life at some of our special events, including a sign that almost stole the show at a Robin Hood event, this little Medieval herbal bag, a 1963 recipe test for fudge count (that counts as history, right?), and a fantastic Victorian Tea program.
I shall get to work on more history posts, posthaste!
Many thanks to Jacqueline Langholtz, Manager of School & Group Programs at Monticello for chatting with me about this amazing program.
All images used with permission of Monticello.