
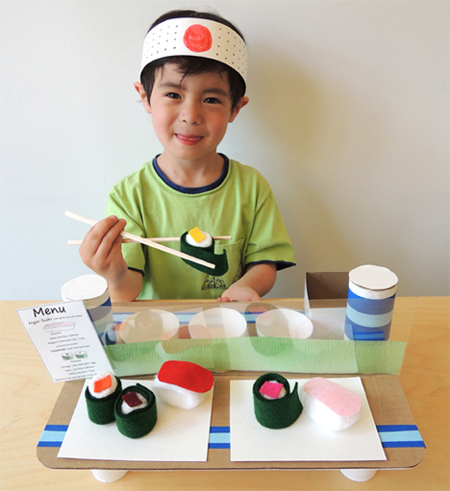
 Today, we’re going to Japan! This adorable sushi bar serves up a number of felt delicacies. The menu includes a pronunciation guide, so you can brush up on your Japanese while dining on maguro (mah-goo-roh) and satsuma imo (sat-soo-mah e-moh). This set was one of our most popular projects yet, with parents reporting that their children continued playing with it weeks after story time had adjourned.
We read The Way We Do It In Japan, written by Geneva Cobb Iijima, and illustrated by Paige Billin-Frye (Albert Whitman & Company, 2002). Gregory’s mom is from Kansas, and his Dad is from Japan. They live in America, but when Dad’s company transfers him to Japan, Gregory quickly learns that the two countries are very different! In Japan, they use chopsticks, pay for things with yen, drive on the other side of the road, sit on zabuton, and sleep on futons. Gregory is very worried about how he will fit in at his new school. But happily, he learns that friendship isn’t culture-dependent. Words and phrases from the Japanese language are woven into this story, with helpful pronunciation guides at the bottom of each page to aid the read-aloud experience.
You’ll need:
- A strip of white poster board (approximately 2″ x 22″)
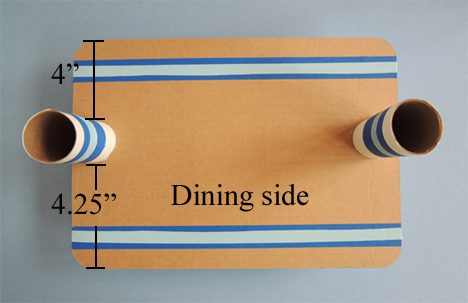
- 1 corrugated cardboard base (I used a 9.75″ x 13.75″ cake pad)
- 4 small plastic cups (mine were 3oz)
- A selection of color masking tape
- 2 toilet paper tubes
- White construction paper
- A large rectangle of clear plastic (more on this below!)
- A piece of light green crepe paper streamer (mine was 13″)
- 3 paper cups
- 1 small box (mine was 2″ x 3″ x 3″)
- 2 rectangles of white poster board (approximately 4″ x 5.25″)
- 2 pairs of chopsticks
- 5 white cotton balls
- Scraps of felt (I used yellow, orange, red, maroon, light pink, and dark pink)
- 4 strips of green felt (approximately 1.25″ x 8.25″ each)
- 1 sushi menu template, printed on 8.5″ x 11″ white paper
- Scissors, stapler, and tape for construction
- Markers for decorating
- Hot glue
First, your headband! Decorate a strip of white poster board, circle it around your head, and staple it. Done.
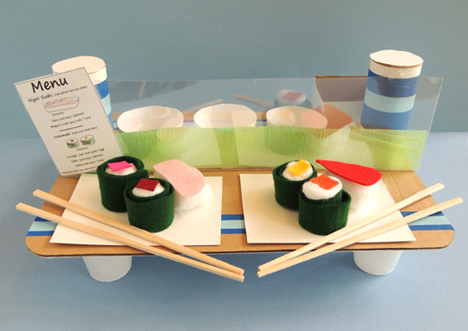
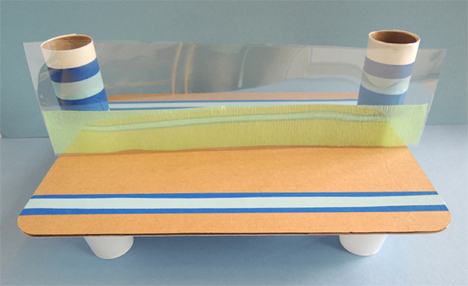
 Now for the sushi bar! The bar has two sides: the side in which the chef prepares the food, and the side in which the customer enjoys it. Here’s what a completed sushi bar looks like:
 Begin by hot gluing 4 plastic cups to the underside of the sushi bar. I glued the mouths of the cups to the underside of the base. This created a slightly tapered look to the sushi bar’s legs.
 Flip the base over and use color masking tape to decorate the top of the bar (or just use markers). Wrap 2 toilet paper tubes with white construction paper, then decorate them with color masking tape (or marker). Hot glue the tubes to the top of the base.
It’s a little hard to see in the photo below, but the tubes are glued slightly towards the back of the base (as opposed to directly in the center). This is because you want a little more room on the “dining” side of your sushi bar.
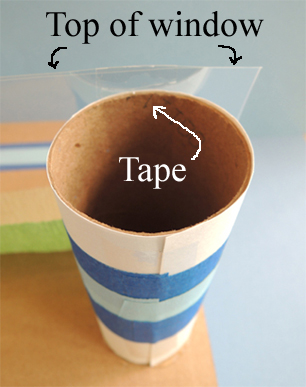
 Tape a piece of clear plastic to the tube posts, creating a “window” your diners look through, watching their delicious sushi being prepared.The window should face the dining side of the base.
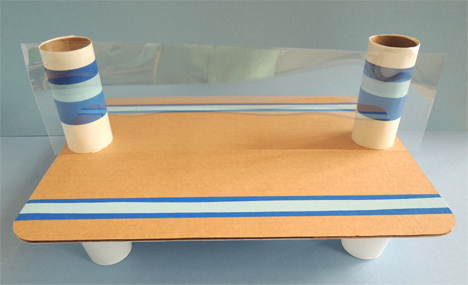 I used a 4″ x 14.5″ piece of archival mylar (leftover from a rare books project) for my window. You can also use transparency film from an overhead projector (OfficeMax sells it), or a piece of plastic from recycled retail packaging. Another option? Tape clear cellophane or plastic wrap inside a poster board frame.
The window shouldn’t rise too far past the top of your tube post…the tape needs to extend from the top of the window down into the tube.
 After the window is attached, slide a piece of light green crepe paper streamer along its bottom.
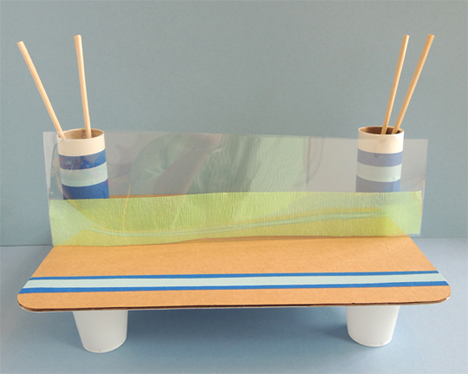
 At this point, I added 2 construction paper circles to the tops of the tube posts to make them look tidy, but one little boy left his tubes open and created these awesome chopstick holders. Genius!
 Next, cut 3 paper cups until they stand approximately 1.75″ tall. Do the same with a small box (if you don’t have a small box handy, use an additional paper cup). Hot glue the box and cups on the “preparation area” side of the base. Hot glue 2 white poster board rectangular “platters” onto the dining side.
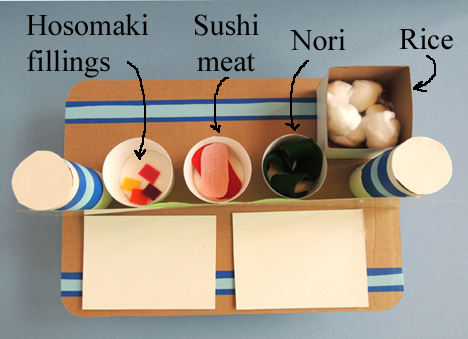
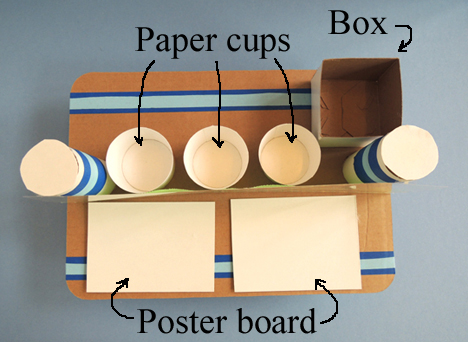 Drop the 6 balls of “rice” (i.e. cotton balls) into the box. Place 4 strips of “nori” (i.e. strips of green felt) in the cup next to the rice box. The 2 oval-shaped pieces of felt “sushi meat” and 4 square felt pieces of “hosomaki filling” go in the remaining 2 cups.
 Finally, color and cut the sushi menu template, and tape it to the front of your window. Your sushi bar is officially open! To make hosomaki for your diners, wrap a piece of green felt around a cotton ball, then add a square of hosomaki filling to the top. To make sushi, slightly elongate a cotton ball, and put a piece of sushi meat on top.
 Interesting aside: the green felt we used for this story time project was recycled from the Rare Books and Special Collections Department at the University. In its previous life, it was used to cover a desk owned by Elizabeth Barrett Browning. How do I recycle thee? Let me count the ways…
But back to sushi! Place the finished sushi onto the customer’s platter, and hand them a pair of chopsticks! Our project allowed kids to make 4 hosomaki and 2 pieces of sushi, but feel free to add more.
In the process of putting this story time together, I ran across two additional books about Japan. Both are super-excellent and…non-fiction!
Hiromi’s Hands by Lynne Barasch (Lee & Low Books, 2007)
A picture book biography of Hiromi Suzuki, a woman who became one of the first female sushi chefs in New York. The story begins with Hiromi’s parents, their journey to New York, the opening of her father’s sushi restaurant, Hiromi’s growing interest in his work, and his ultimate encouragement for her to become a chef. It’s really interesting!
My Japan by Etsuko Watanabe (Kane Miller, 2009)
An absolutely adorable picture book about seven year-old Yumi and her little brother Takeshi. Through detailed drawings and Yumi’s cheerful conversational tone, we learn about her life – her house in the suburbs of Tokyo, what her family prepares in the kitchen, what her bathroom looks like, and what a school day is like. You also learn about holidays, Japanese writing, and more!