
 Yes, that is a chicken in a hot air balloon! Take a ride in the skies…and maybe you’ll pick up some interesting passengers!
We read Wings: A Tale of Two Chickens by James Marshall (Houghton Mifflin Harcourt, 2003). Studious chicken Harriot must rescue her clueless friend Winnie when Winnie fails to recognize that the “kind” stranger who offers her a ride in his hot air balloon is actually a fox intent on a chicken dinner with dumplings.
The craft project involved creating a hot air balloon, making “you” the pilot, and then a flight to rescue a chicken of your very own!
You’ll need:
- A box. I used a 4″ x 4″ x 4″ white box, but you can also use a tissue box
- 2 paper lunch bags
- 3 strips of white poster board (approximately 22″ x 2.5″)
- 4 pieces of twisteez wire (or pipe cleaners)
- 1 pipe cleaner
- 2 toilet paper tubes
- Markers and construction paper for decoration
- Stapler, hole punch, and tape for construction
- 1 long piece of brown raffia for the balloon basket (optional)
- Red and yellow self-adhesive foam (optional)
- 2 white feathers (optional)
- If you want to “fly” the balloon, a long piece of yarn with paperclip hook
To get started, use the markers to decorate the strips of poster board. Staple one of the strips in a circle (about the diameter of a large oatmeal container). The remaining two strips become your balloon’s “framework” and get attached to the circle like so:
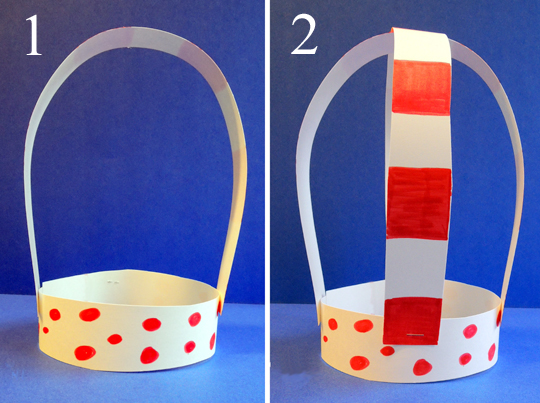 You’ll notice the two striped framework strips are attached closer to the top the polka dot circle. This will give your balloon a better shape later.
Wait until the two strips are fully attached to the circle BEFORE you staple them where they intersect at the top of the balloon. Otherwise, you might get a lopsided framework.
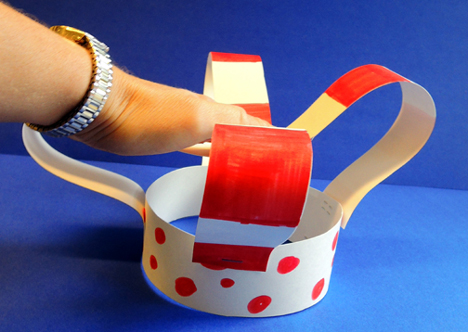
Once the framework is secure, use your hand to squish it down. Do this twice. This will mold the framework into the desirable balloon shape.
 Now for the balloon part! Slide the paper lunch bag onto your hand, and stick it up through the circle on one side. Staple the outer edge of the bag to the circle (leave the inner edge of the bag alone). Repeat with the second bag on the opposite side. Fluff them up if you’d like to achieve full balloon-ly-ness.
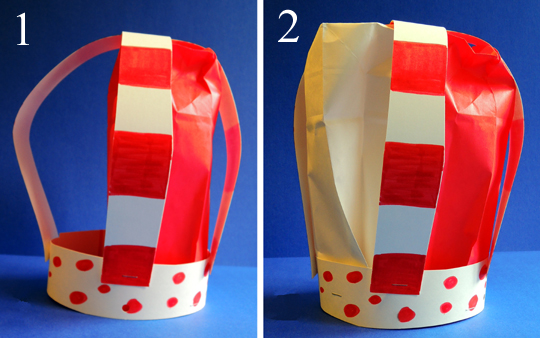 Finally, use the hole punch to make 4 holes around the poster board circle. This is where your basket will attach.
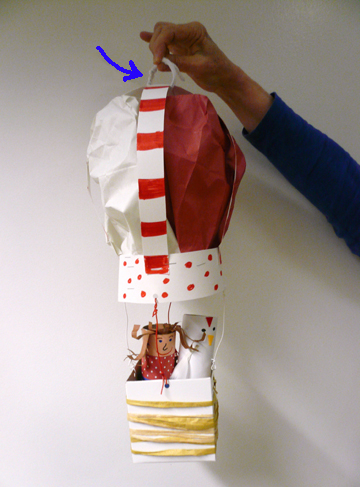
Whew! That’s the hard part, done. On to the basket! Take your box and, if necessary, trim off the lid and side tabs (if it’s a tissue box, cut the opening out and perhaps shorten the box a little). Use the hole punch to make 4 holes around the box. If you’d like, you can wind the long piece of raffia around the box to resemble wicker (or use markers to decorate it).
When the basket is done, use twisteez wires (or pipe cleaners) to attach the basket the the balloon. Another pipe cleaner loops through the top of the balloons framework, creating a ring to hang the balloon from.
 Now it’s time for you! Tape construction paper around the tube for your face, shirt and pants (I used patterned paper as well). I really love using multicultural construction paper for various skin tones. Draw the face with markers.
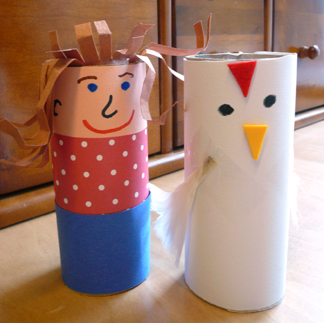 When I did this project for my story time, I prepped all the chickens myself. But kids can certainly create their own. I used self-adhesive foam pieces for the chicken’s beak and comb, and white feathers for the wings, but you can also use markers to draw them on. Your passengers are done!
As an additional activity, I attached a paperclip hook to a super-long piece of yarn, went up a stairwell, and the kids took turns attaching the hook to their balloon rings and watching the balloon “fly” up to “rescue” a chicken. When the balloon reached me at the top of of the stairwell, I dropped a chicken in the basket and lowered the balloon back down to them.