
Team Chewbacca: (Group 14)
Karena Cai
Stephen Cognetta
Jean Choi
Eugene Lee
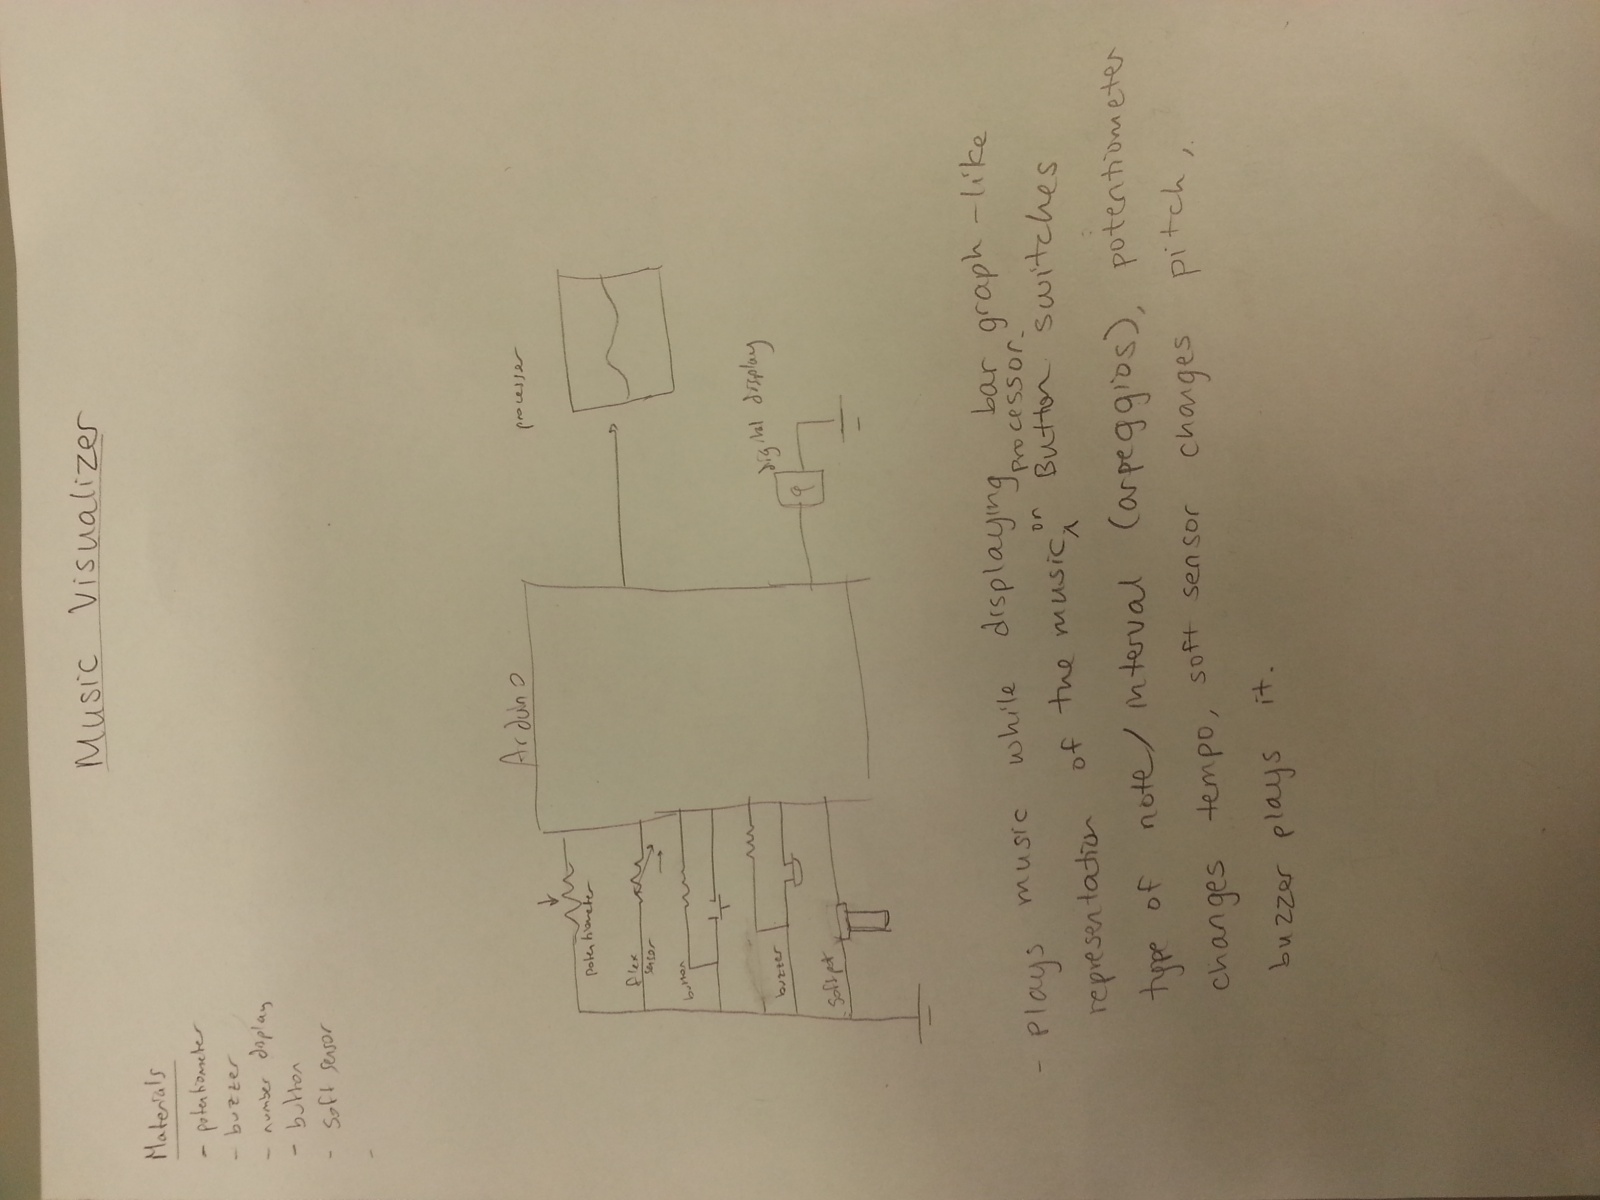
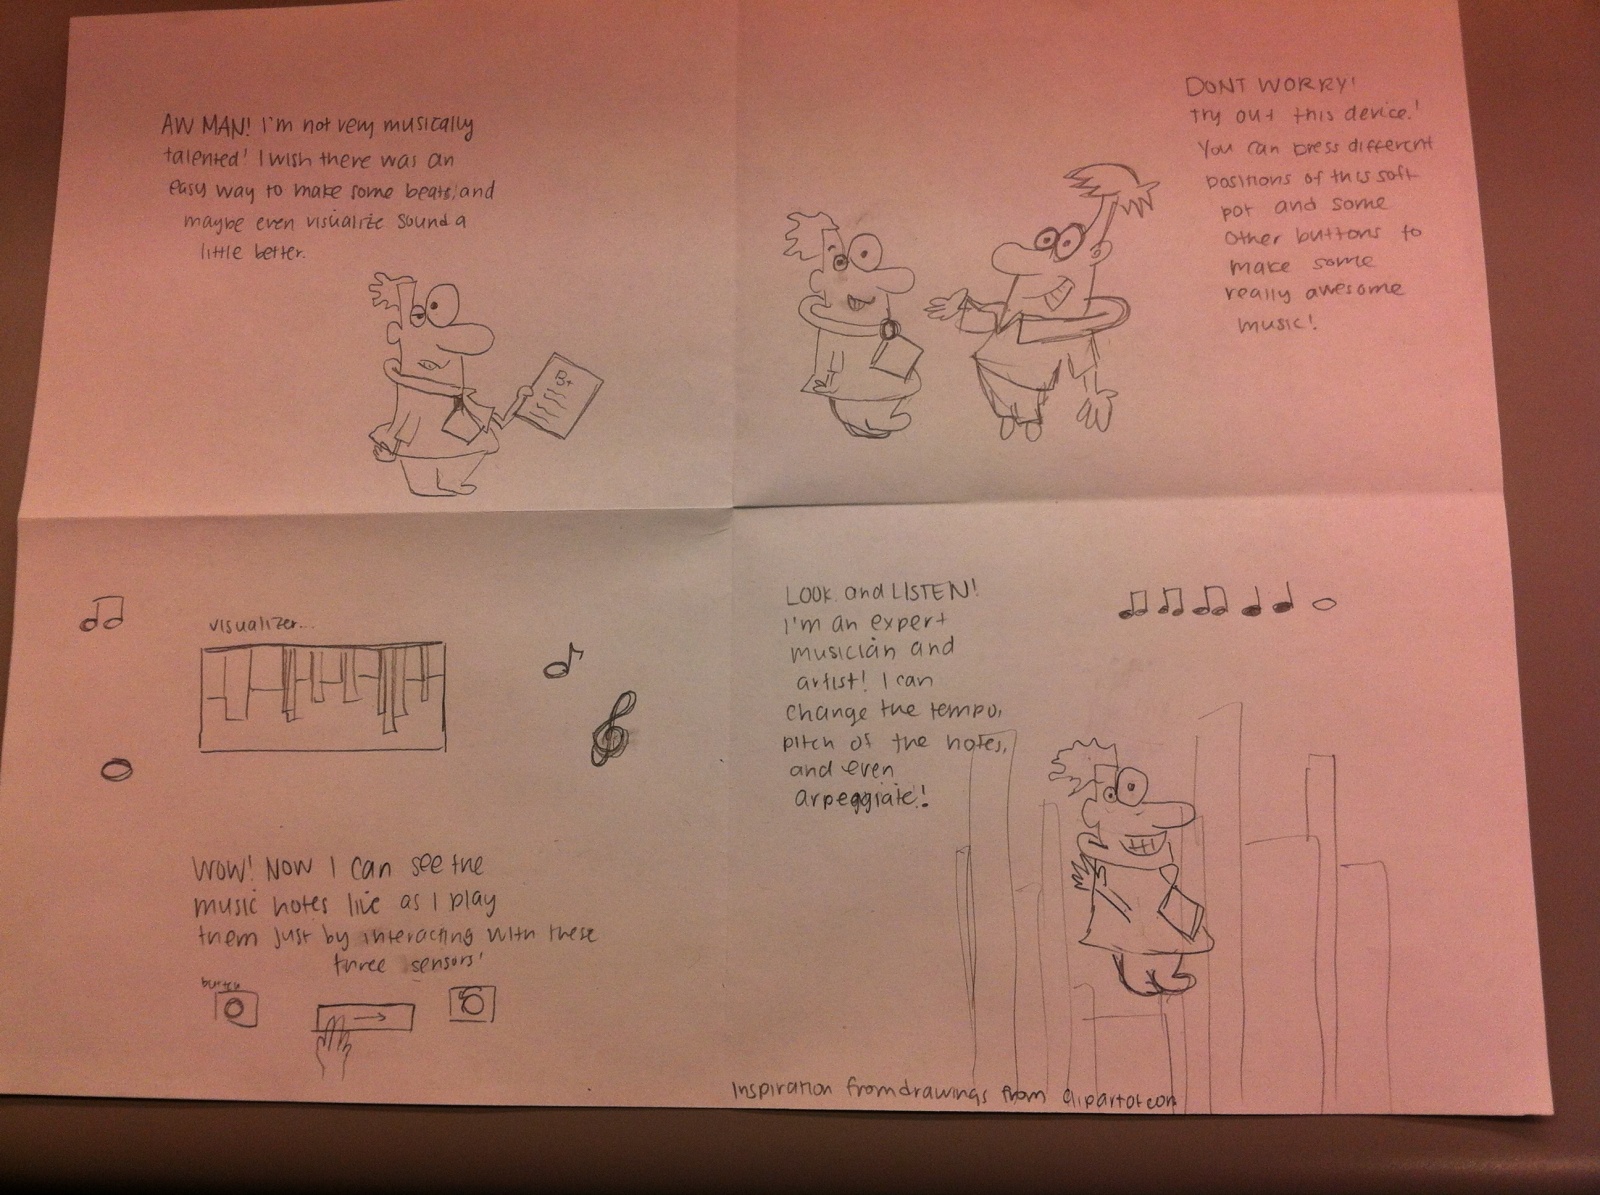
We built a music-visualizer device, where you can play music and visualize the music being played. Using the soft pot sensor to determine pitch, the button to change arpeggio modes, and the potentiometer changes tempo. We used the buzzer to output the sound and Processing to visualize the outputs. We built it because it’s cool, we wanted to integrate Processing with our device, we wanted to do a music project, and we thought it might be useful for helping people who can’t read music to visualize basic music notes and chords in an intuitive way. Overall, this was a successful project in that we were able to visualize the music we played accurately. We didn’t quite get perfect measurements, the soft pot sensor did not seem to exhibit linear behavior. Another issue we had was that we originally attempted to make a different idea, which just played music and changed between tracks: after completing this we ultimately decided to switch to our current idea.
Three Sketches:
Storyboard:
Video
http://www.youtube.com/watch?v=3pUHGMbRqRo&feature=youtu.be
Materials:
Potentiometer
Buzzer
Soft Pot Sensor
Button
Instructions:
– Hook up the inputs: potentiometer, the soft pot, button
– Hook up the outputs: buzzer
– After hooking up those inputs/outputs through the appropriate means, develop the Arduino and Processing code to take the three inputs and output them to the buzzer and to Processing. The detailed circuit diagram is shown above, following that diagram should be sufficient to recreate our design.
Borrowed code/instructions from:
http://www.arduino.cc/en/Tutorial/Graph (Arduino -> Processing code)
by David A. Mellis modified by Tom Igoe and Scott Fitzgerald
Source code
- Processing Visualizer:
    // Graphing sketch

   // This program takes ASCII-encoded strings
   // from the serial port at 9600 baud and graphs them. It expects values in the
   // range 0 to 1023, followed by a newline, or newline and carriage return

   // Created 20 Apr 2005
   // Updated 18 Jan 2008
   // by Tom Igoe
   // This example code is in the public domain.

   import processing.serial.*;

   Serial myPort;        // The serial port
   int xPos = 1;         // horizontal position of the graph

   void setup () {
     // set the window size:
     size(1000, 300);

     // List all the available serial ports
     println(Serial.list());
     // I know that the first port in the serial list on my mac
     // is always my  Arduino, so I open Serial.list()[0].
     // Open whatever port is the one you're using.
     myPort = new Serial(this, Serial.list()[0], 9600);
     // don't generate a serialEvent() unless you get a newline character:
     myPort.bufferUntil('\n');
     // set inital background:
     background(0);
   }
   void draw () {
   // everything happens in the serialEvent()
   }

   void serialEvent (Serial myPort) {
     // get the ASCII string:
     String inString = myPort.readStringUntil('\n');
     // 0 = lin/frequency, 1 = pot/tempo

     String[] inStrings = split(inString, ',');
     float[] inBytes = new float[inStrings.length];
     println(inString);
     for (int i = 0 ; i < inStrings.length; i++) {          inStrings[i] = trim(inStrings[i]);          inBytes[i] = float(inStrings[i]);      }      //println(inBytes);            inBytes[0] = map(inBytes[0], 0, 1023, 0, width/3);      float tempo = inBytes[0];      inBytes[1] = map(inBytes[1], 0, 1023, 0, height/2);      float frequency = inBytes[1];            float rectWidth = tempo;            // at the edge of the screen, go back to the beginning:      if (xPos + rectWidth >= width) {
       xPos = 0;
       background(0);
     }

     //println(rectangleWidth);
     // draw the line:
     int color1 = color(127, 34, 255 - frequency);
     fill(color1);
     rect(xPos, 0, rectWidth, (int)frequency);

     // increment the horizontal position:
     xPos += rectWidth;
   } // END serialEvent
- Arduino
/*
  Graph

 A simple example of communication from the Arduino board to the computer:
 the value of analog input 0 is sent out the serial port.  We call this "serial"
 communication because the connection appears to both the Arduino and the
 computer as a serial port, even though it may actually use
 a USB cable. Bytes are sent one after another (serially) from the Arduino
 to the computer.

 You can use the Arduino serial monitor to view the sent data, or it can
 be read by Processing, PD, Max/MSP, or any other program capable of reading
 data from a serial port.  The Processing code below graphs the data received
 so you can see the value of the analog input changing over time.

 The circuit:
 Any analog input sensor is attached to analog in pin 0.

 created 2006
 by David A. Mellis
 modified 9 Apr 2012
 by Tom Igoe and Scott Fitzgerald

 This example code is in the public domain.

 http://www.arduino.cc/en/Tutorial/Graph
 */

// ******************************************************
// CHORD INITIALIZATION
// ******************************************************
int singleNote[] = { 1, 1, 1, 1 };
int majorChord[] = { 4, 5, 6, 0 };
int minorChord[] = { 10, 12, 15, 0 };
int seventhChord[] = { 20, 25, 30, 36 };
int majorChordLength = 3;
int *chords[] = { singleNote, majorChord, minorChord, seventhChord };
const int chordsLength = 4;

int chordType = 0;                // changes between chords[]
int arpStep = 0;                  // changes between chord frequencies

// ******************************************************
// INPUT INITIALIZATION
// ******************************************************
const int linPin = A0;
const int potPin = A2;
const int btnPin = 12;
const int tonePin = 10;
boolean firstButtonCycle = false; // button 'debouncer'

// pressing the button changes the chord number
void buttonControl(int btnReading) {
  if(btnReading == HIGH){
    // firstButtonCycle prevents the device from changing songs rapidly when
    // the button is held down
    if (firstButtonCycle == false) {
      firstButtonCycle = true;
        // change the chord type
        chordType = chordType < chordsLength - 1 ? chordType + 1 : 0;
      }
  }
  if(btnReading == LOW){
     firstButtonCycle = false;
  }
}

// ******************************************************
// MAIN LOOP
// ******************************************************

unsigned int tempo;
unsigned int frequency;
unsigned int chordFrequency;

void setup() {
  // initialize the serial communication:
  Serial.begin(9600);
}

void loop() {
  int linReading = analogRead(linPin);
  // send the value of analog input 0:
  int potReading = analogRead(potPin);
  int btnReading = digitalRead(btnPin);
  // send the value of analog input 0:

  // wait a bit for the analog-to-digital converter
  // to stabilize after the last reading:
  delay(2);

  tempo = potReading/3 + 10;

  buttonControl(btnReading);
  int* chord = chords[chordType];
  float chordFactor = (float)chord[arpStep] / (float)chord[0];

  if (linReading < 1020) {
    frequency = linReading;
  }
  chordFrequency = frequency * chordFactor;

  Serial.print(tempo);
  Serial.print(",");
  Serial.println(chordFrequency);
//Serial.print(",");
//  Serial.println(chordType);

  unsigned int duration = tempo - tempo / 20;
  delay(tempo);
  tone(tonePin, chordFrequency, duration);
  arpStep = arpStep < majorChordLength ? arpStep + 1 : 0;
}