A3 heuristic evaluation

Craigslist Evaluation

by Andrew Ferg, Ryan Soussan, John Subosits – aferg, rsoussan, subosits

aferg: https://www.dropbox.com/s/iao1pr387b4fagv/A3.pdf

rsoussan: https://www.dropbox.com/s/e1mk3oq5j647g5t/HCIIn_ClassAssignment.pdf

subosits: https://www.dropbox.com/s/tj3sb4ghyaiqhhg/Craigslist.docx

i) The most severe problem with the site in our opinion was the complete lack of regular structure to users posts. when seraching for a gig pr product, cost/pay is often not included, and the title of the post (which is all you see before clicking on the post for more info) has information in a random order (and occasionally tells you NOTHING useful about the product or event. Our suggested fixes included a more structured posting system, perhaps one with more guidelines, perhaps more categories in which to post, and certainly making price a required field for all posts, unless posting in the “free” category.

ii) Nielsen’s heuristics did not really seem to help a tin for this. A large deal of the hueristics were actually folowed, or were not very relevant to the context of the site, and the large overarching problems with craigslist were apparent from the beginning. However, it did help a bit to have the “Consistency and standards” and “error prevention” heuristics clearly stated.

iii) Since craigslist is a search-heavy site, it would be very useful to add more filtering criteria in order to improve the search function, and find other ways to improve the searching experiece (e.g. return related searches when there are no/few results, rather than just displaying a “nothing found” message.

iv)

1. Match prototyping example, including heuristic evaluation to a picture or example of them in use, or a situation in which they are being iplemented effectively.

2. Match each of the 10 heuristics to a picture or example of it being very well or very poorly used.

Assignment 2

1. Observations

I conducted my observation over the course of 2 weeks by trying to pay close attention to everyone around me as I walked and waited between all of my classes. After a few days, I began to notice several trends. Many students (especially after 1:30pm classes and before 10 or 11am classes) used the 10 minutes in between classes to run off and find food. Many students also used this time to print (and sometimes finish) last-minute assignments. Once arriving in the classroom, most students spent their time surfing the web, or socializing with nearby friends. However, there were 2 notable social trends. 1) students generally didnt appear to use this time to meet new people, but instead to socialize within established circles of friends. 2) Students never really got involved in any large-scale social interactions with the entire class or the professor. Lastly, I noticed that the students who consistently arrived late always seemed a bit lost for the first few minutes after arriving to lecture, likely because they missed important introductory material.

2. Brainstorming

Collaborated with: Bereket Abraham, Ryan Soussan, Lauren Berdick

1. name game, get to know your neighbor

2. talent show

3. professor story time

4. joke telling contest

5. applications/videos of what your are going to learn in order to generate interest

6. crowdsourced music making. everyone gets to contribute a beat to a song, entire thing gets compiled

7. Current events related to the class. Example, speakers, new books, important figures, etc

8. One tough problem that everyone collaborates on and if they get it then the entire class gets extra credit

9. Crowdsourced, collaborative art project that everyone contributes to

10. Personal subreddit for the class.

11. Class votes on interesting questions for the professor, i.e. about his work or life experiences

12. Professor gives a brief summary / update of his current research or the state of his research field.

13. Riddle of the day, Google interview questions

14. Map application that shows shortest path to your next class from your current location, with a stop for food along the way

15. Same as above map idea, only for bathrooms instead of food.

16. App for perpetually late students that provides a live audio broadcast of the first 10 minutes of large lectures

3. Favorite Ideas

1. Food map: My observations showed me that many students used their time walking between classes to grab some food, and this idea would be very useful if you need to grab a quick snack/meal in between classes by minimizing the walking distance you would need to travel to both grab a bite to eat and make it to class.

2. Lecture audio broadcasts: I noticed that late students would often look confused for a bit after arriving to lecture. This app would allow perpetually late students the opportunity to not be completely lost when arriving late to a lecture because they can listen to it while walking to class; additionally, because it only provides 10 minutes of audio, it  still forces students to go to class so it will not encourage skipping class entirely.

Photos and Descriptions of Prototypes

Prototype 1, screen 1
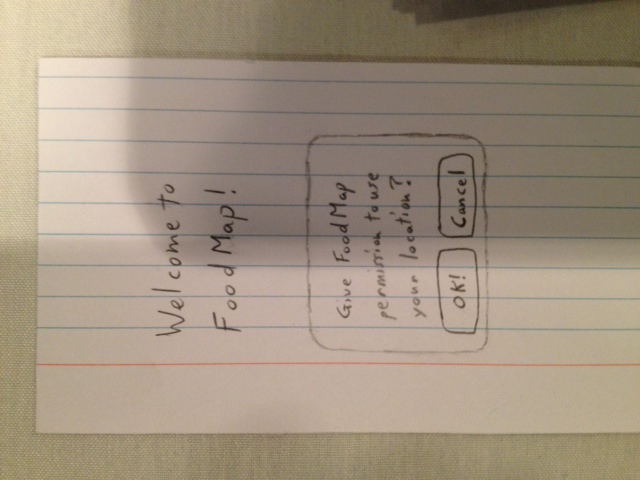
This is the title screen of Prototype 1, FoodMap

Prototype 1, screen 2

This is the second screen; it is an interactive map that lets you choose the location of you next class.

Prototype 1, Screen 3

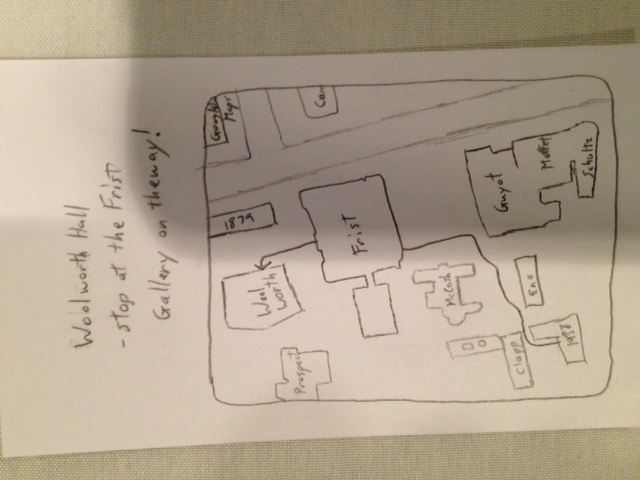
This is the final screen of Prototype 1; it shows a sample path from the current location (1938 Hall) to the next class at Wollworth, recommending Frist as the closest source of food.

A2_2

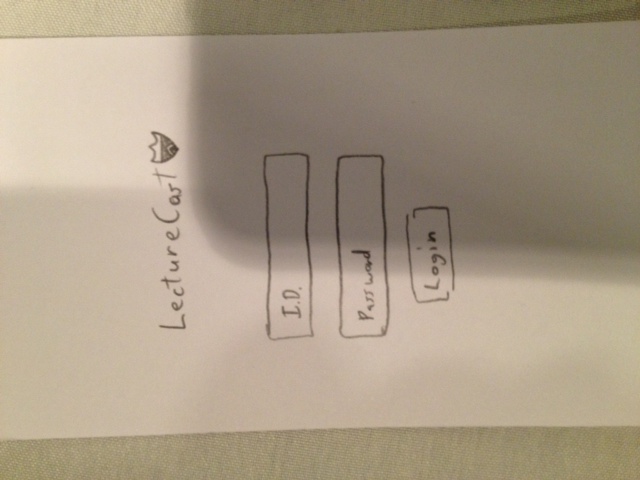
This is the welcome screen of Prototype 2, LectureCast, with the login screen for a PUID.

A2_3

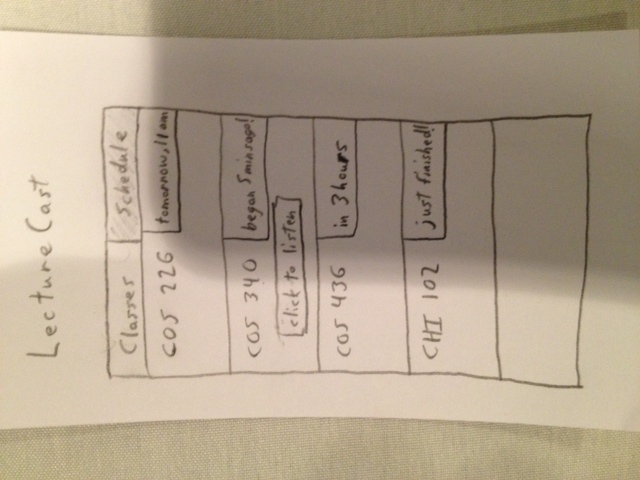
This is the main screen of LectureCast, giving teh times until each of your classes, and notifying you if you are currently late for a class with an available audio stream.

Prototype 2

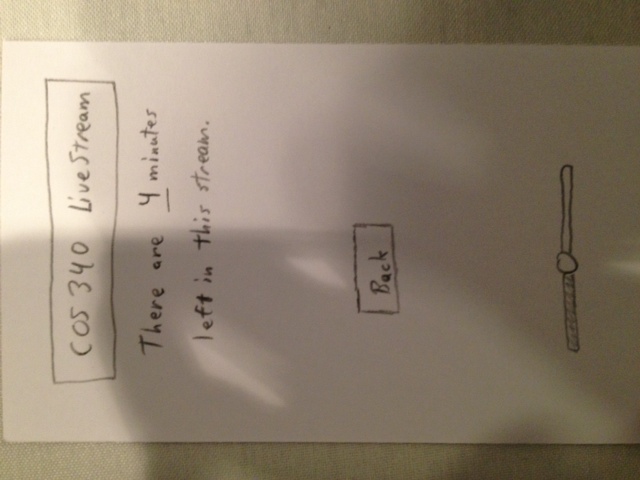
This is the play screen, which shows when LectureCast is playing a live audio stream of a lecture.

A2

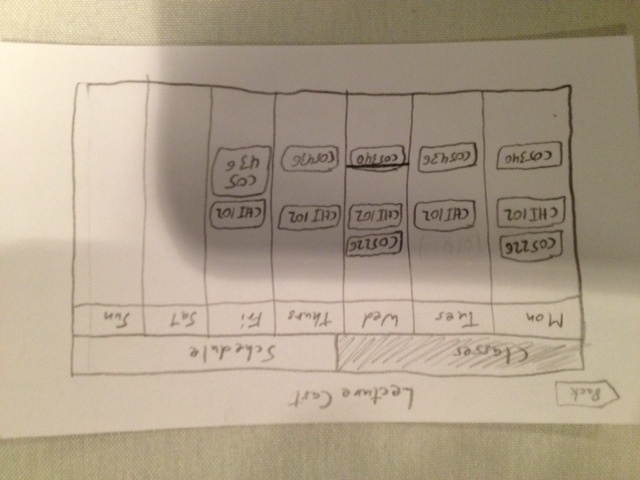
This is the Schedule screeen of LectureCast, whic shows a Google Calendar styled calendar of each of your classes, including a bar showing the current day and time.

Notes From User Testing

Joe Margolies – Joe was a big fan of the concept of the app. He did not know immediately that the Schedule option on the Classes screen was the one available to be clicked on, and suggested that the darker tab should be the current selection. He intuitively noticed that the line on the schedule page indicated the current time, a la Google Calendar. His main complaint was the lack of additional functionality on the main Classes screen; he tried to click on all of the classes, and was disappointed that nothing happened. He suggested something such as Blackboard integration.

Greg Smith – Greg was a big fan of the simple home screen, because it reminded him of the PUID login screen, and felt that made it very intuitive. He was also a big fan of the displayed class times, as a sort of shortcut schedule. He was a fan of the simple design, and large buttonssaying they were easy to hit on a touchscreen while running to lecture. However, he wants more functionality, e.g. Blackboard synchronization, other academic information, just like Joe suggested.

Salvador Martinez – Salvador did not notice the Schedule button until much later on. He remarked when he finally clicked it that it was ambiguous whether the ‘Classes’ and ‘Schedule’ were descripive, or represented tabs. Sal was also the only person to notice a very obvious flaw: I forgot to include a signout button…. Lastly, he too was disappointed when there was no extra functionality, and suggested Blackboard integration.

Insights From Testing

Everyone seems to be a big fan of the app’s concept, but all wanted more from its implementation. Everyone I interviewed suggested Blackboard integration, and perhaps inclusion of powerpoints and other form of lecture materials. The GUI also needs minor improvements, especially the ‘Classes’ and ‘Schedule’ tabs, which most people did not recognize as a clickable option, and the volume control, which most users did not seem to try to use. Also, as Sal pointed out, the app obviously requires a logout button.

Light DJ

Light DJ
Ryan Soussan, Bereket Abraham, Lauren Berdick, Andrew Ferg

Description
We used Processing and the Arduino to map a color wheel to the multi-color LED. On the computer screen, Processing displayed 3 overlapping circles, which were red, green, and blue. The mouse’s distance from each circle’s center corresponds to the intensity of that color. We then send those values to the Arduino and use them to set the brightness of each LED color. The only problem we encountered was the mismatch between the RGB mixing from Processing’s color values and the actual mixing of red, green, and blue light. When the LED mixes all 3 colors at equal intensities, it creates white light; however, mixing red, green, and blue in Processing creates a dark black-brown, creating a discrepancy between the GUI and the actual LED output.

Parts
1 computer (to run Processing and Arduino)
1 Arduino Uno microcontroller
1 multi-color LED
4 jumper wires
3 330 ohm resistors
1 small breadboard
1 piece of wax paper to diffuse the LED

Instructions

2 of our design sketches:

LightDJ3LightDJ4
Install Arduino and connect the board to you computer. Use the Blink and Dimmer tutorials to make the LED turn on. Remember to include a resistor for each pin. Use three PWM pins (~) so that you can modulate the brightness of the LED (these let you mimic an analog signal using a digital output). Test the different ends in order to match each pin to a certain color, and then encase the LED and mini-breadboard in wax paper to diffuse the light.

Front and back views of our little contraption:

LightDJ

LightDJ2

Now go to Processing and make your GUI. We represented the color wheel with 3 circles in a triangle (go to the color tutorial at processing.org). Make the circles slightly transparent so that they can overlap and mix. We then mapped the distance from each circle to the intensity of that particular color.

Our Processing GUI:

LightDJ5

The last step is to send the Processing color values to the Arduino using serial communications. Convert the color values calculated by Processing into bytes, to ease serial communications, and have the Arduino read the bytes one at a time, and set them to the corresponding color values. (For debugging, it may be useful to have the Arduino print the RGB values back to the serial port)

Source Code

Arduino:
#define RED 6
#define GREEN 10
#define BLUE 3

int rByte = 0;
int gByte = 0;
int bByte = 0;

void setup() {
pinMode(RED, OUTPUT);
pinMode(GREEN, OUTPUT);
pinMode(BLUE, OUTPUT);
Serial.begin(9600);
}

void loop() {

while (Serial.available() < 3) {};

// if there are any serial bytes available to read
if (Serial.available() > 0) {
// then read the 3 bytes, sent in order R,G,B
rByte = Serial.read();
gByte = Serial.read();
bByte = Serial.read();
}

// write the RGB values to the LED outputs
analogWrite(RED, rByte);
analogWrite(GREEN, gByte);
analogWrite(BLUE, bByte);

//Serial.write(rByte);
//Serial.write(gByte);
//Serial.write(bByte);
}

Processing:
import processing.serial.*;

int r = 390;
float rr = 0;
float gg = 0;
float bb = 0;
int b1,b2,b3 = 0;

Serial port;

void setup_port() {
port = new Serial(this, Serial.list()[0], 9600);
}

void setup() {
size(600, 600);
colorMode(RGB, 255);
noStroke();

setup_port();
}

void draw() {
background(255);
//blue circle
fill(0, 0, 255, 255);
ellipse(300, 200, r, r);
//green circle
fill(0, 255, 0, 150);
ellipse(200, 400, r, r);
//red circle
fill(255, 0, 0, 150);
ellipse(400, 400, r, r);

rr = sqrt((400-mouseX)*(400-mouseX) + (400-mouseY)*(400-mouseY));
gg = sqrt((200-mouseX)*(200-mouseX) + (400-mouseY)*(400-mouseY));
bb = sqrt((300-mouseX)*(300-mouseX) + (200-mouseY)*(200-mouseY));

rr = 255 – rr;
gg = 255 – gg;
bb = 255 – bb;

if (rr < 0)
rr = 0;
//  else if (rr < r)
//    rr = 255;
if (gg < 0)
gg = 0;
//  else if (gg < r)
//    gg = 255;
if (bb < 0)
bb = 0;
//  else if (bb < r)
//    bb = 255;

fill(rr, gg, bb, 255);
ellipse(0, 0, r, r);

b1 = (int)rr;
b2 = (int)gg;
b3 = (int)bb;

byte[] rgb = {(byte) rr, (byte)gg, (byte)bb};

port.write(rgb);

println(“Sending:”);
println(b1);
println(b2);
println(b3);

if (port.available()  > 0) {
println(“Reading: “);
println(port.read());
}
delay(5);
}