
PART I Names
Karena Cai (kcai@)
Jean Choi (jeanchoi@)
Stephen Cognetta (cognetta@)
Eugene Lee (eugenel@)
PART II
We built a mini Lightsaber, which makes ‘authentic’ lightsaber noises when held , turns on and off with a button, changes brightness based on a knob, and also changes brightness and noise frequency when you flex your wrist. We built it because it is awesome. More seriously, we built this because the focus is on the light diffuser, as per the project description, but because it also allowed us to make a lot of interesting modifications to it. The project was an immense success. Although the lightsaber wasn’t as long or bright as we would have liked, that was a limitation of resources, not of effort. We liked that it changes brightness with both the potentiometer and flex sensor, and incorporated many types of sensors. It also interfaces with the body in an interesting way, as wrist motion affects the brightness of the LEDs. We found that the LEDs on pins 3 and 11 turn off when the buzzer (on pin 8) sounded. We were not entirely sure why. We also decided not to change the color of the tri-color LED because it would take up 3 of the 6 analog output pins. For simplicity, we decided to connect LEDs in series, so we didn’t need to use these two analog output pins. If we were to do this again, we would begin by planning our circuit design better – we had to split components between two breadboards for greater ergo-dynamics If we were to do this again, we would try to use more powerful LEDs of the same color to closer resemble a lightsaber. Most importantly, we would like to have some kind of impact sensor so the lightsaber can react when it is used to hit things.
PART III Sketches
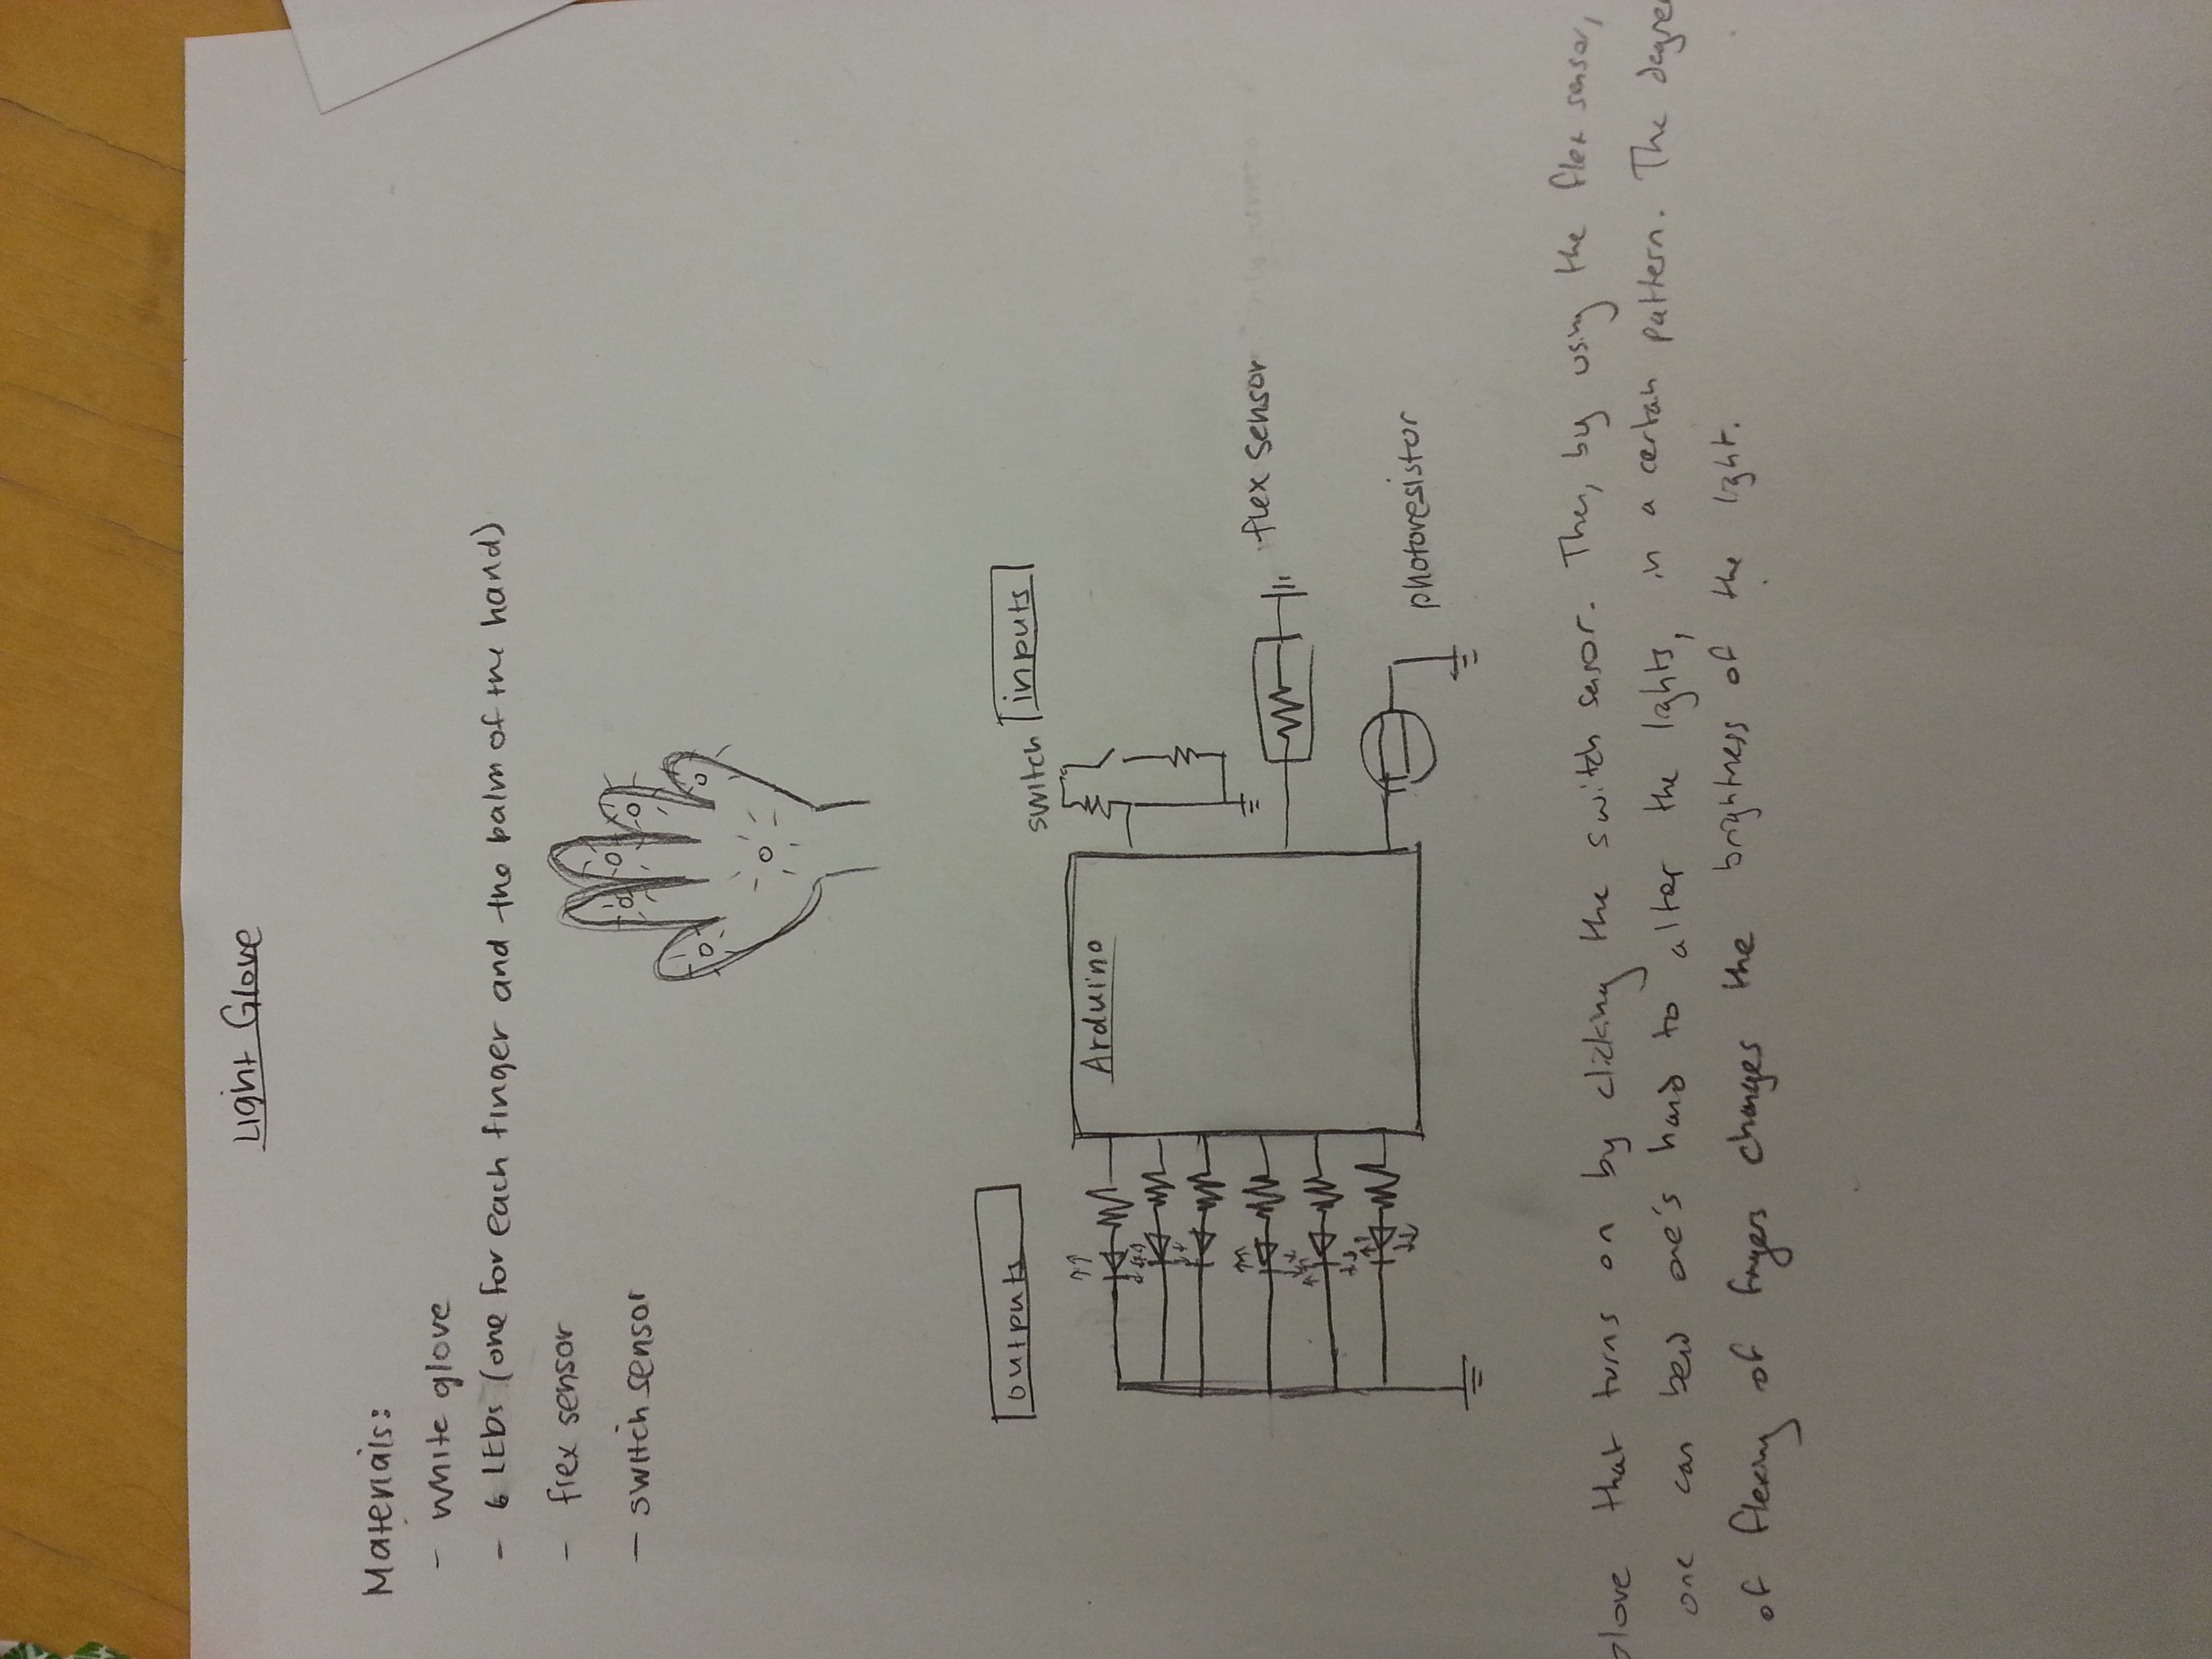
Light Glove
Glove turns on by clicking the switch, by using the flex sensor, one can bend ones hand to alter the light in a pattern determined by their hand motions. The flex sensor would change brightness of the LEDs.
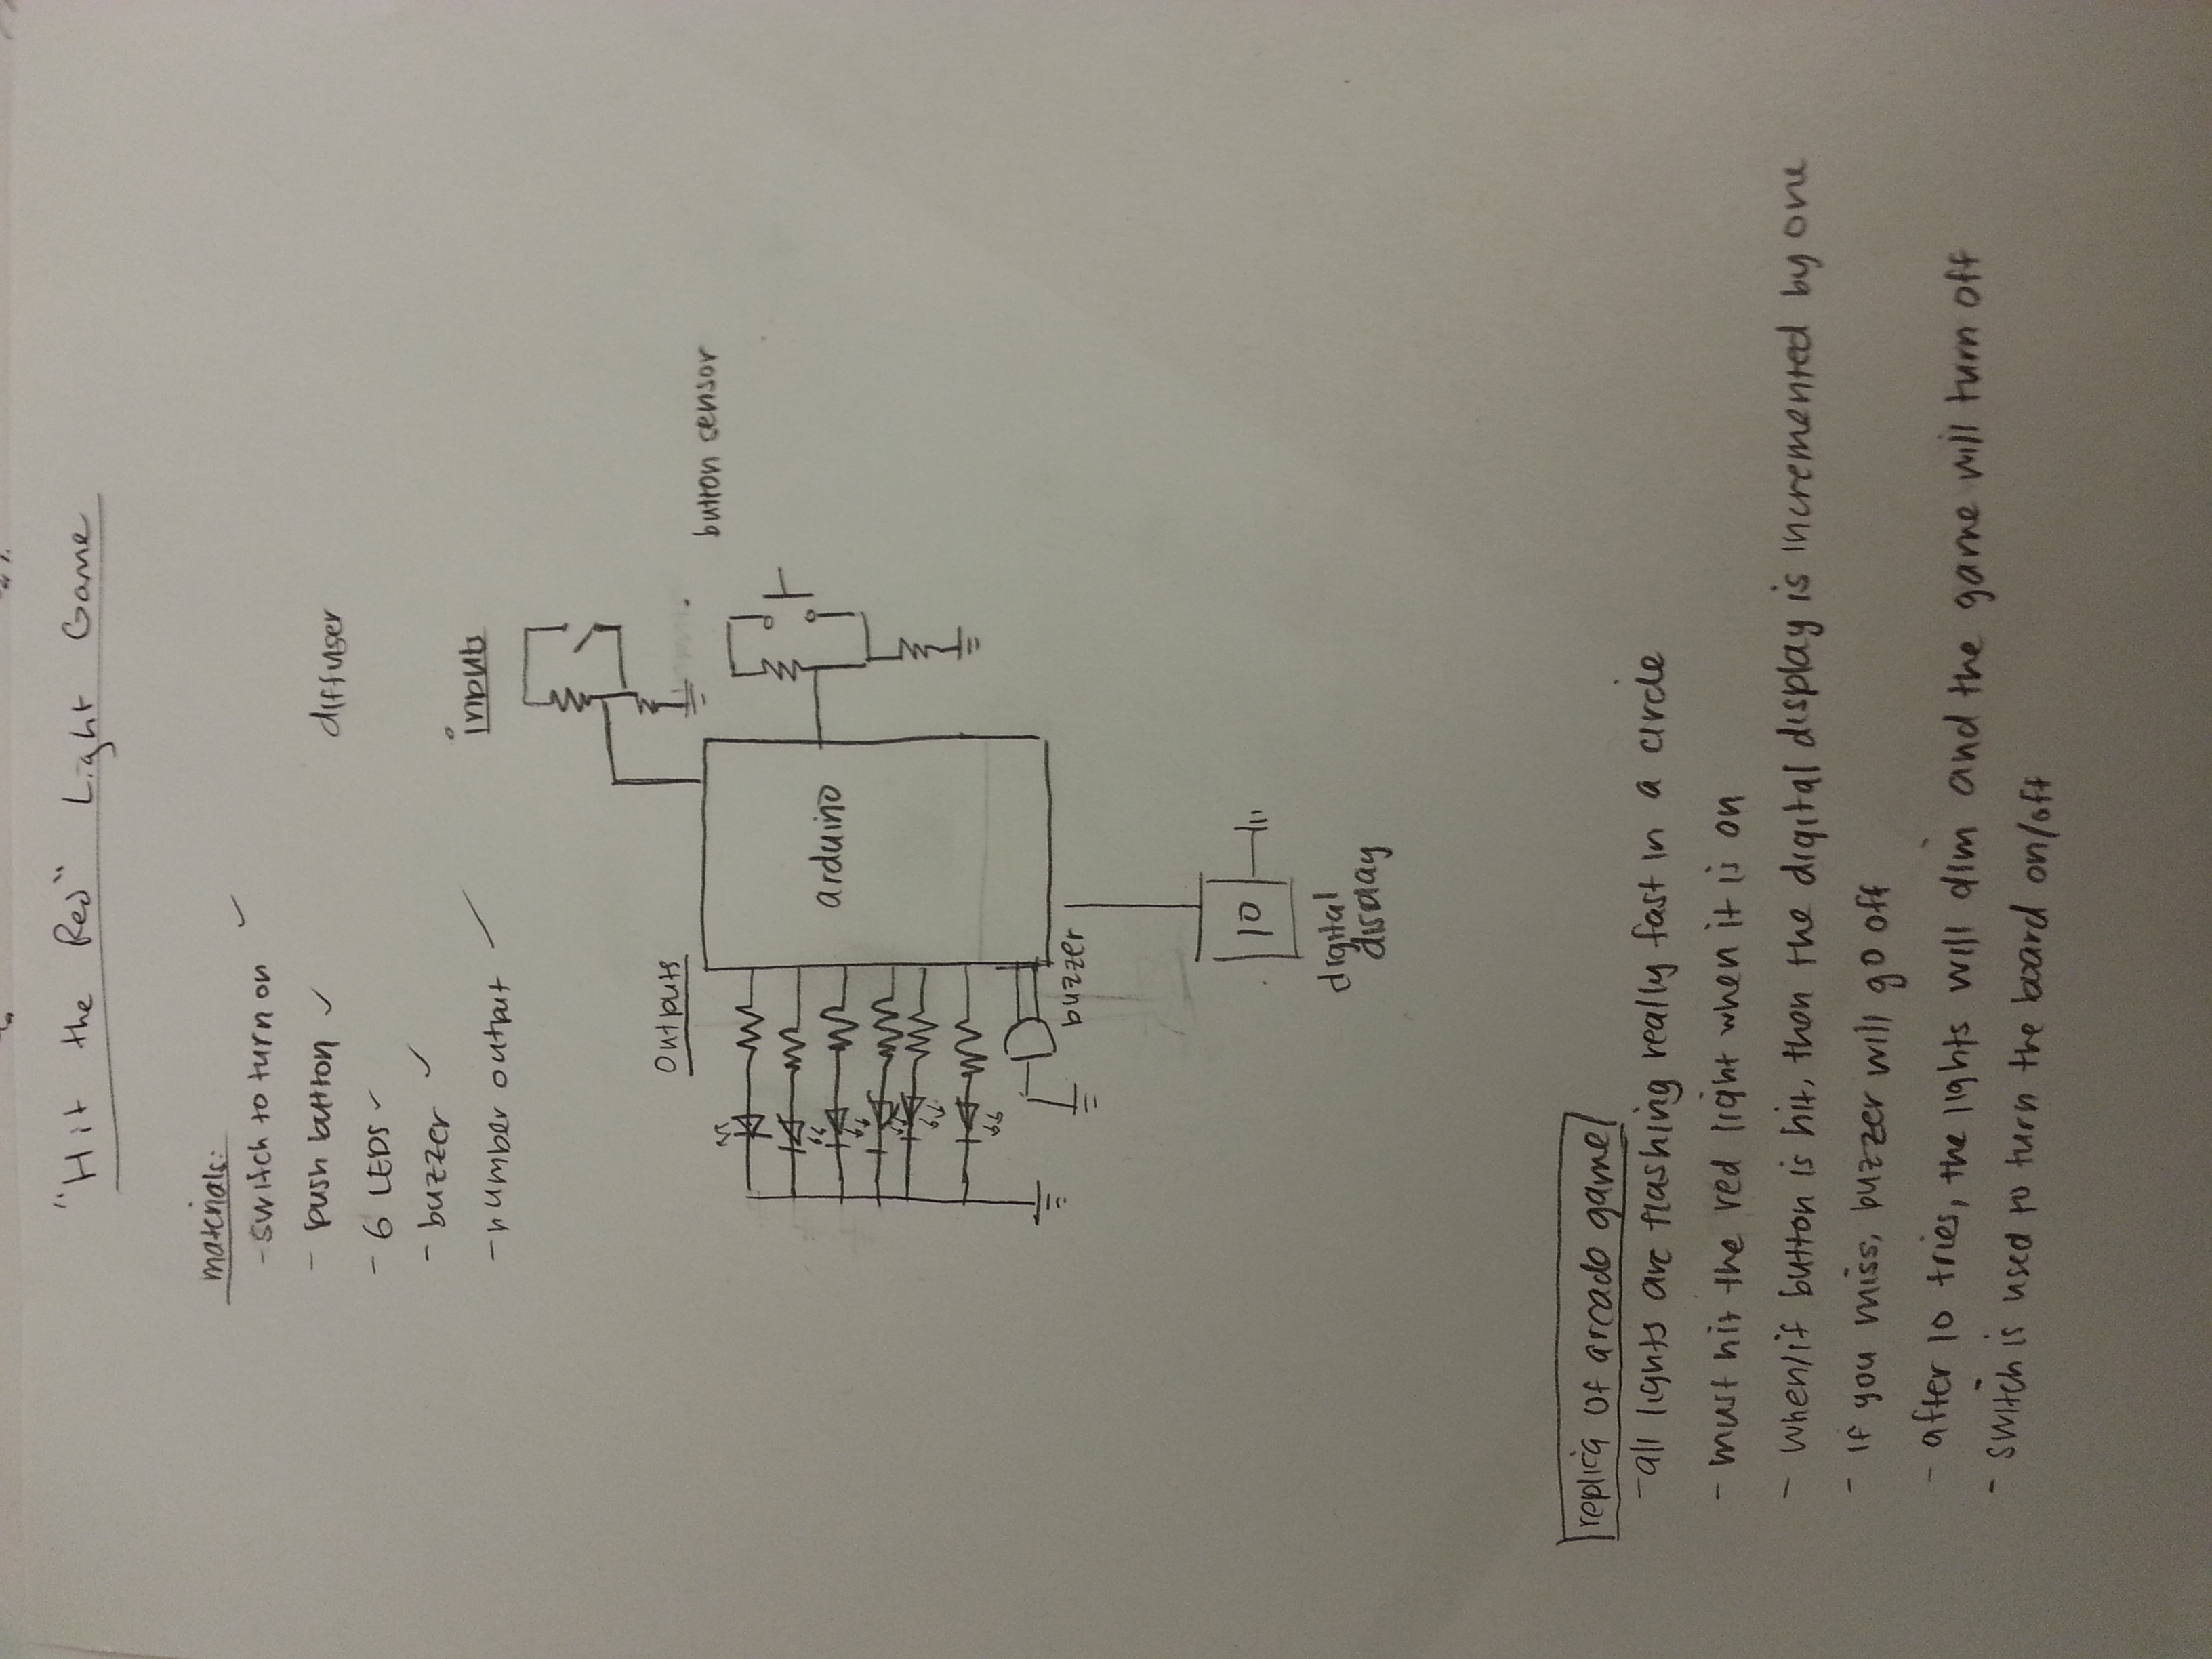
Hit the right light
Replica of an arcade game, where you must hit the proper LED when its on. The six LEDs are arranged in a circle and turn on in succession. When you hit the button when the LED is on, the digital display is incremented by one. If you miss, the buzzer will go off, but the game will continue. After 10 misses, the lights will dim and the game will end.

Lightsaber
The arduino will be mounted on a handle (not included) with a protruding rod, along which the LEDS will be mounted. Button will turn the LEDs on/off, the potentiometer will change the brightness of the lights, the linear sensor (not included) will change the color of the top tri-color LED. The flex sensor will detect impacts which change the brightness of the lights and emit a sound from the buzzer.
Note: we did not include the linear sensor into our final product.
PART IV : Photo and video showing final system in action
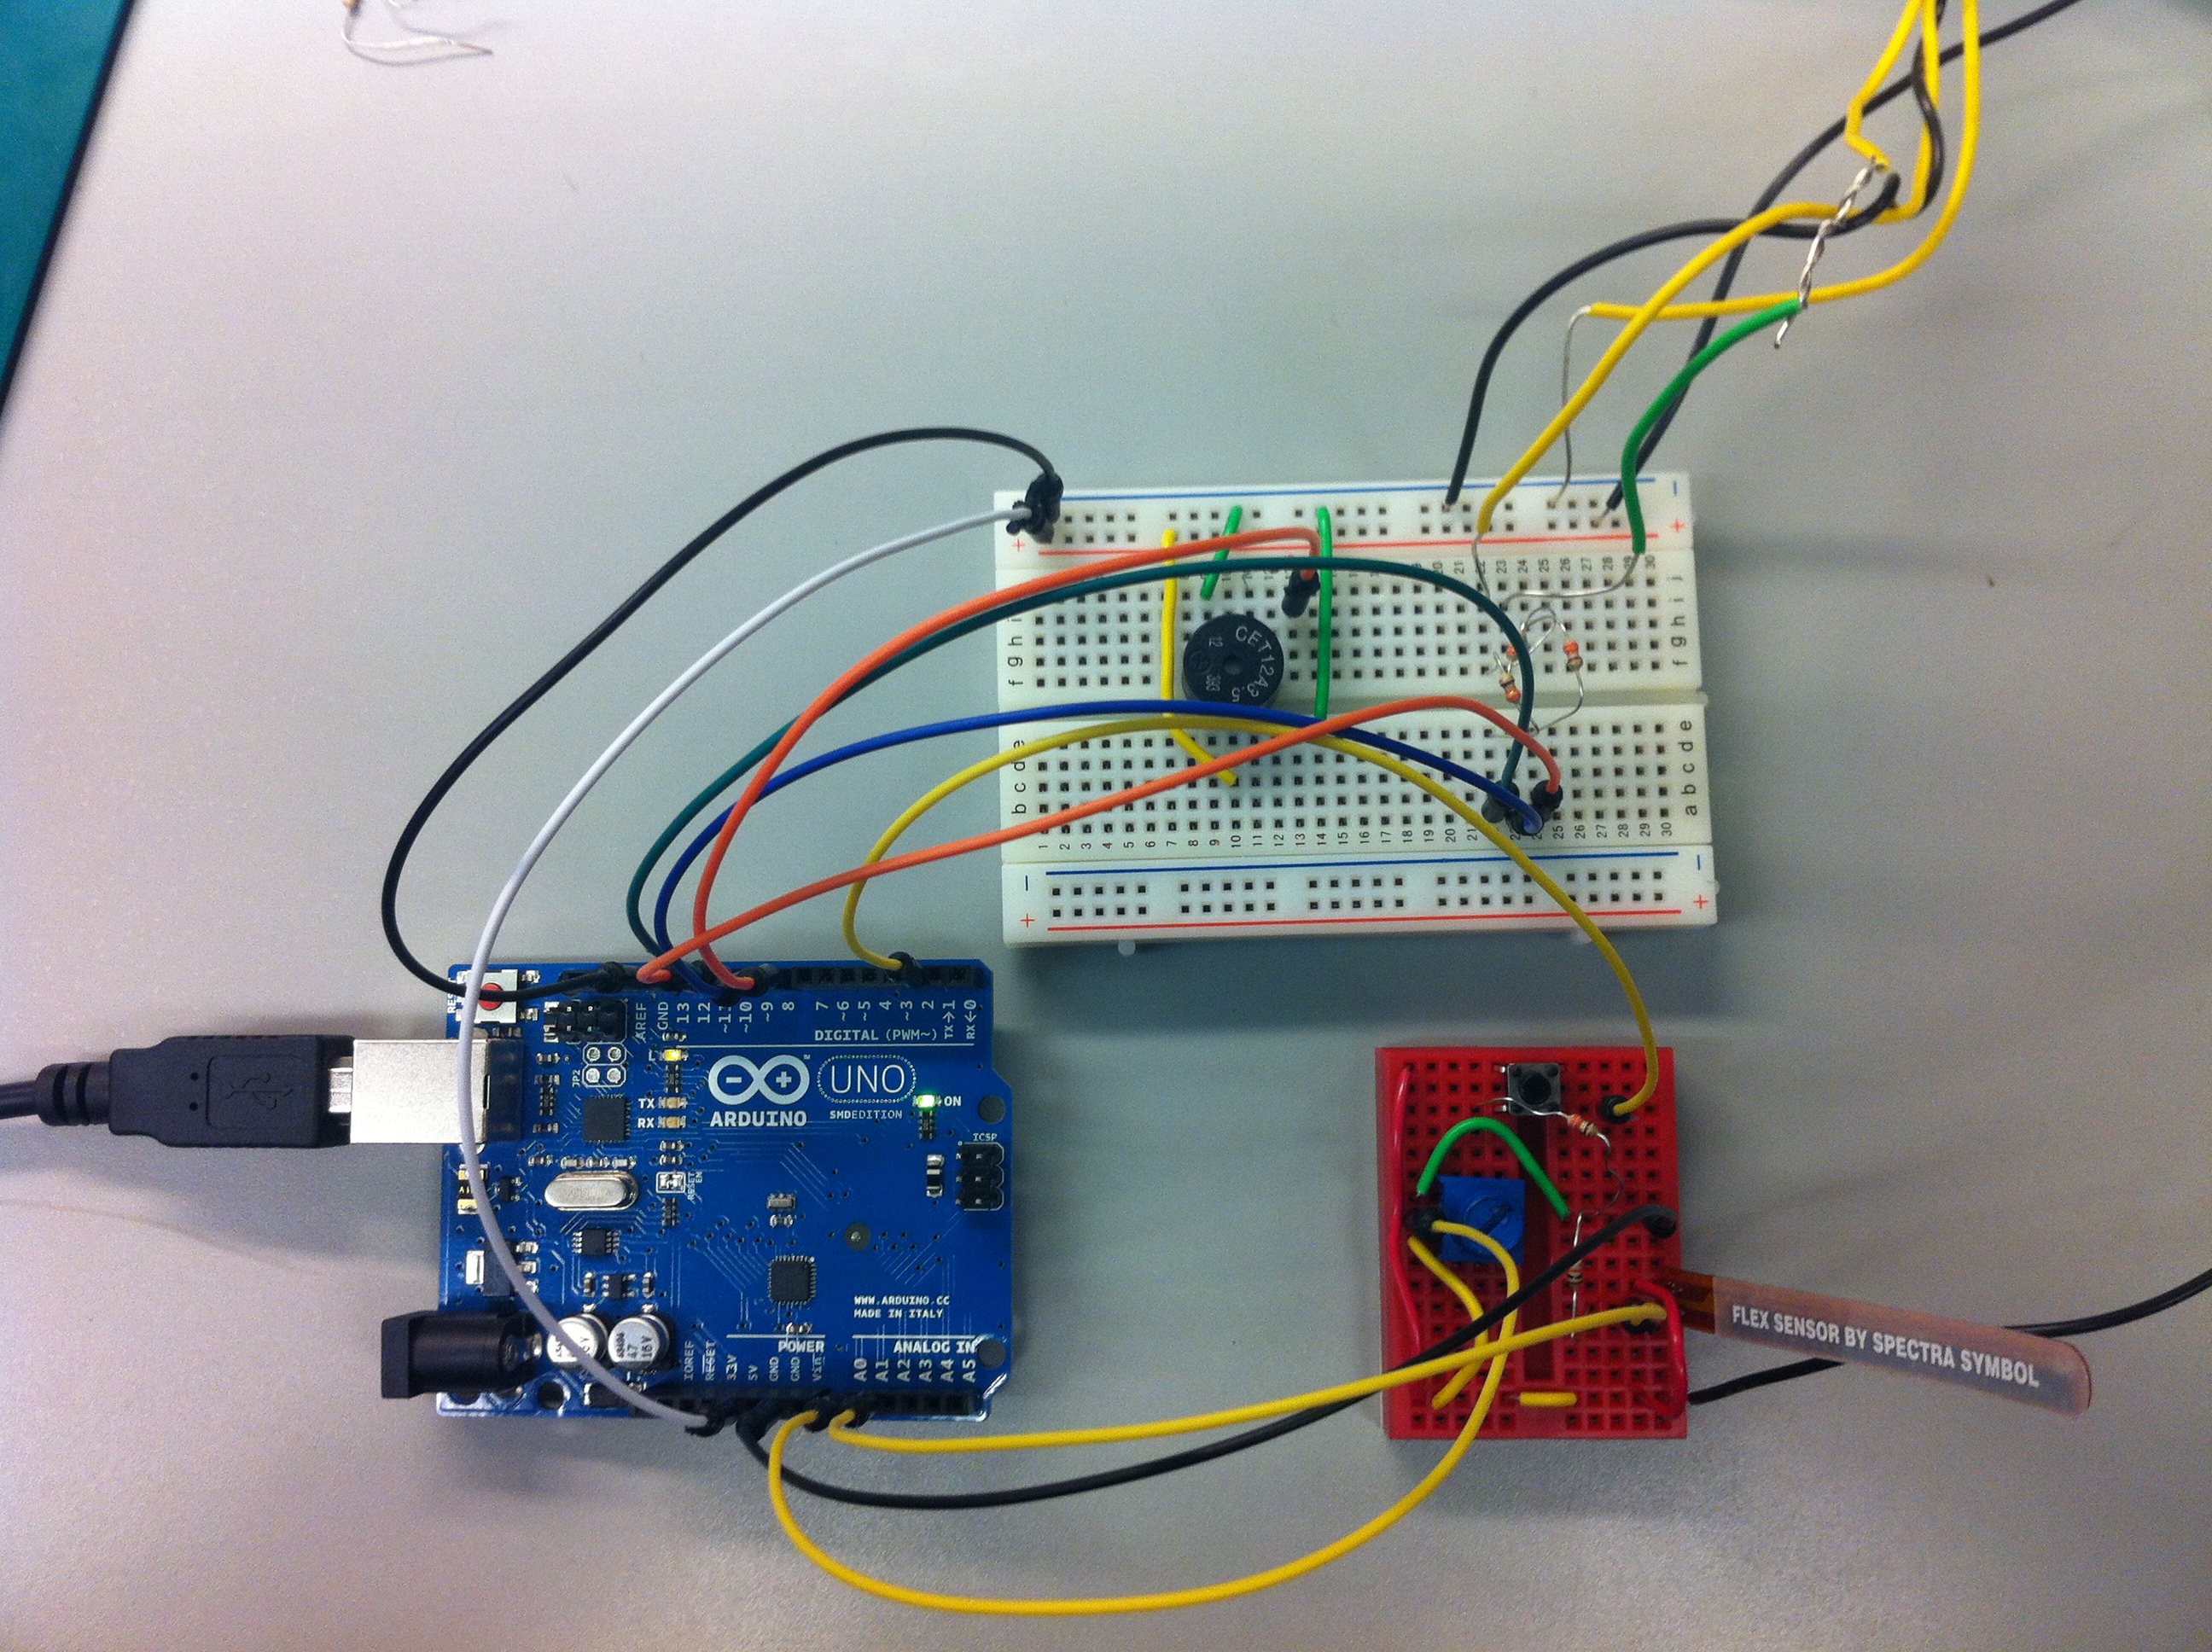
The circuit

In action

Palm of glove

Back of glove
PART V : List of parts used in final system:
- 4 LEDs
- 1 multi-colored LED
- 2 breadboards
- 1 push button
- 1potentiometer
- 1 flex sensor
- Arduino Uno
- plastic straw
- buzzer
- 5 330 Ohm resistors
- 1 10kOhm resistor
- wires
PART VI : INSTRUCTIONS
- Set up the potentiometer so its analog output goes to pin A0, it is powered by 5V, and connected to ground.
- Set up the flex sensor so that it is pulled up by a 10 kOhm resistor, and its analog output goes to pin A1. Place the flex sensor on the edge of the board with the stripes facing in the direction off of the breadboard.
- Set up the push button so that the digital output goes to digital pin 2 of the Arduino and it is pulled down by a 330 ohm resistor.
- On a separate breadboard, set up the buzzer so that it is pulled up by a 330 ohm resistor and is connected to pin 8.
- Connect the multi-colored LED to a 330 ohm resistor connected to digital pin 9 of the Arduino. Use long electrical wires to place the LED at the top of the straw.
- Place two LEDs in series, pulled up by a 330 ohm resistor and digital pin 10, and thread the LEDs into the straw using electrical wire.
- Use electrical tape along the electrical connections to prevent short-circuiting along the straw.
- Attach the flex sensor onto a glove and the lightsaber should be ready to use!
PART VII :
/*
  Karena Cai
  Stephen Cognetta
  Jean Choi
  Eugene Lee
  Sets up commands for a lightsaber/wand. Buzzes
  when flex sensor detects wrist movement, and changes brightness
  from both the potentiometer and the flex sensor. The pushbutton
  turns on and off the entire laser.
 */
// ******************************************************
// PINS
// ******************************************************

int led1 = 6;
int led2 = 9;
int led3 = 10;

int button = 2;
int buzzer = 8;

// ******************************************************
// INPUT VARIABLES
// ******************************************************
int buttonState = 0;         // variable for reading pushbutton state
boolean lightIsOn = false;   //variable for whether saber is on
boolean firstButtonCycle = false;
int ledBrightness;

// ******************************************************
// INITIALIZE
// ******************************************************
// the setup routine runs once when you press reset:
void setup() {
  // initialize serial communication at 9600 bits per second:
  Serial.begin(9600);
  pinMode(led1, OUTPUT);
  pinMode(led2, OUTPUT);
  pinMode(led3, OUTPUT);
  pinMode(button, INPUT);
}

// ******************************************************
// INPUT CONTROLS
// ******************************************************
// On button down, turn the system off and on
void togglePowerState() {
  lightIsOn = lightIsOn ? false : true;
}

// pressing the button toggles the device on/off
void buttonControl(int buttonState) {
  if(buttonState == HIGH){
    // if statment prevents the device from turning on/off rapidly when
    // the button is held down
    if (firstButtonCycle == false) {
      firstButtonCycle = true;
      togglePowerState();
    }
  }
  if(buttonState == LOW){
     firstButtonCycle = false;
  }
}

// ******************************************************
// POWER CONTROLLER
// ******************************************************
  // controls what to do when device is on and off
  // allows device to play sounds and show appropriate brightness when on
  // if off, turn off lights and sounds.
void powerControl(int ledBrightness, int flexSensorValue) {
  if(lightIsOn)
  {
    showLight(ledBrightness);
    playTone(flexSensorValue);
  }
  else
  {
    showLight(0);
    turnOffTone();
  }
}

// ******************************************************
// OUTPUT CONTROLS
// ******************************************************
//displays light on LEDs with brightness int bright
void showLight(int bright) {
    analogWrite(led1, bright);
    analogWrite(led2, bright);
    analogWrite(led3, bright);
}

//plays tone if flex sensor is bent beyond some fixed amount
void playTone(int flexVal) {
    if (flexVal < 300) {
      // a higher pitched noise when the flex sensor is flexed
      tone (buzzer, (800-flexVal));
    }
    else {
      // an ambient lightsaber "hum" when the flex sensor is not flexed
      tone (buzzer, 20);
    }
}

void turnOffTone () {
   noTone (buzzer);
}

// ******************************************************
// MAIN LOOP
// ******************************************************
// the loop routine runs over and over again forever:
void loop() {
  // read the potentiometer input on analog pin 0: (0-1023)
  int potSensorValue = analogRead(A0);
  // read the flex sensor input on analog pin 1: (~314-210)
  int flexSensorValue = analogRead(A1);
  // kind of a hack, but bendValue starts at approximately 0
  // and increases in value with larger bends
  int bendValue = (320 - flexSensorValue);

  // tells you if the button is up or down
  buttonState = digitalRead(button);
  // led brightness is a function of the potentiometer and the degree
  // to which the flex sensor is bent
  ledBrightness = constrain(potSensorValue / 10 + bendValue, 0, 255);

  // controls what happens when the button is pushed
  buttonControl(buttonState);

  // controls what to do when the device is on or off
  powerControl(ledBrightness, flexSensorValue);

  delay(10);        // delay in between reads for stability
}