Group Name: VARPEX
Group Number: 9
Group Members: Abbi Ward, Dillon Reisman, Prerna Ramachandra, Sam Payne
Prototype 1 (The Dog Toy Instrument):
For our first prototype, we use a force sensitive resistor to build a toy that a dog can bite at various places and create music. The force of the bite determines the tone of the music.
Prototype 2 (The Roll-Instrument)
For our second prototype, we use an accelerometer continuously maps the y-coordinate to a unique frequency of the tone that to create music when we roll the instrument.
Prototype 3 (The Clapper)
For our third prototype, we built a clapper that uses a light sensor to adjust the speed of beats based on the amount of light that reaches it through the plates, hence creating music.
We decided to refine our clapper to build a more playable, intuitive instrument.
Project Description:
Our musical instrument uses light to control the tempo of notes that have a pitch set by a user’s sliding finger. In our prototype of the light mechanism we found that the use of light gave the player a surprising amount of control over the sound produced, and could perform interesting, simple beats without even controlling pitch. This mechanism worked by placing a light sensor in a ‘clamshell’ that could be opened or closed- more light to the sensor created a faster beat, while a closed clamshell resulted in a slower beat. For our refined model, we have two black acrylic panels- one with the light mechanism attached, and another with the slider sensor for pitch-control. The player holds each piece in a hand and can pivot, rotate, pull away, or cover up the light sensor on one piece using the other piece. We chose this design because it gave the player two dimensions of sound to control in a very fluid, three dimensional way. In a future revision of this design we might want to give the user more control over the beat, such as the ability to have no beat (right now, the beat is, when the light sensor is completely covered, very slow, but not off).
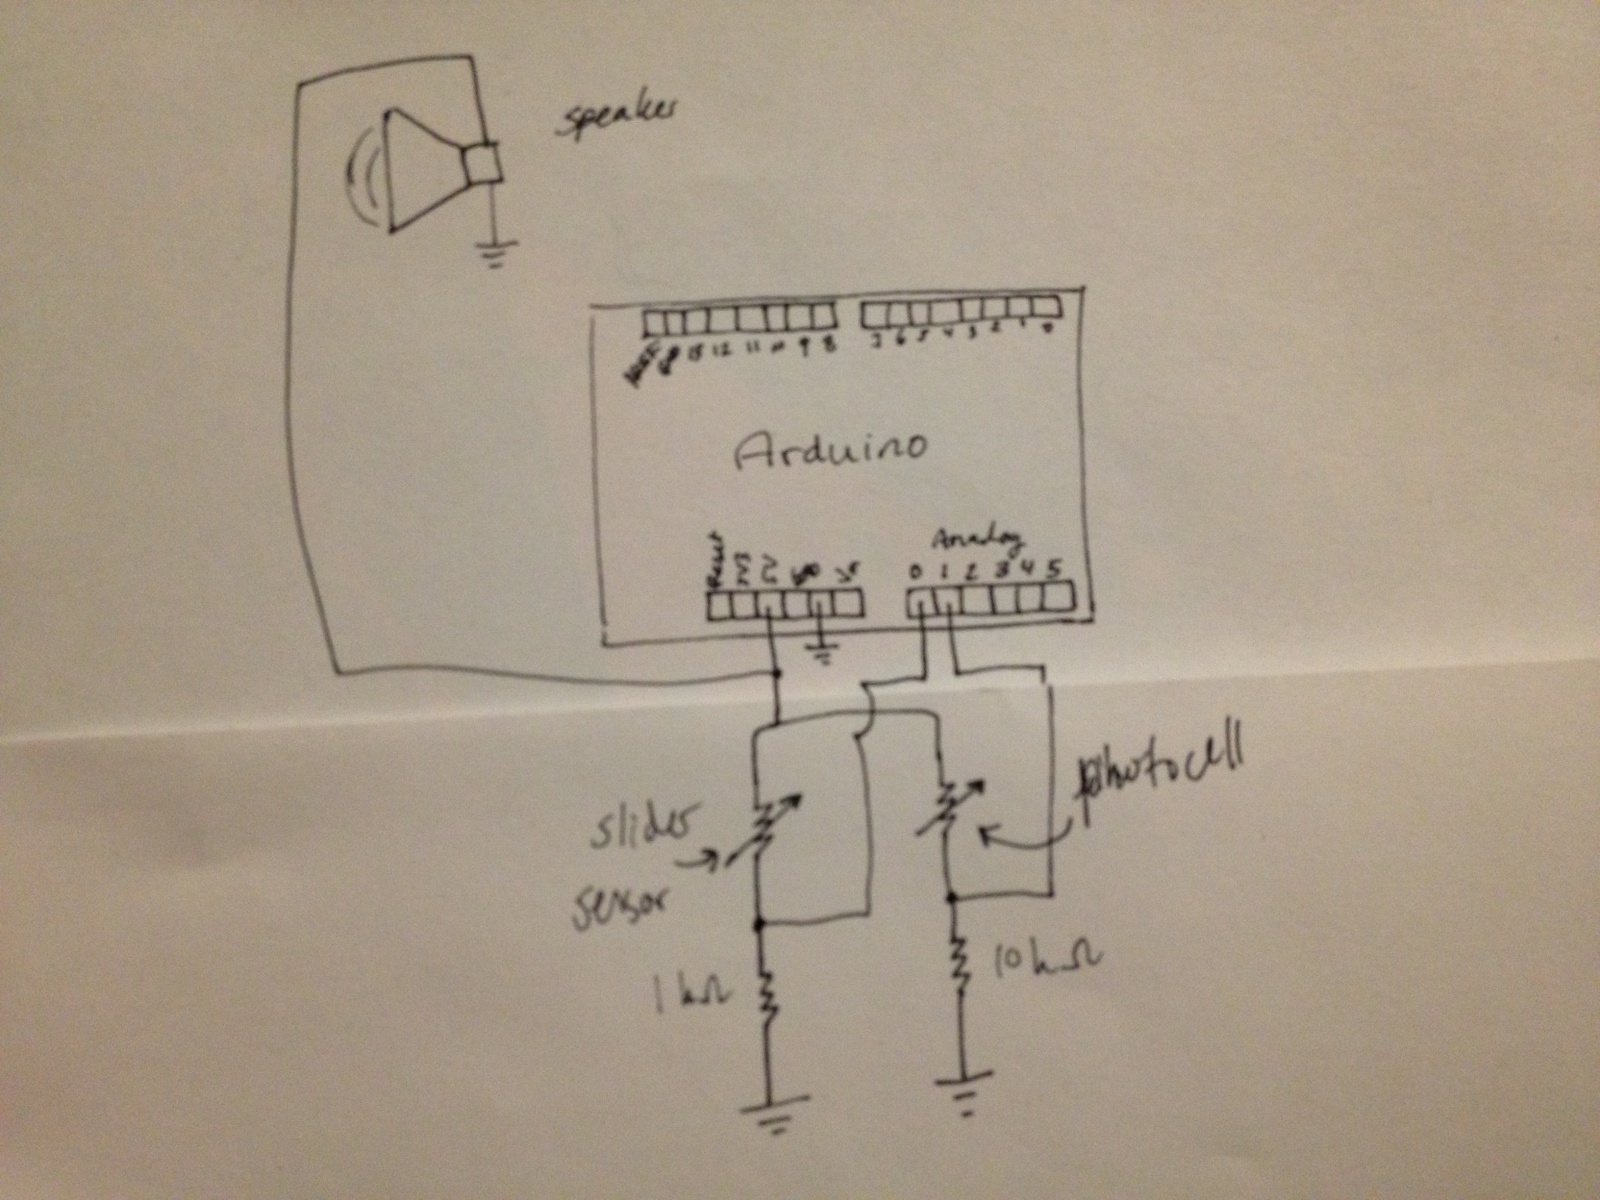
Schematic
Project Demo
List of Parts
A list of parts used in your final system
- Arduino
- 1k-Ohm resistor
- 10k-Ohm resistor
- slider sensor
- photocell
- buzzer (speaker)
- dead battery (This keeps the acrylic pieces from crushing the photocell and provides a pivot point for the pieces to rotate)
- 2 pieces of acrylic
- electrical tape to attach the battery to the acrylic
Instructions to Recreate System
Build the given schematic using alligator clips to attach the sensors. Tape the dead battery to one of the acrylic pieces — cover up the terminals. Carefully bend the leads of the photocell and rest it on top of the battery, parallel to the acrylic. Tape the slider sensor to one side of the other piece of acrylic. Load the Arduino code. Use the piece of acrylic with the slider sensor to cover the photocell and change the beat. Change the position of your finger on the slider sensor to change the tone.
Source Code
/*
Names: Dillon R, Prerna R, Sam P, Abbi W (Group 9)
Date: 3/2/13
Class: COS 436 - L2
For a musical instrument using the photocell and slider sensor.
Light makes a faster beat and the slider corresponds to a scale
*/
// Pins
int sliderPin = A0;
int lightPin = A1;
int speakerPin = 9;
int sliderValue;
int lightValue;
int tempo = 330;
int beat;
// sensor value ranges
int lightRangeLow = -1*200;
int lightRangeHigh = -1*950;
int sliderRangeLow = 100;
int sliderRangeHigh = 550;
void setup(){
 pinMode(speakerPin, OUTPUT);
 Serial.begin(9600);
}
void loop() {
 sliderValue = analogRead(sliderPin);
 lightValue = analogRead(lightPin);
 Serial.println(lightValue);
 //char note = setNotefromSlider(sliderValue);
 setBeat(-1 * lightValue);
 playNote(setNote(sliderValue),tempo);
 delay(tempo/2);
}
// varies the tempo
void setBeat(int sensorValueA) {
 // for reading light sensor
 tempo = map(sensorValueA, lightRangeHigh, lightRangeLow, 5, 800);
}
// sets a note c to C based on the slider position
char setNote(int sensorValue) {
 /* sensor value is 100 to 550 */
 int readVal = map(sensorValue, sliderRangeLow, sliderRangeHigh, 0, 830);
 int cmax = 180;
 int dmax = cmax+100;
 int emax = dmax+100;
 int fmax = emax+100;
 int gmax = fmax+100;
 int amax = gmax+100;
 int bmax = 780;
 if (sensorValue < cmax) {
 return 'c';
 }
 if (sensorValue < dmax) {
 return 'd';
 }
 if (sensorValue < emax) {
 return 'e';
 }
 if (sensorValue < fmax) {
 return 'f';
 }
 if (sensorValue < gmax) {
 return 'g';
 }
 if (sensorValue < amax) {
 return 'a';
 }
 if (sensorValue < bmax) {
 return 'b';
 }
 return 'C';
}
// method from Arduino tutorial
void playTone(int tone, int duration) {
 for (long i = 0; i < duration * 1000L; i += tone * 2) {
 digitalWrite(speakerPin, HIGH);
 delayMicroseconds(tone);
 digitalWrite(speakerPin, LOW);
 delayMicroseconds(tone);
 }
}
// method from Arduino tutorial
void playNote(char note, int duration) {
 char names[] = { 'c', 'd', 'e', 'f', 'g', 'a', 'b', 'C' };
 int tones[] = { 1915, 1700, 1519, 1432, 1275, 1136, 1014, 956 };
// play the tone corresponding to the note name
 for (int i = 0; i < 8; i++) {
 if (names[i] == note) {
 playTone(tones[i], duration);
 }
 }
}