Team TFCS: Dale Markowitz, Collin Stedman, Raymond Zhong, Farhan Abrol
Mission Statement
In the last few years, microcontrollers finally became small, cheap, and power-efficient enough to show up everywhere in our daily lives — but while many special-purpose devices use microcontrollers, there are few general-purpose applications. Having general-purpose microcontrollers in things around us would be a big step towards making ubiquity of computing and would vastly improve our ability to monitor, track, and respond to changes in our environments. To make this happen, we are creating a way for anyone to attach Bluetooth-enabled sensors to arbitrary objects around them, which track when and for how long objects are used. Sensors will connect to a phone, where logged data will be used to provide analytics and reminders for users. This will help individuals maintain habits and schedules, and allow objects to provide immediate or delayed feedback when they are used or left alone.
Because our sensors will be simple, a significant part of the project will be creating an intuitive interface for users to manage the behavior of objects, e.g. how often to remind the user when they have been left unused. To do this, Dale and Raymond designed the user interface of the application, including the interaction flow and screens, and described the actual interactions in the writeup. Collin and Farhan designed, built, and documented a set of prototype sensor integrations and use cases, based on the parts that we ordered.
Document Prototype
We made a relatively detailed paper prototype of our iOS app in order to hash out what components need to go in the user interface (and not necessarily how they will be sized, or arranged, which will change) as well as what specific interactions could be used in the UI. We envision that many iOS apps could use this sensor platform provided that it was opened up; this one will be called Taskly.
Below, we have a created a flowchart of how our app is meant to be used. (Right-click and open it in a new tab to zoom.)

Here we have documented the use of each screen:
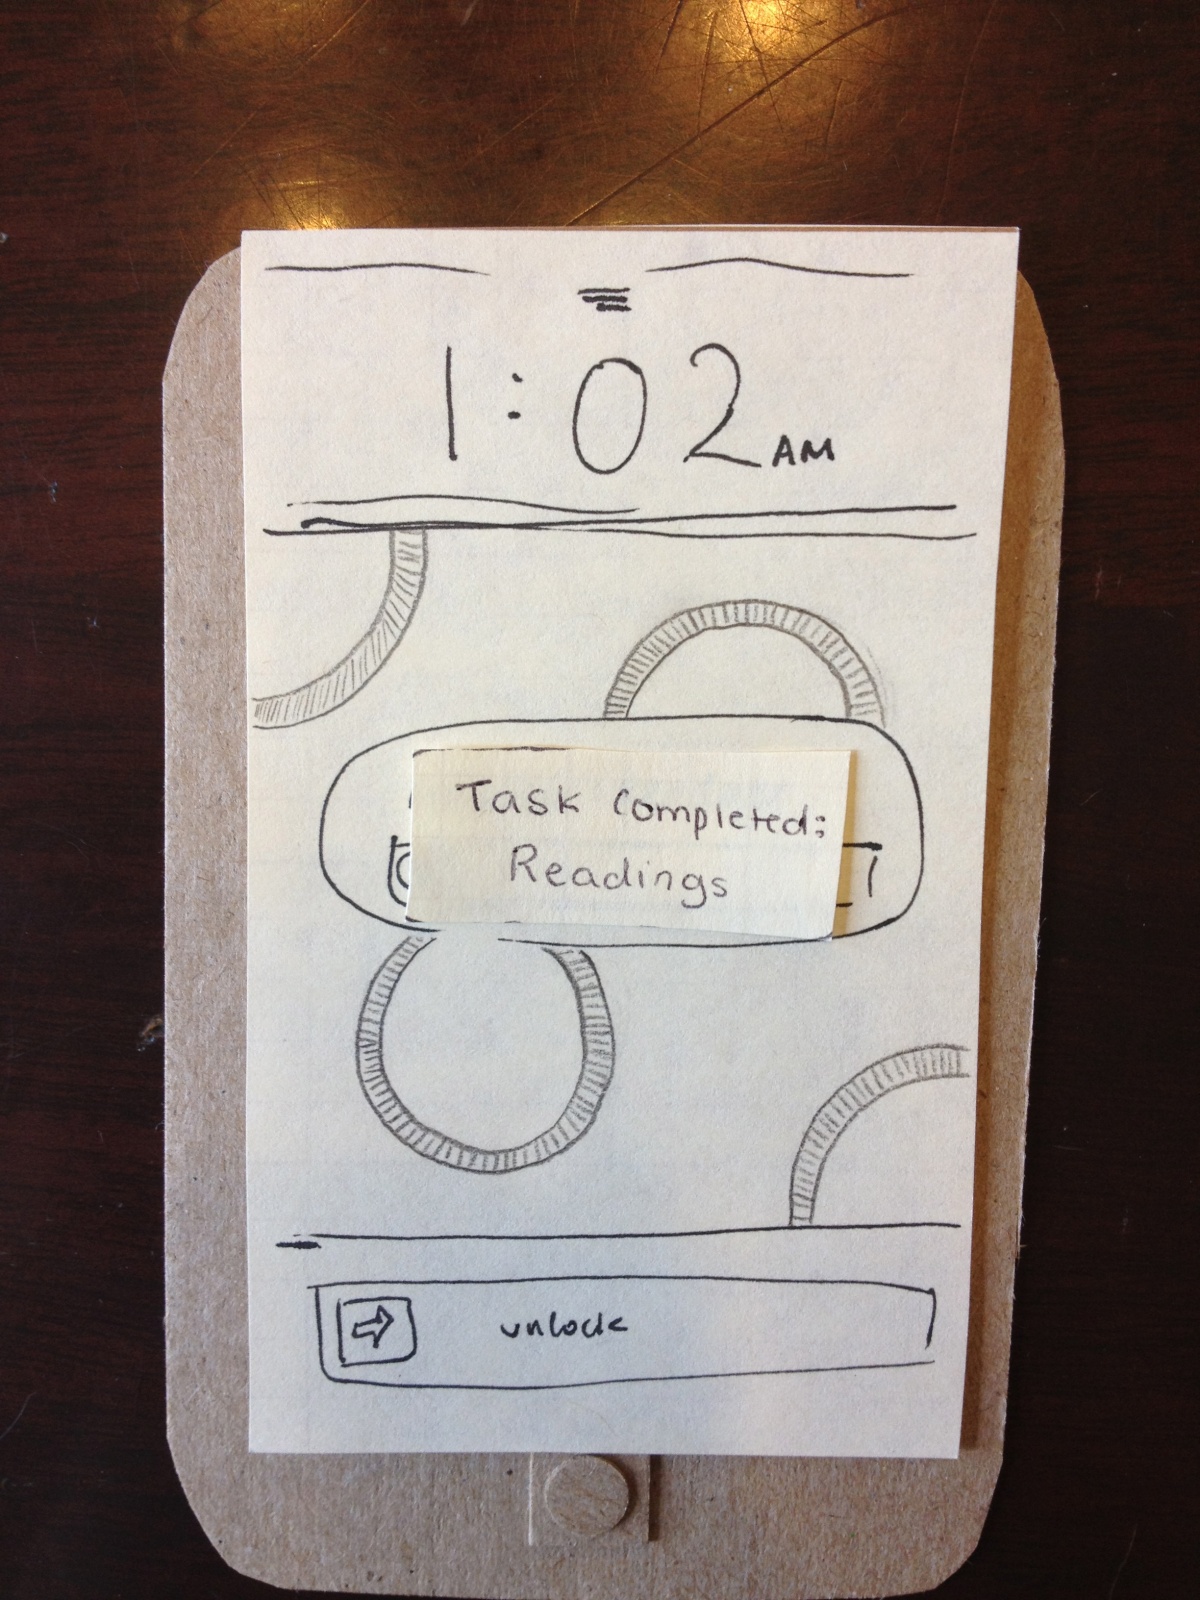
When a user completes a task, it is automatically detected by our sensor tags and pushes the user an iPhone notification–task completed!
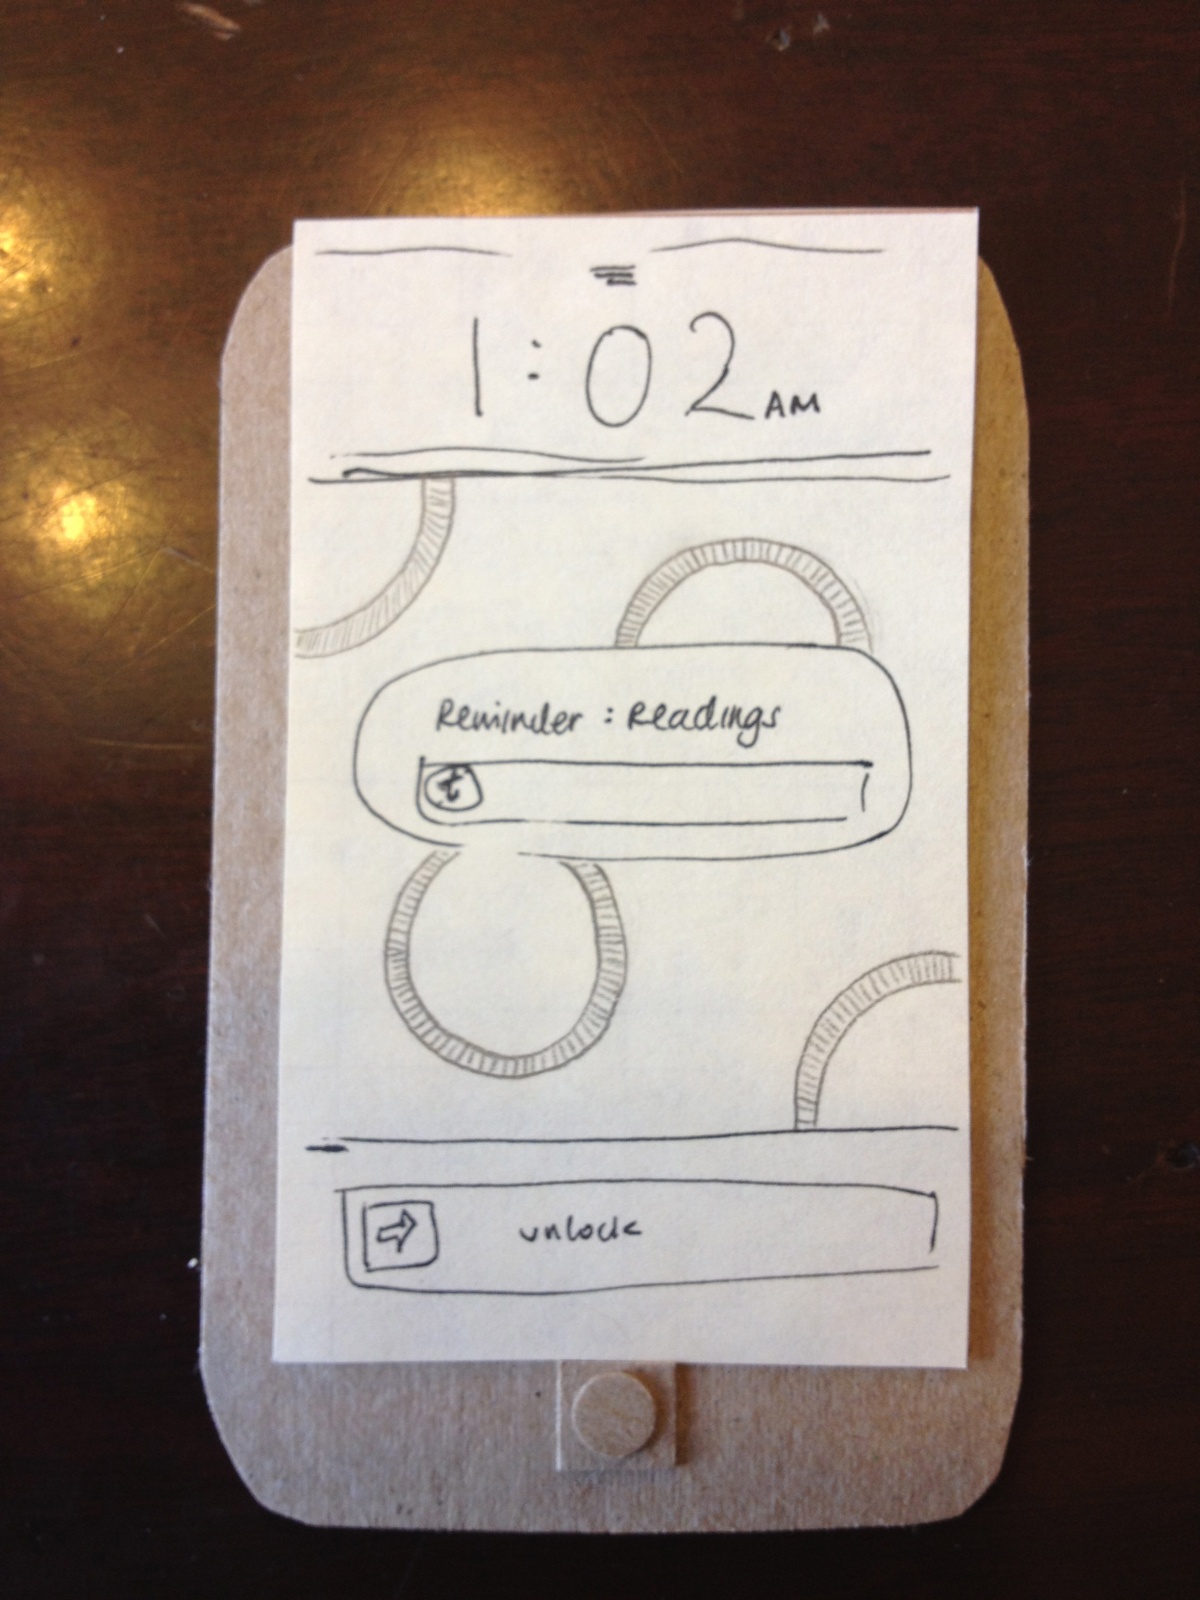
User gets a reminder–time to do reading!
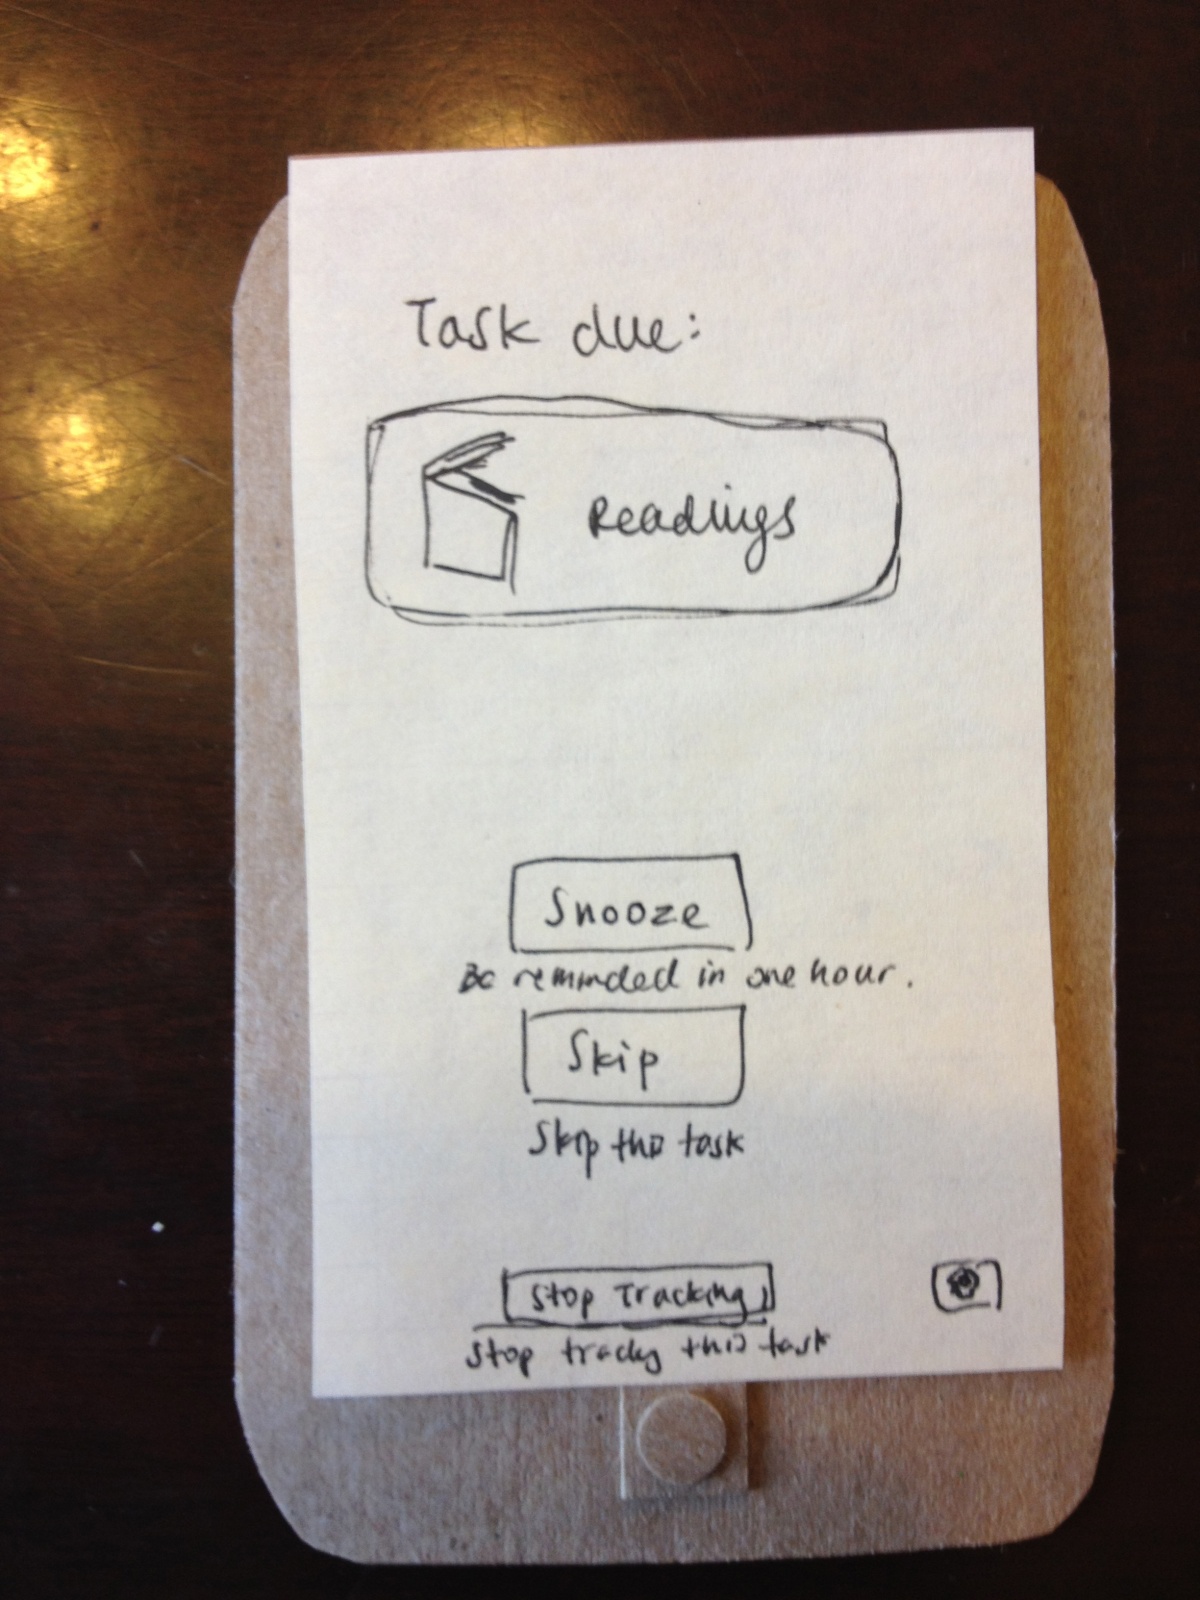
More information about the scheduled task–user can snooze task, skip task, or stop tracking.
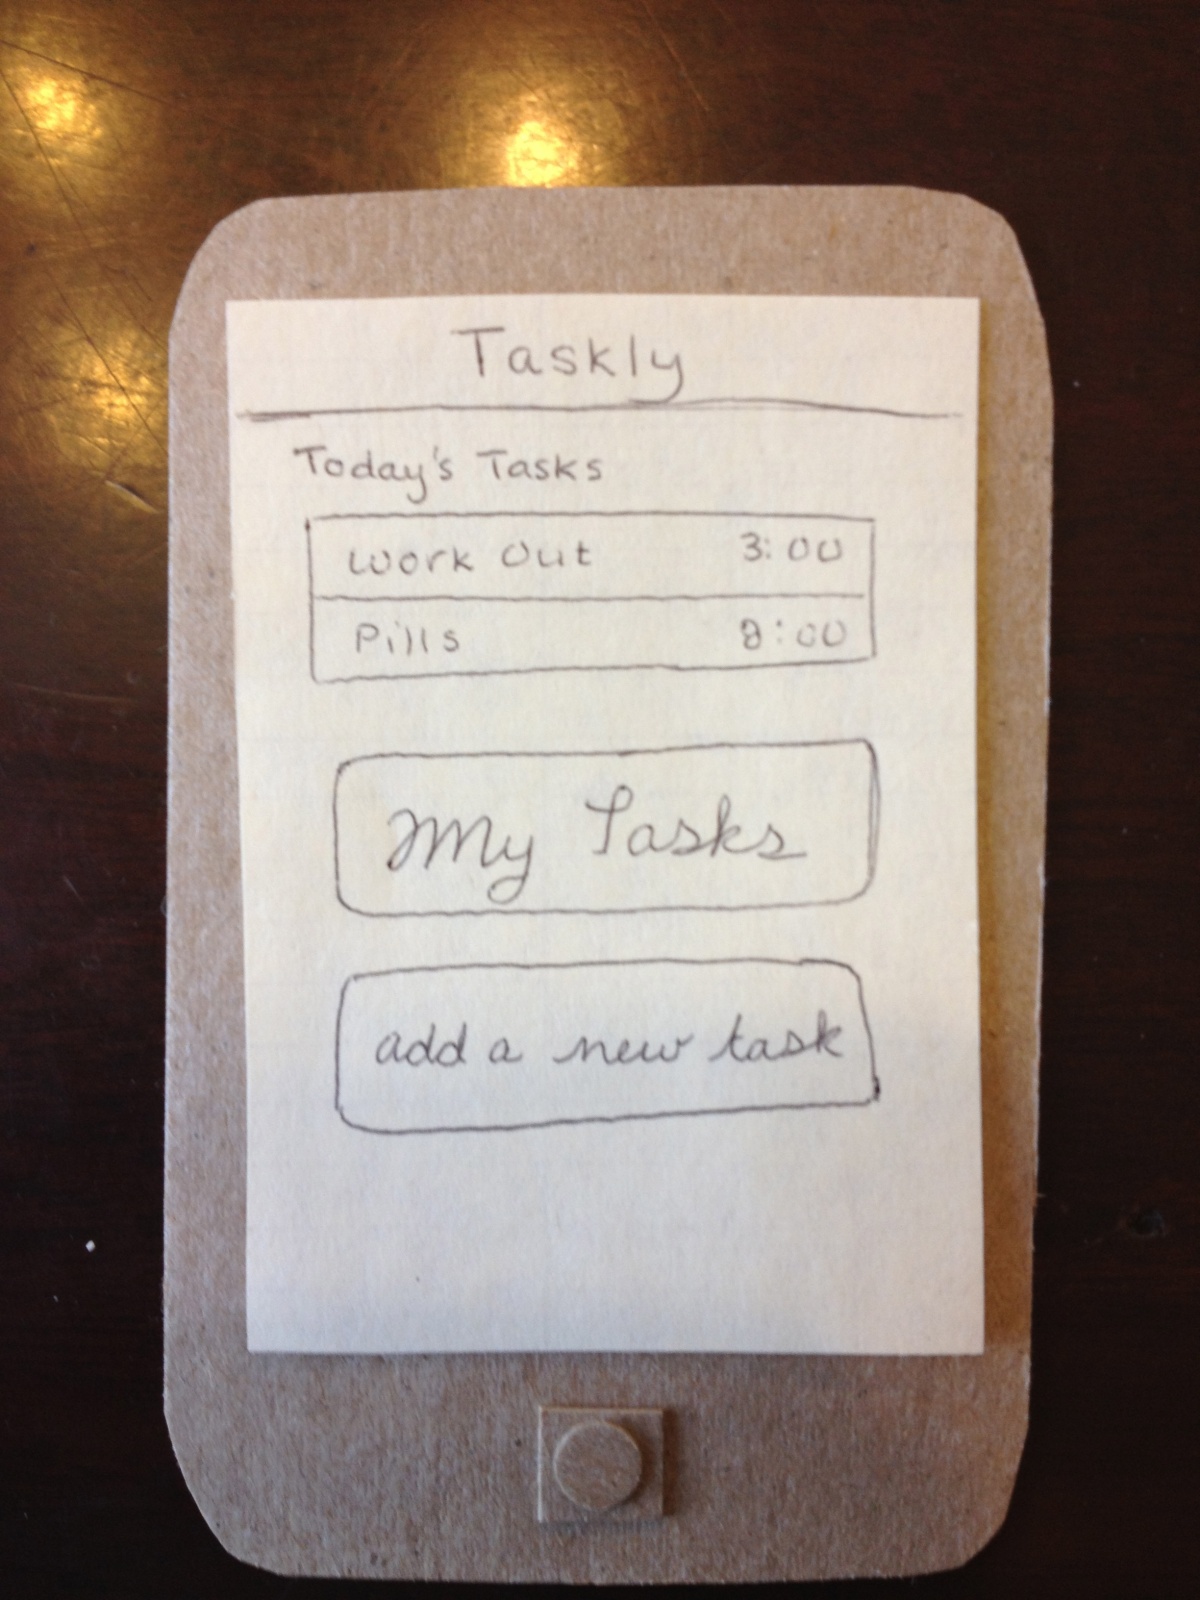
Taskly start screen–user can see today’s tasks, all tracked tasks, or add a new task
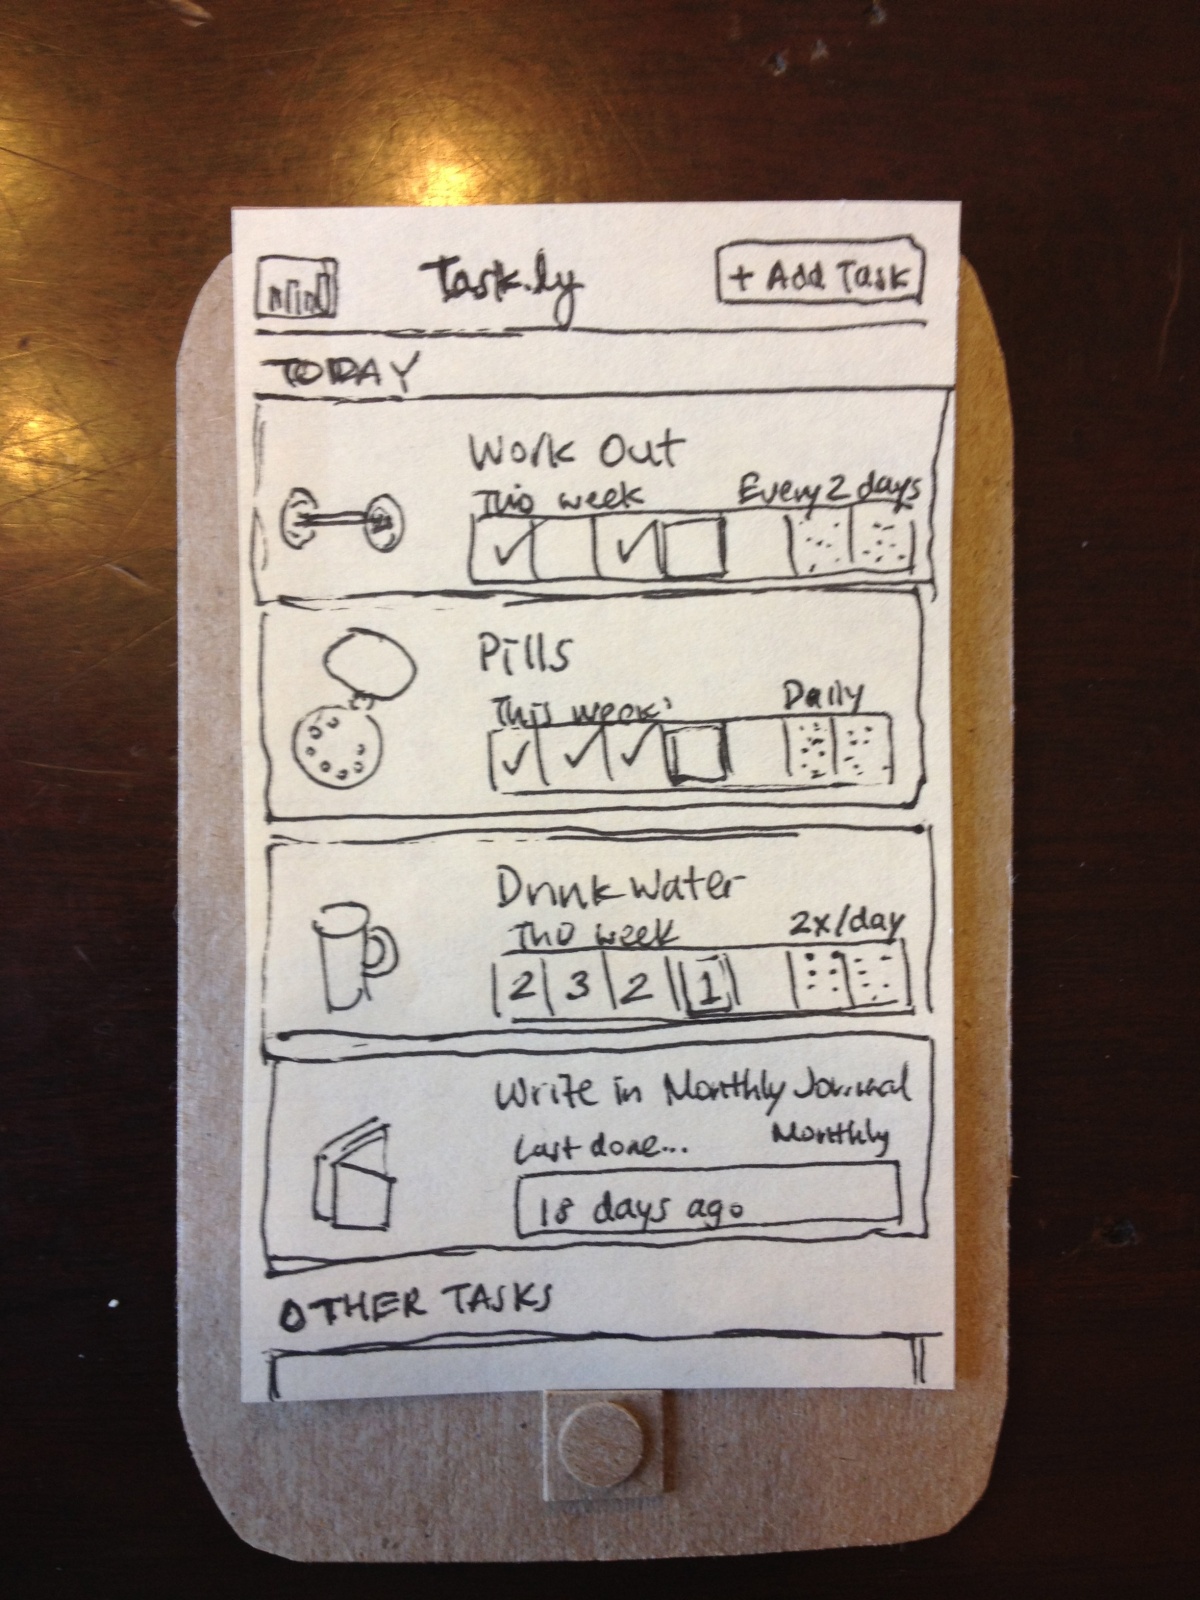
When user clicks on “MyTasks”, this screen appears, showing weekly progress, next scheduled task, and frequency of task.
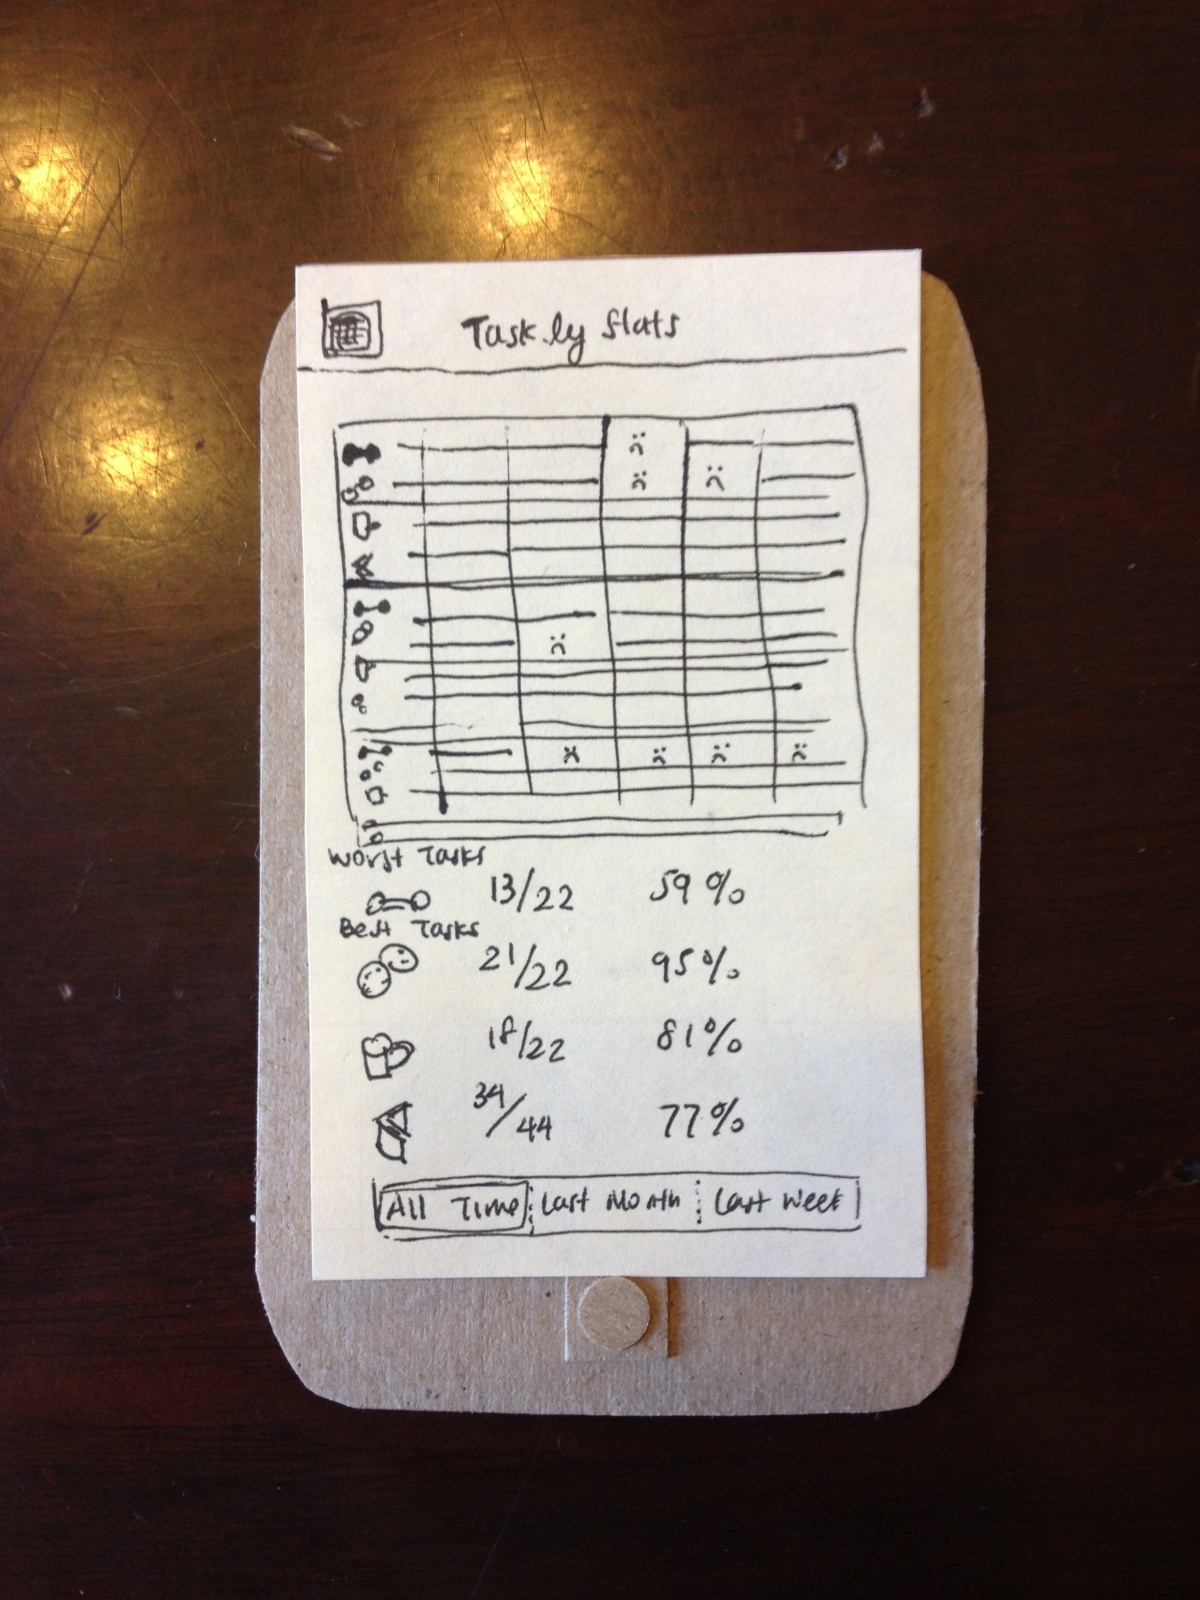
When user clicks on the stats icon from the My Tasks screen, they see this screen, which displays progress on all tasks. It also shows percent of assigned tasks completed.
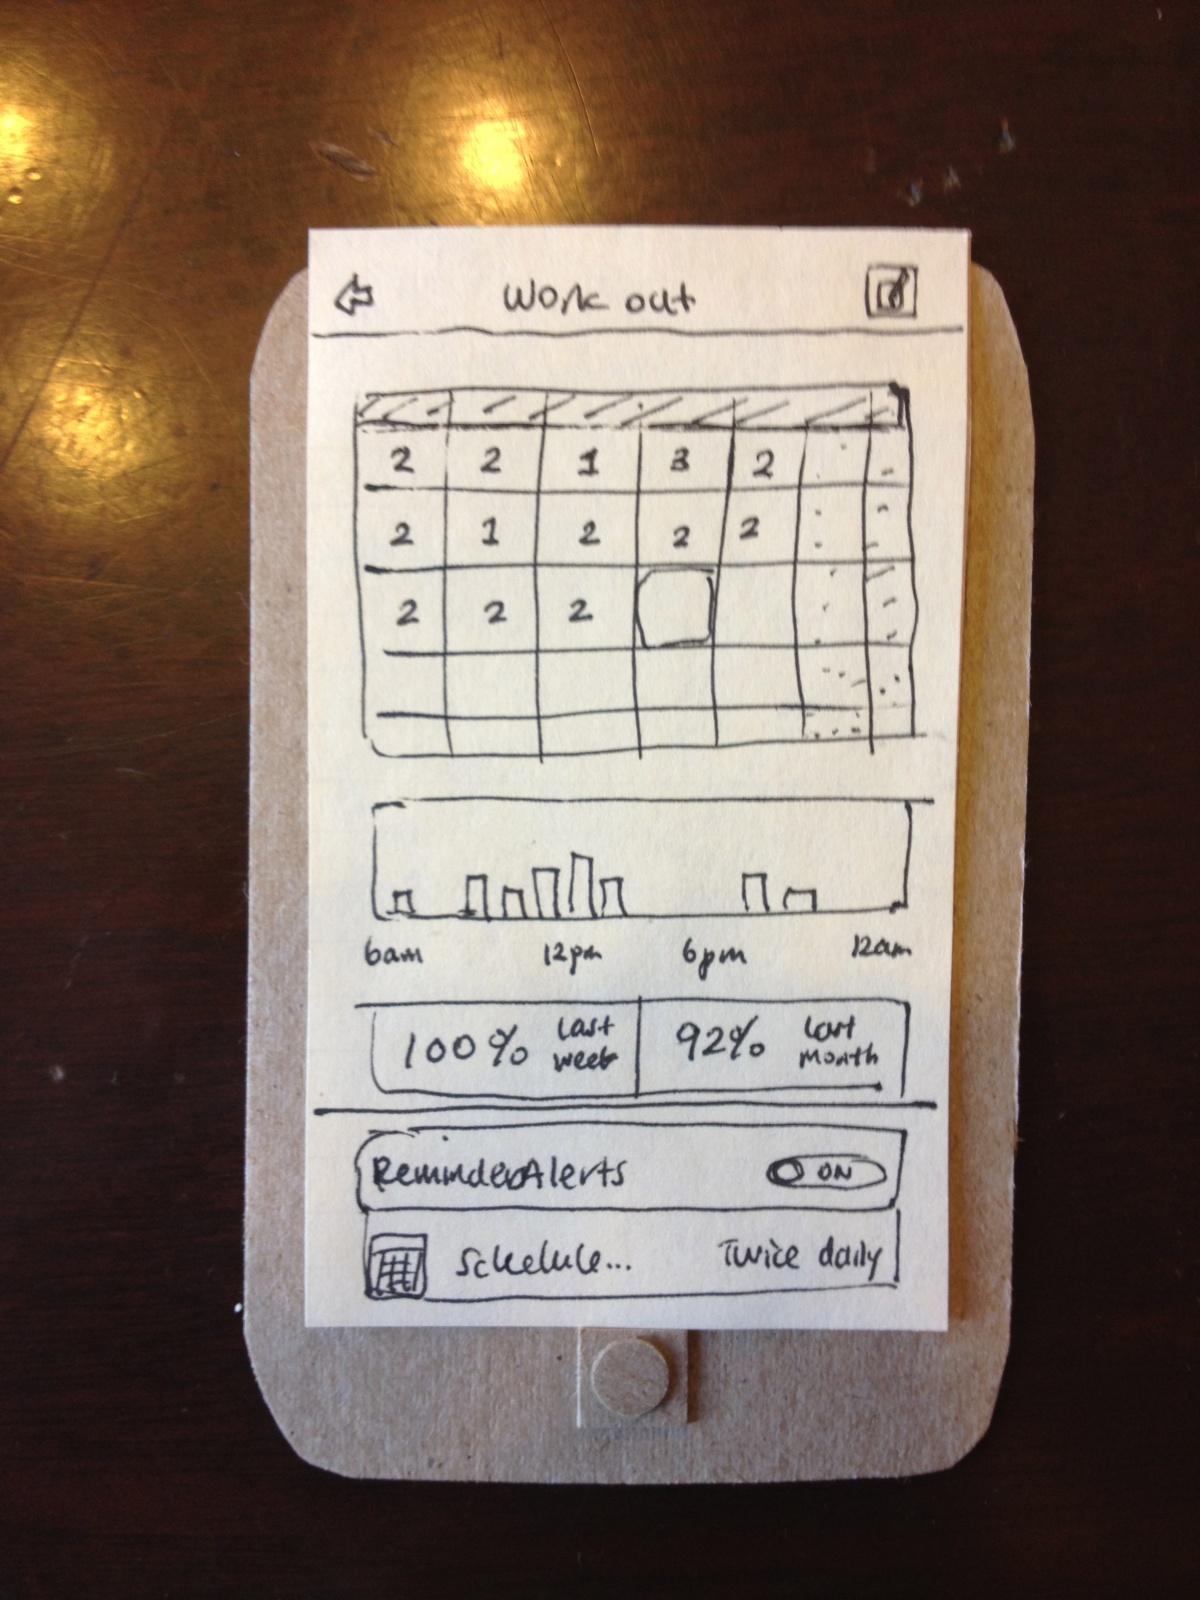
User can also see information about individual scheduled tasks, like previously assigned tasks (and if they were completed), a bar chart of progress, percent success at completing tasks, reminder/alert schedules, etc. User can also edit task.
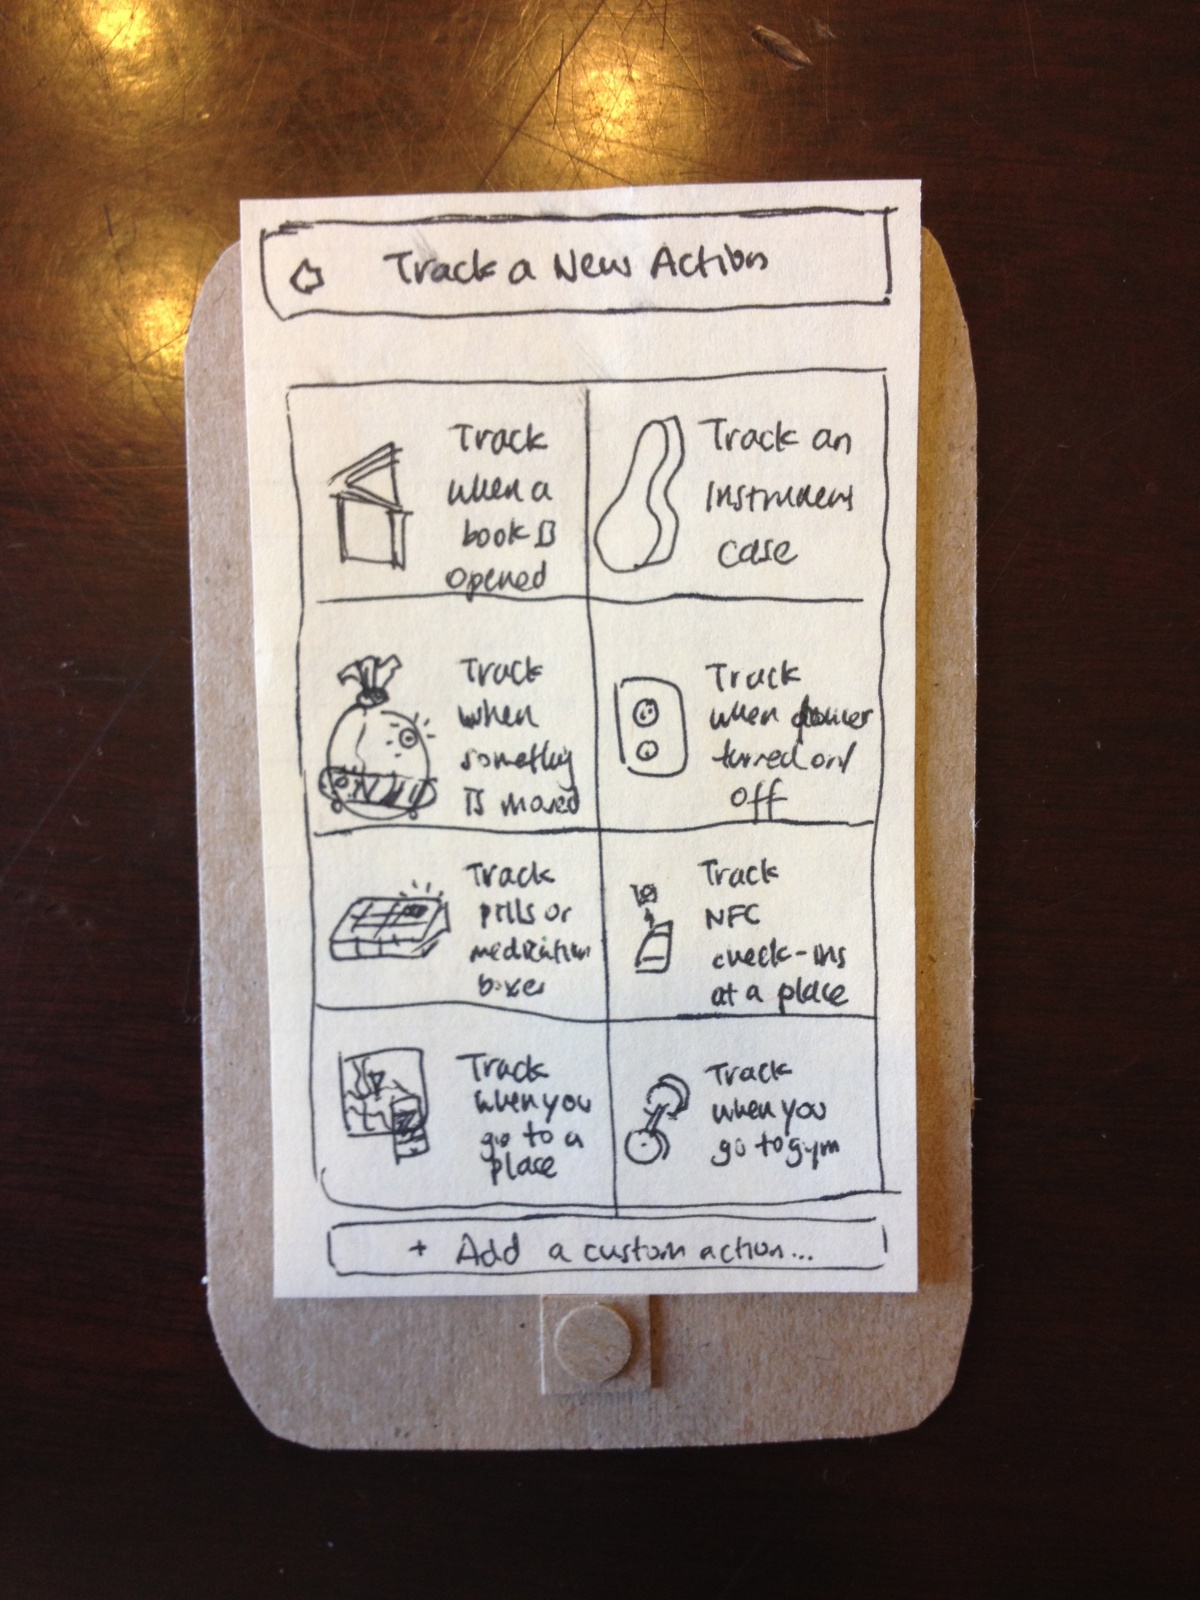
When user clicks, “Track a New Action”, they are brought to this screen, offering preset tasks (track practicing an instrument, track reading a book, track going to the gym, etc), as well as “Add a custom action”
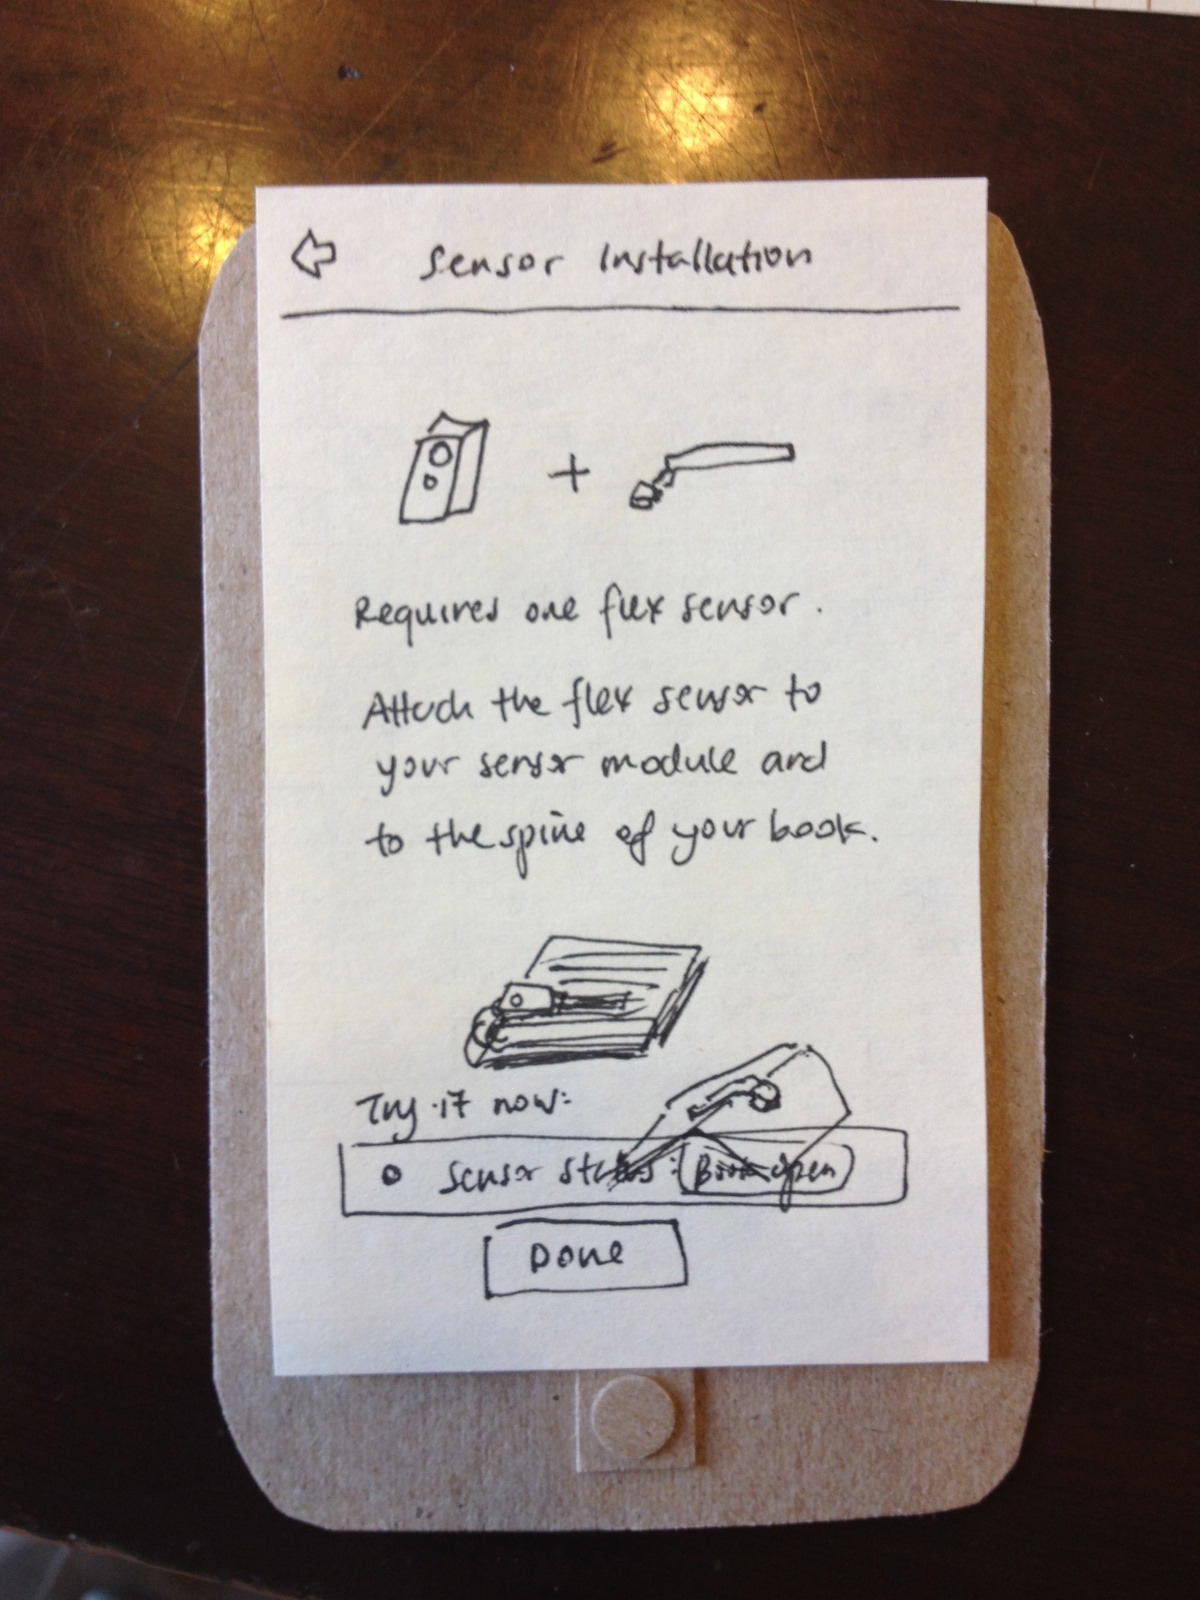
User has selected “Track reading a book”. Sensor installation information is displayed.

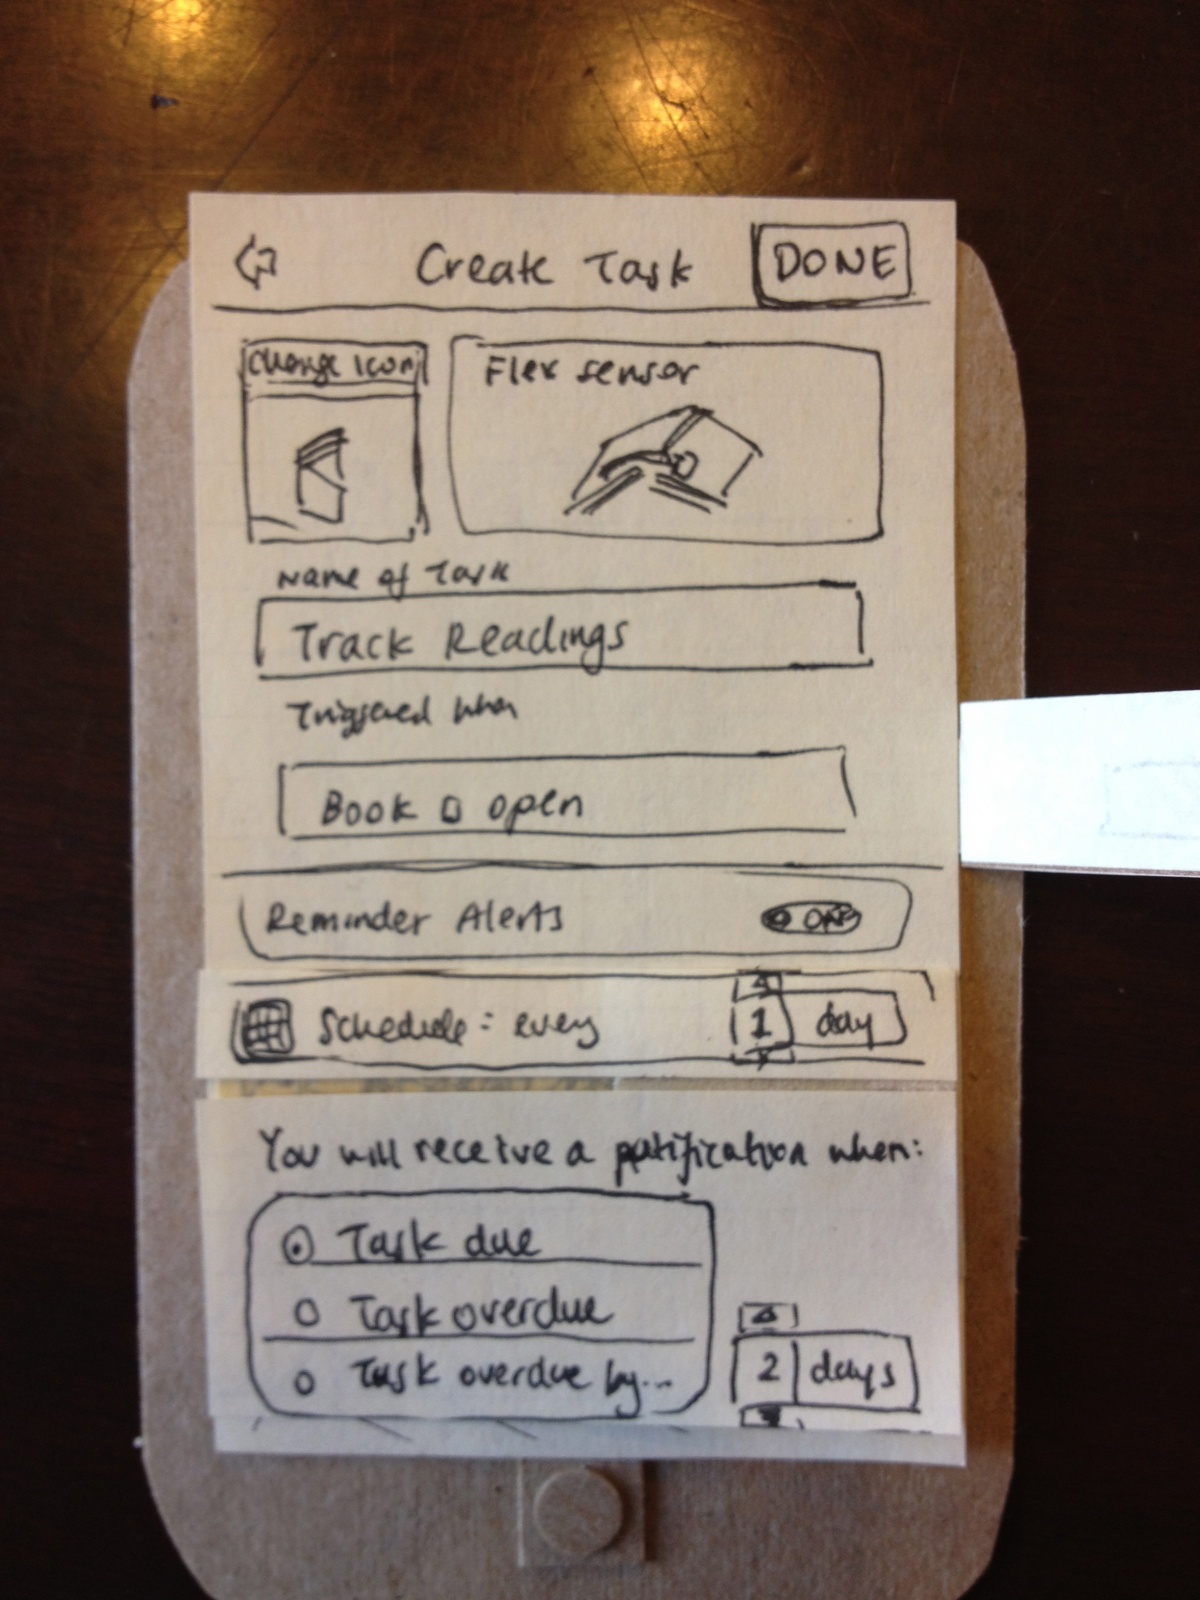
User can name a task here, upload a task icon, set reminders, change sensor notification options (i.e. log when book is opened) etc.
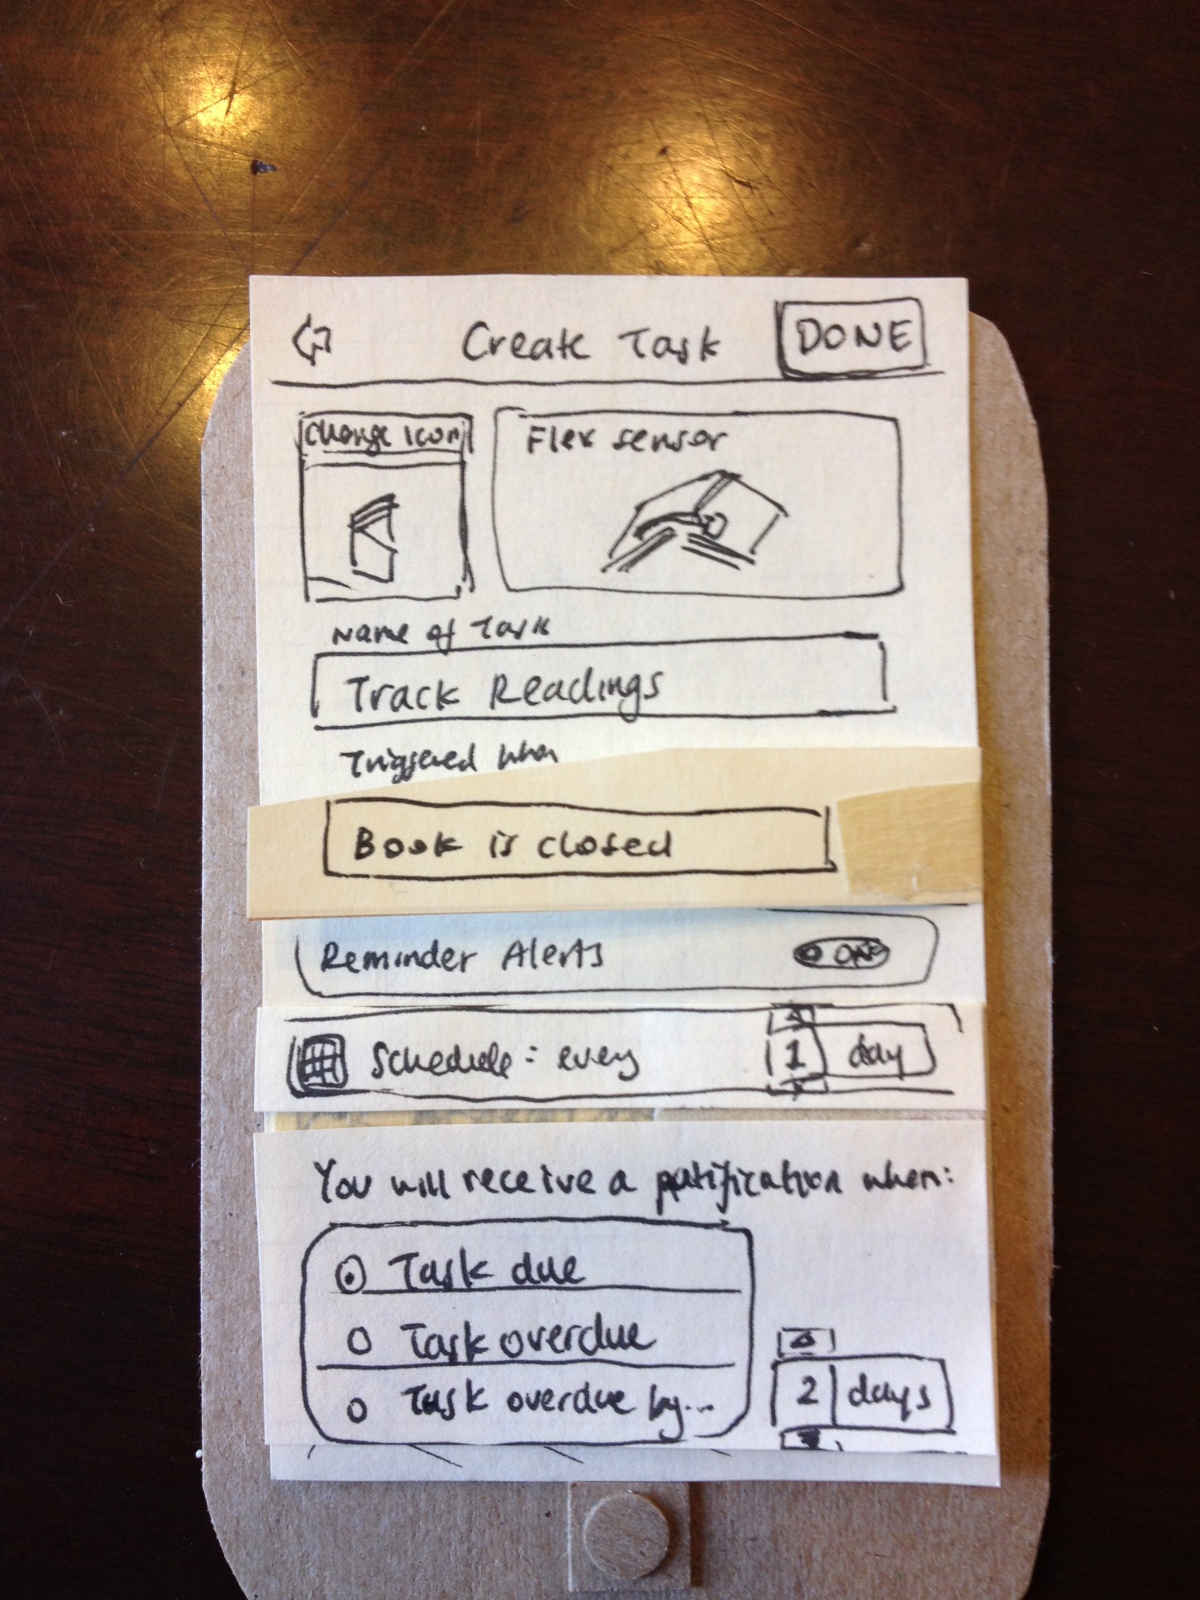
Here, user changes to log task when book is closed rather than opened.
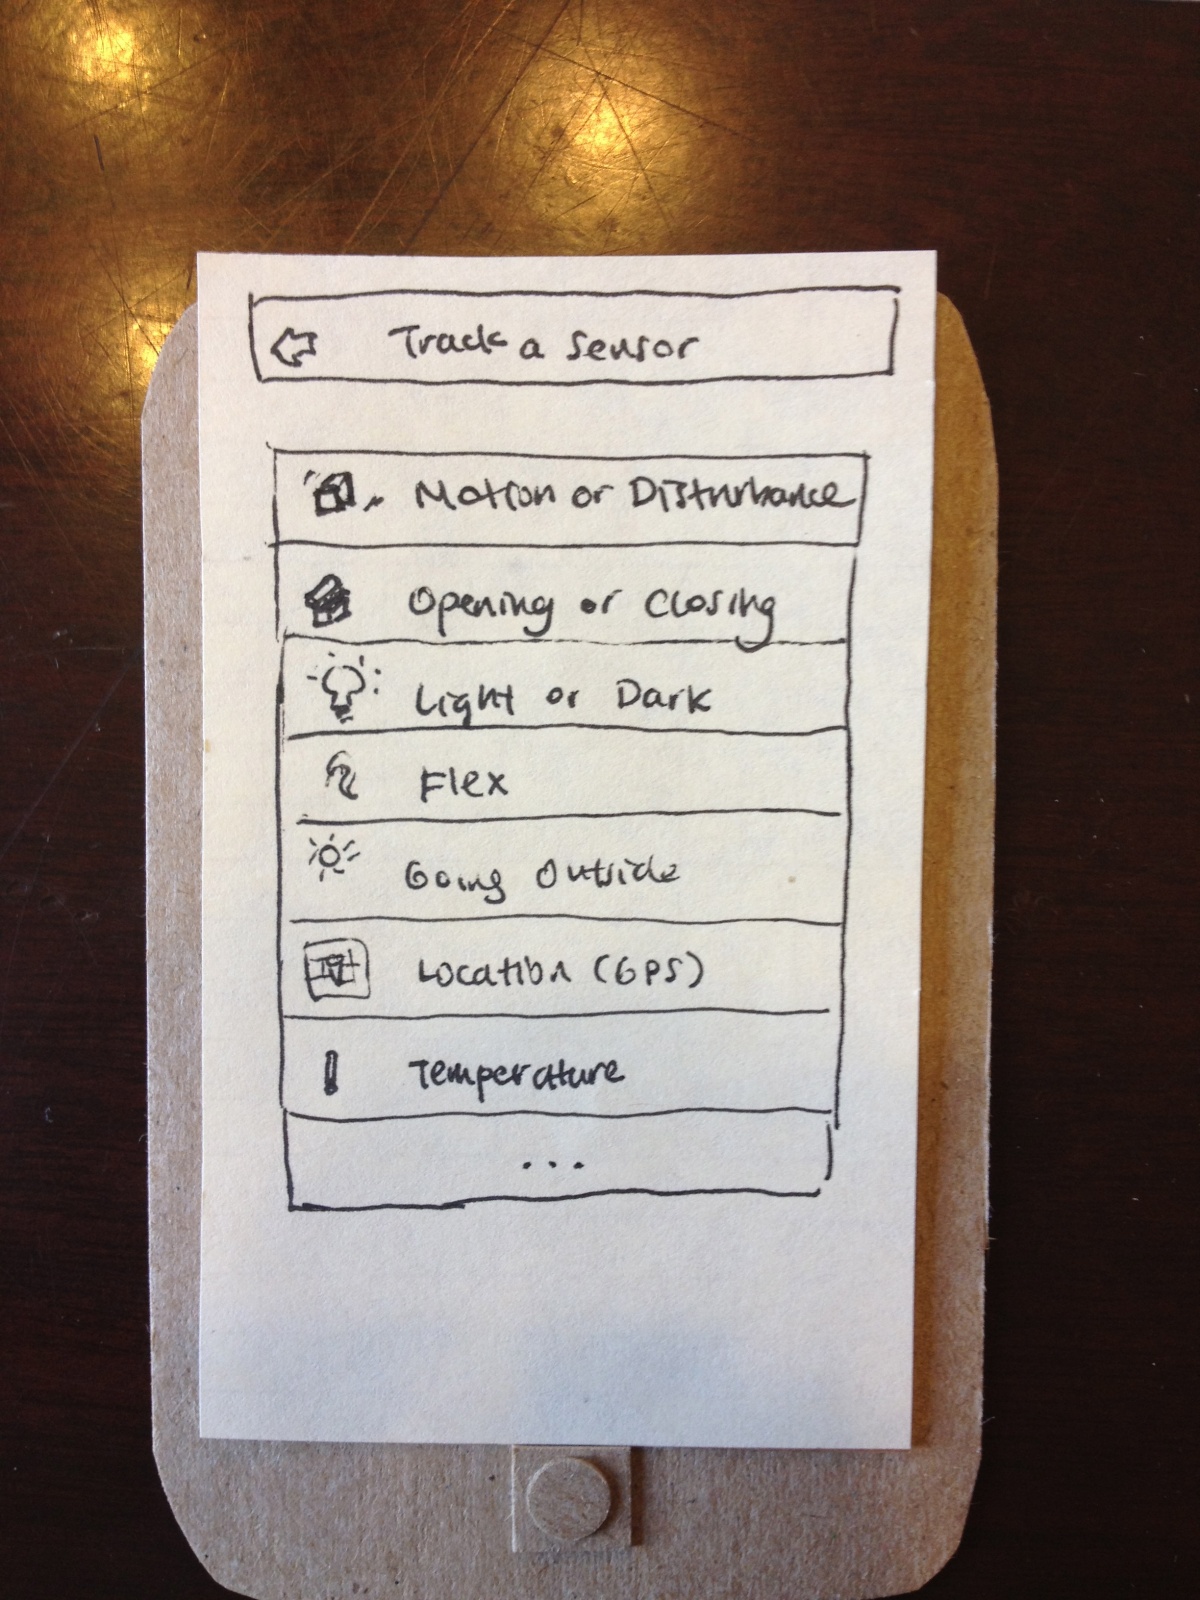
When a user decides to create a custom task, they are brought to the “Track a Sensor” screen, which gives simple options like “track light or dark”, “track by location”, “track by motion”, etc.
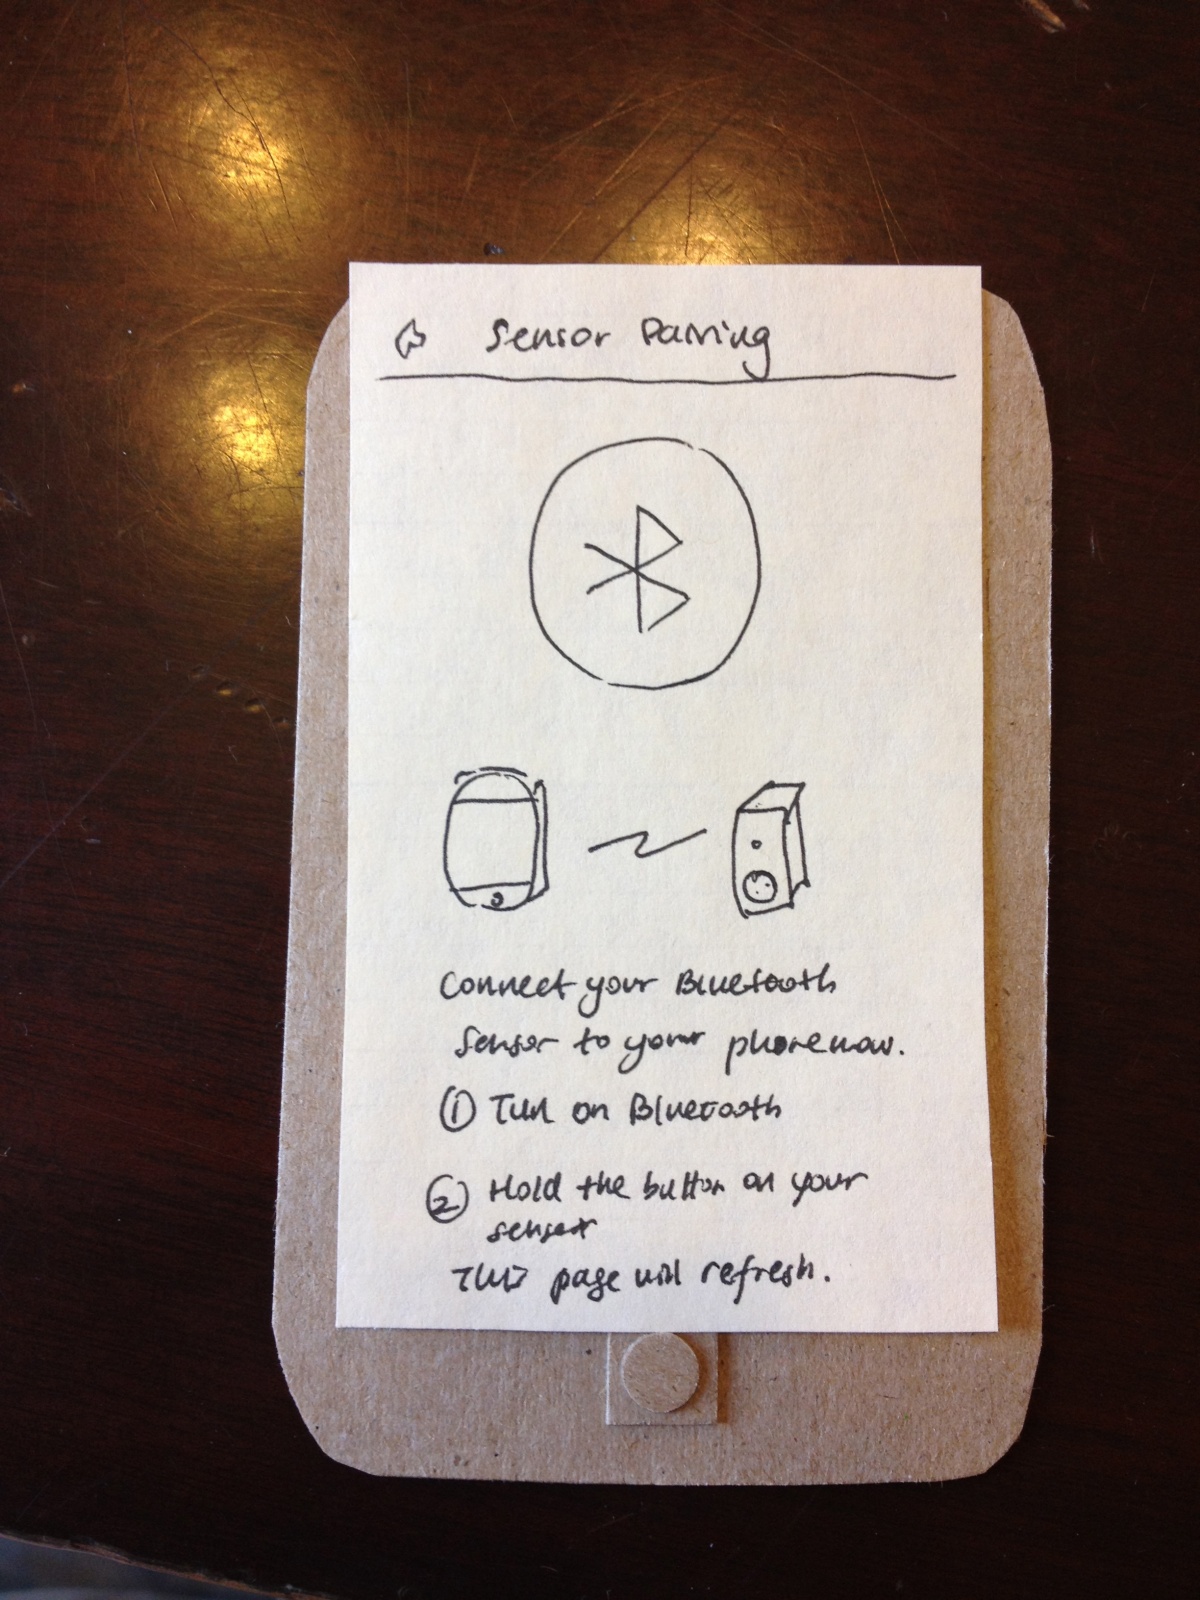
Bluetooth sensor setup information
Document Tasks
Easy: Our easy task was tracking how often users go to the gym. Users put a sensor tag in their gym bags, and then our app logs whenever the gym bag moves, causing the sensor tag’s accelerometer to note a period of nonmovement followed by movement. We simulated this with our fake tags made out of LED timer displays (about the same size, shape of our real sensors). We attached the tags to the inside of a bag.
Our app will communicate with the tag via Bluetooth and log whenever the tag’s accelerometer experiences a period of nonmovement followed by movement (we’ve picked up the bag!), nommovement (put the bag down at the gym), movement (leaving the gym), and nonmovement (bag is back at home). It will use predefined thresholds (a gym visit is not likely to exceed two hours, etc.) to determine when the user is actually visiting the gym, with the visit starting when the bag remains in motion for awhile. To provide reminders, the user will configure our app with the number of days in a week they would like to complete this task, and our app will send them reminders via push notification if they are not on schedule, e.g. if they miss a day, at a time of day that they specify.
Accelerometer Sensor for Gym Bags

Sensor is placed in a secure location in a gym bag, Its accelerometer detects when the bag is moved.
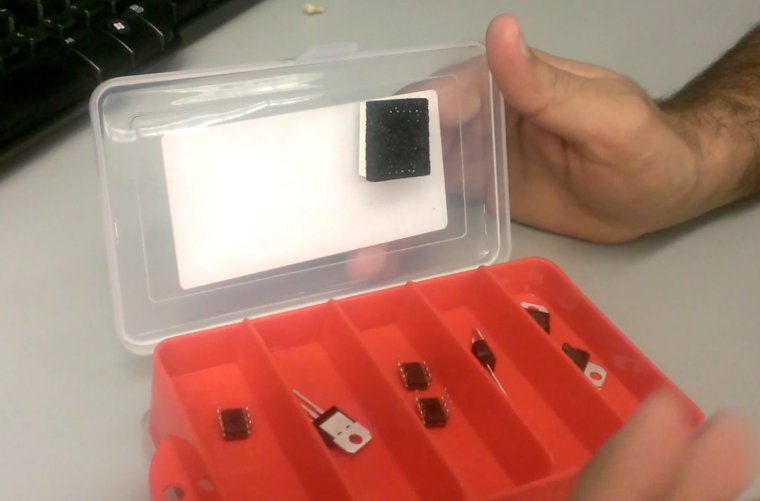
Medium: Our medium difficulty task was to log when users take pills. We assume that the user’s pillbox is typically shaped, i.e. a box with a flip-out lid and different compartments for pills (often labeled M, T, W, etc.). This was exactly the same shape as our Sparkfun lab kit, so we used it and had integrated circuits represent the pills. We attached one of our fake tags (LED timer display) to the inside of the box lid.
Our app connects to the tag via bluetooth and detects every time the lid is opened, corresponding to a distinct change of about 2 g’s in the accelerometer data from our tags. To provide reminders, the user sets a schedule of times in the week when they should be using medication. If they are late by a set amount of time, or if they open the pillbox at a different time, we will send them a push or email notification.
Magnetometer Sensor for Pill Containers
This “pillbox” is structurally very similar to the pillbox we imagine users using our product with (we even have IC pills!). A sensor is placed on the inside cover, and its accelerometer detects when the lid has been lifted.
Hard: Our hard task was to track how frequently, and for how long, users read tagged books. Users will put a sensor on the spine of the book they wish to track. They will then put a thin piece of metal on the inside of the back cover of the book. Using a magnetometer, the sensor will track the orientation of the back cover in reference to the book’s spine. In other words, it will detect when the book is opened. Our iPhone app will connect to the sensor via bluetooth and record which books are read and for how long. It is important to note that this system is most viable for textbooks or other large books because of the size of the sensor which must attach to the book’s spine. Smaller books can also be tracked if the sensor is attached to the front cover, but our group decided that such sensor placement would be too distracting and obtrusive to be desirable.
This is the most difficult hardware integration, since sensors and magnets must fit neatly in the book. (It might be possible for our group to add a flex sensor to the microcontroller which underlies the sensors we purchased, thus removing the issue of clunky hardware integration in the case of small books. In that case, neatly attaching new sensors to the preexisting circuit would likely be one of the hardest technical challenges of this project.)
To track how often books are read, the user will set a threshold of time for how long the book can go unused. When that time is exceeded, our app will send them reminders by push notification or email. The interface to create this schedule must exist in parallel to interfaces for times-per-week or window-of-action schedules mentioned above.
User attaches sensor to spine of a book. The magnetometer of the sensor detects when the magnet, on the cover of the book, is brought near it.

Sensor on spine of book.
Our Prototypes
How did you make it?:
For our iPhone app, we made an extensive paper/cardboard prototype with 12 different screens and ‘interactive’ buttons. We drew all of the screens by hand, and occassionally had folding paper flaps that represented selecting different options. We cut out a paper iphone to represent the phone itself.
For our sensors, we used an LED seven-segment display, as this component was approximately the correct size/shape of the actual sensor tags we’ll be using. To represent our pillbox, we used a sparkfun box that had approximately the same shape as the actual pillboxes we envision using our tags with.
Did you come up with new prototyping techniques?:
Since our app will depend upon sensors which users embed in the world around them, we decided that it was important to have prototype sensors which were more substantial than pieces of paper. We took a seven-segment display from our lab kit and used that as our model sensor because of its small box shape. Paper sensors would give an incorrect sense of the weight and dimensions of our real sensors; it is important for users to get a sense for how obtrusive or unobtrusive the sensors really are.
What was difficult?
Designing our iPhone app GUI was more difficult than we had imagined. To “add a new task,” users have to choose a sensor and ‘program’ it to log their tasks. It was difficult for us to figure out how we could make this as simple as possible for users. We ultimately decided on creating preset tasks to track and what we consider to be an easy-to-use sensor setup workflow with lots of pictures of how the sensors worked. We also simplified the ways our sensors could work. For example, we made sensor data discrete. Instead of our accelerometers to track acceleration, we allow users to track movement or no movement.
What worked well?
Paper prototyping our iPhone app worked really well because it allowed us, the developers, to really think through what screens users need to see to most easily interact with our app. It forced us to figure out how to simplify what could have been a complicated app user interface. Simplicity is particularly important in our case, as the screen of an iPhone is too small to handle unnecessarily feature-heavy GUIs.
Using a large electronic component to represent our sensors also worked well because it gave us a good sense of the kinds of concerns users would have when embedding sensors in the objects and devices around them. We started to think about ways in which to handle the relatively large size and weight of our sensors.