
Team CAKE (#13) – Connie (demos and writing), Angela (filming and writing), Kiran (demos and writing), Edward (writing and editing)
Mission Statement
People who deal with 3D data have always had the fundamental problem that they are not able to interact with the object of their work/study in its natural environment: 3D. It is always viewed and manipulated on a 2D screen with a 2 degree-of-freedom mouse, which forces the user to do things in very unintuitive ways. We hope to change this by integrating a 3D display space with a colocated gestural space in which a user can edit 3D data as if it is situated in the real world.
With our prototype, we hope to solidify the gesture set to be used in our product by examining the intuitiveness and convenience of the gestures we have selected. We also want to see how efficient our interface and its fundamental operations are for performing the tasks that we selected, especially relative to how well current modelling software works.
We aim to make 3D modelling more intuitive by bringing virtual objects into the real world, allowing natural 3D interaction with models using gestures.
Prototype
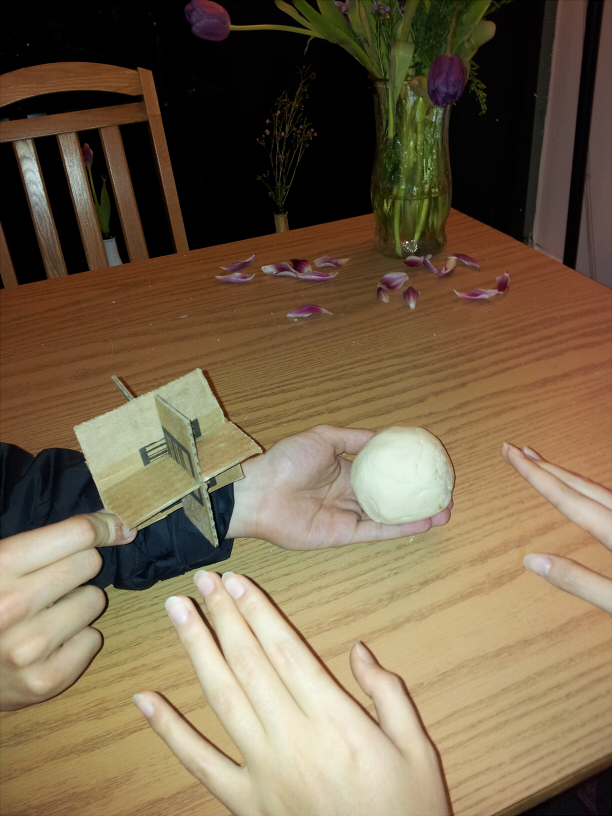
Our prototype consists of a ball of homemade play dough to represent our 3D model, and a cardboard 3D coordinate-axis indicator to designate the origin of the scene’s coordinate system. We use a wizard of oz approach to the interface, where an assistant performs gesture recognition and modifies the positions, orientations, and shapes of the “displayed” object. Most of the work in this prototype is the design and analysis of the gesture choices.
Discussion
Because of the nature of our interface, our prototype is very unconventional. It requires two major parts: a comprehensive gesture set, and a way to illustrate the effects of each gesture on a 3d object or model (neither of which is covered by the standard paper prototyping methods). For the former, we considered intuitive two-handed and one-handed gestures, and open-hand, fist, and pointing gestures. For the latter, we made homemade play dough. We spent a significant time discussing and designing gestures, less time mixing ingredients for play dough, and a lot of time playing with it (including coloring it with Sriracha and soy sauce for the 3D painting task). In general, the planning was the most difficult and nuanced, but the rest of building the system was easy and fun.
Gesture Set
We spent a considerable amount of time designing well-defined (for implementation) and intuitive (for use) gestures. In general, perspective manipulation gestures are done with fists, object manipulation gestures are done with a pointing finger, and 3D painting is done in a separate mode, also with a pointing finger. The gestures are the following (with videos below):
- Neutral – 2 open hands: object/model is not affected by user motions
- Camera Rotation – 2 fists: tracks angle of the axis between the hands, rotates about the center of the object
- Camera Translation – 1 fist: tracks position of hand and moves camera accordingly (Zoom = translate toward user)
- Object Primitives Creation – press key for object (e.g. “C” = cube): creates the associated mesh in the center of the view
- Object Rotation – 2 pointing + change of angle: analogous to camera rotation
- Object Translation – 2 pointing + change of location: analogous to camera translation when fingers stay the same distance apart
- Object Scaling – 2 pointing + change of distance: track the distance between fingers and scale accordingly
- Object Vertex Translation – 1 pointing: tracks location of tip of finger and moves closest vertex accordingly
- Mesh Subdivision – “S” key: uses a standard subdivision method on the mesh
- 3D Painting – “P” key (mode change) + 1 pointing hand: color a face whenever fingertip intersects (change color by pressing keys)
Display
Our play dough recipe is simply salt, flour, and water in about a 1:4:2 ratio (it eventually hardens, but is sufficient for our purposes). We use a cardboard cutout to represent the x, y, and z axes of the scene (to make camera movements distinct from object manipulation). Lastly, for the sake of 3D painting, we added Sriracha and soy sauce for color. We did not include a keyboard model for selecting modes, to avoid a mess – in general, a tap on the table with a spoken intent is sufficient to model this.
To represent our system, we have an operator manually moving the object/axes and adding to/removing from/stretching/etc. the play dough as the user makes gestures.
Neutral gesture:
[kaltura-widget uiconfid=”1727958″ entryid=”0_5cywalwv” width=”260″ height=”206″ addpermission=”-1″ editpermission=”-1″ /]
Perspective Manipulation (gestures 2 and 3):
[kaltura-widget uiconfid=”1727958″ entryid=”0_plcklhja” width=”260″ height=”206″ addpermission=”-1″ editpermission=”-1″ /] [kaltura-widget uiconfid=”1727958″ entryid=”0_zkjrl2oe” width=”260″ height=”206″ addpermission=”-1″ editpermission=”-1″ /]
Object Manipulation (gestures 4-8):
[kaltura-widget uiconfid=”1727958″ entryid=”0_ectbev0x” width=”260″ height=”206″ addpermission=”-1″ editpermission=”-1″ /] [kaltura-widget uiconfid=”1727958″ entryid=”0_3c4tjcus” width=”260″ height=”206″ addpermission=”-1″ editpermission=”-1″ /] [kaltura-widget uiconfid=”1727958″ entryid=”0_pas35w52″ width=”260″ height=”206″ addpermission=”-1″ editpermission=”-1″ /] [kaltura-widget uiconfid=”1727958″ entryid=”0_kq3doena” width=”260″ height=”206″ addpermission=”-1″ editpermission=”-1″ /] [kaltura-widget uiconfid=”1727958″ entryid=”0_uqb8zyft” width=”260″ height=”206″ addpermission=”-1″ editpermission=”-1″ /]
3D Painting (gesture 10):
[kaltura-widget uiconfid=”1727958″ entryid=”0_mzod6bp3″ width=”260″ height=”206″ addpermission=”-1″ editpermission=”-1″ /]
Not shown: gesture 9.
Task Descriptions
Perspective Manipulation
The fundamental operation people perform when interacting with 3D data is viewing it. To be able to understand a 3D scene, they have to be able to see all sides and parts of it. In our prototype, users can manipulate the camera location using a set of gestures that will always be available regardless of the editing mode. We allow the user to rotate and translate the camera around the scene using gestures 2 and 3, which use a closed fist; we also allow for smaller natural viewpoint adjustments by moving their head (to a limited degree).
Object Manipulation
For 3D modelling, artists and animators often want to create a model and define its precise shape. One simple way of object creation is starting with geometric primitives such as cubes, spheres, and cylinders (created using gesture 4) and reshaping them. The user can position the object by translating and rotating (gestures 5 and 6), or alter the mesh by scaling, translating vertices, or subdividing faces (gestures 7-9). These manipulations are a combination of single finger pointing gestures and keyboard button presses. Note that these gestures are only available in object manipulation mode.
3D Painting
When rendering 3D models, we need to define a color for every point on the displayed surface. 3D artists can accomplish this by setting the colors of vertices or faces, or by defining a texture mapping from an image to the surface. In our application, we have a 3D painting mode that allows users to define the appearance of surfaces. Users select a color or a texture using the keyboard or a tablet, and then “paint” the selected color/texture directly onto the model by using a single finger as a brush.