
Group 11: Don’t Worry About It
Krithin, Amy, Daniel, Thomas, Jonathan
1-Sentence Project Summary:
The NavBelt will help navigating around unfamiliar places safer and more convenient.
Supported Tasks in this Working Prototype
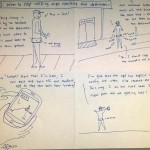
Task 1. Hard: Choose the destination and start the navigation system. It should be obvious to the user when the belt “knows” where they want to go and they can start walking.
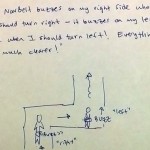
Task 2. Medium: Figure out when to turn. This information should be communicated accurately, unambiguously and in a timely fashion (within a second or two)
Task 3. Easy: Know when you’ve reached the destination and should stop walking.
Rationale for Changing Tasks
We replaced Task 3 (Reassure user is on the right path [without looking at the phone]). Our lo-fi testers trusted the belt but kept referring to the map to know their absolute position. This is unnecessary for our system but users like to know this and we do not want to force them to modify their habits for our system. The task is replaced with “know when you’ve reached the destination”, a more concrete task that will be completed often.
We’ve kept our second task unchanged, because it is clearly an integral part of finding your way around.
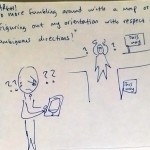
We thought Task 1 (choosing the destination) would be the easiest, but our user tests showed otherwise. All three test users were confused with the phone interface and how to choose a destination. Users had no idea if the phone accepted the destination or if the belt had started giving directions. As a result, Task 1 is now our hardest task.
Revisions to Interface Design
Originally, we intended to use 8 buzzers, spaced evenly around the user’s waist. After testing in P4, however, where we simulated having just three buzzers, we decided that implementing four buzzers would be enough for this prototype. Four buzzers are sufficient for signaling forward motion, right and left turns, and reverse motion (for when the user has gone too far forward); this is enough to cover the majority of our use cases, so we decided that adding the four additional buzzers for intermediate turns was not worth the additional complexity it would bring to the prototype at this stage.
A second change we decided to make was to have the phone interface have an explicit switch to turn the belt navigation system on and off, in the form of a toggle button constantly displayed on the same screen as the route map. By default, the belt will start buzzing – and this switch on the display will indicate that fact – as soon as the user selects a destination and the route to it is computed. This at once overcomes an explicit problem that users told us about during P4 testing, where they were not sure whether the belt navigation system was supposed to have started buzzing, and an implicit problem where users might occasionally want to temporarily turn the buzzing off even while en route to a destination.
Updated Storyboards for 3 Tasks
-

- Task 1
-

- Task 2: part 1 of 5
-
- Task 2: part 2 of 5
-

- Task 2: part 3 of 5
-
- Task 2: part 4 of 5
-

- Task 2: part 5 of 5
-
- Task 3
Sketches for Still-Unimplemented Portions of the System, and Changes to Design
There are two key elements that are as yet unimplemented. The first of these is the map interface on the phone. We envision having an interface on the phone where the user will select a destination, observe the computed route to that destination, and if necessary toggle the vibration on the navbelt. We chose not to implement that yet at this stage, mostly because writing a phone UI is something more familiar to us as a team of CS majors than working with hardware, so we wanted to get the harder problem of the phone-Arduino-buzzer signaling out of the way first. We do however have a detailed mockup of how this UI will look; see the pictures of this UI in the following gallery:
-
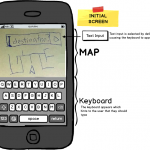
- 1) Initial Screen
-
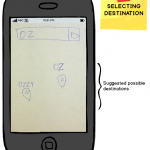
- 2) Selecting Destination
-
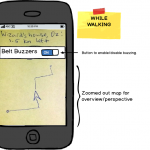
- 3) While Walking
Another key functional element not yet implemented is the correction for user orientation. We envision that this would be done using an electronic compass module for the Arduino, with the Arduino computing the difference between the absolute heading it receives from the phone and the direction the user is facing (from the compass reading) to determine the direction the user needs to move in and the appropriate buzzer to activate. An alternative way of implementing this would be to have the phone itself compute the direction the user needs to move in based on its internal compass and send the appropriate signal to the Arduino. We chose not to implement this at this stage because we have these two possible ways of implementing this functionality, and the latter of them, though possibly less accurate, should be relatively easy for us to do.
Overview and Discussion For New Prototype
We have thus far implemented a belt with four buzzers along it, each of which is connected to an output pin on an Arduino controller. These four buzzers all share a common ground, which is sewn to the inside of the belt in a zig-zag shape in order to allow it to expand when the belt stretches. This elasticity allows the belt to accommodate different waist sizes without repositioning the buzzers, as well as holding the buzzers tightly against the user’s body so that they can be felt easily.
As mentioned above, we decided to drop the number of buzzers from eight to four, as it reduces complexity. For the most part this does not affect the users, as receiving directions from four buzzers is practically as easy as receiving directions from eight buzzers.
The Arduino is connected to an Android phone through an audio cable, and on receiving signals from the phone, causes the appropriate buzzers to vibrate. We also implemented a phone interface where we can press buttons to generate audio signals of differing frequencies that match what the Arduino expects as input. We can thus use the phone interface to control individual buzzers on the belt, and have tested that this works correctly (see video at http://youtu.be/dc86q3wBKvI). This is a much quicker and more efficient method of activating the buzzers than our previous method of attaching/detaching separate wires to the battery source.
Video of Belt Being Worn by User
Wizard-of-oz techniques needed so far are to have a user press buttons corresponding to the directions of motion on a phone interface to cause the appropriate buzzer to start vibrating.
We used example code posted on StackOverflow at http://stackoverflow.com/questions/2413426/playing-an-arbitrary-tone-with-android by Steve Pomery to generate arbitrary tones on Android.