The Elite Four (#19) P5

The Elite Four (#19)
Jae (jyltwo)
Clay (cwhetung)
Jeff (jasnyder)
Michael (menewman)

Project Summary
We will develop a minimally intrusive system to ensure that users remember to bring important items with them when they leave their residences; the system will also help users locate lost tagged items, either in their room or in the world at large.

Supported Tasks
In this prototype there are three tasks that we have implemented. The first task (easy) is to identify when a door has been opened and alert the user if s/he tries to leave without tagged item(s). The second task (medium) is for the system to help the user locate lost tagged items in his/her own room. Our final task (hard) is to help the user locate lost tagged items outside of his/her room. This task is very similar to the second from the system’s point of view, but for the user it is far more difficult, since the potential location of the lost item(s) is much greater.

Changes to Tasks
We considered changing the tasks to focus on the first goal of our system: making sure the user doesn’t forget important items when leaving home. In the end, however, this change seemed fairly meaningless, since that’s all encompassed within our first task. Feedback from P4 did not reveal any reason to seriously change the tasks, so we ultimately decided to leave them as is.

Thus, the same storyboards we used in P2 are still applicable.

The design itself has changed a little from the sketches, mostly because we now have a more concrete idea of what the parts look like and how they work and interact. Functionally, however, the design is still mostly the same (minus syncing), and any minor changes in appearance can be seen in the photos/video below.

Revised Interface Design
Our prototype’s interface currently lacks syncing capability — we deemed it unnecessary and impractical for a system that currently only has a single tag. Otherwise, the user interacts with the prototype in much the same way as previously specified — the device sits near the door and flashes a warning LED if it detects a door being opened without important objects in close proximity. For item-finding, the user press a button that switches to item-finding mode, then moves the device around, gauging distance to the missing tag by the frequency of the LED’s blinking.

Overview and Discussion
For our working prototype, we were able to implement the core features of our system. For task one, this functionality consists of recognizing a door being opened and either alerting the user if they have forgotten their tagged items or giving them the go-ahead to leave their room. For now, these alerts take the form of differently colored LEDs. For tasks two and three, the functionality consists of being able to walk around with the system and see changes in frequency of LED flashing based on proximity to the tagged items.

For our prototype, we left out the syncing feature, which would allow the user to sync their tags to the device and have some way of knowing which device is missing. This is mostly a practical decision, as we currently only have a single active RFID tag (due to cost), but the functionality would be quite useful if our system used multiple tags simultaneously.

Currently, the prototype is fairly rough. The “door-mounted” mode is not actually door-mounted, and we haven’t yet moved to battery power only for the entire device (a necessity for practically implementing tasks two and three). For the search mode, since we haven’t yet neatly encapsulated the prototype into a single chassis, it’s fairly awkward to carry it around. We had some difficulty with attempts to produce sound, but we hope to resolve this for future prototypes. Despite all of this, however, we were able to successfully complete our outlined tasks.

No wizard-of-oz techniques were used in this prototype. In addition, no outside code was used in this prototype.

Video and Images

The "door-mounted" version of our prototype, which detects when the door is opened and alerts the user if tagged items are nearby or missing.

The “door-mounted” version of our prototype, which detects when the door is opened and alerts the user if tagged items are nearby or missing.

The door-mounted version of the prototype from another angle. You can see the infrared sensor (which detects the door opening) dangling off the table.

The door-mounted version of the prototype from another angle. You can see the infrared sensor (which detects the door opening) dangling off the table.

The device affixed to a board for mobility. This allows it to be carried around for tasks 2 and 3, which involve finding lost tagged items.

This video demonstrates our prototype’s ability to perform task 1, alerting the user when tagged items are left behind.

This video demonstrates our prototype’s ability to perform tasks 2 and 3, finding lost tagged items. Note that from the system’s perspective, these tasks are quite similar, so only a single video is provided.

The Elite Four (#19) P4

The Elite Four (#19)
Jae (jyltwo)
Clay (cwhetung)
Jeff (jasnyder)
Michael (menewman)

Project Summary
We will develop a minimally inconvenient system to ensure that users remember to bring important items with them when they leave their residences; the system will also help users locate lost tagged items, either in their room or in the world at large.

Test Method

Informed Consent
We wrote out a consent form and gave it to each participant to read and sign before proceeding with any testing. The consent form briefly talks about the purpose of our project, and it outlines any potential risks and benefits. It also informs the participant that all information will be kept confidential. We made sure we were present while they were reading it in case they had any questions or concerns, but overall it was very straightforward.

Link to consent form:
https://docs.google.com/document/d/1RmM8eRv5mjBGGQm7pDlTCuOmP3u5cS82MRnoDfVA7iM/edit?usp=sharing

Participants
We selected our participants randomly from a sample of upperclassmen studying in a public area during the afternoon. We had one participant who lives in a single (and consequently has a higher chance of being locked out), one participant who lives in a quad, and one in a triple. All three participants, as upperclassmen who have used both the new electronic self-locking doors and the previous mechanical locks, are part of our target demographic. None of them are COS/ELE majors or students in COS 436.

Testing Environment
We performed the testing in Terrace’s upper dining room, using the back door as a simulated dorm door. We held the prototype device up to the door frame when appropriate and let the user carry it around for tasks two and three (as described below in Testing Procedure). The users were able to literally go outside for task three, and the dining room served as the user’s “dorm room.” Our equipment consisted of cardboard mockups of the device and a credit card form factor RFID tag that fits inside of a wallet.

Testing Procedure
Clay wrote the demo and task scripts and helped read them to the users. Jae wrote the consent form and helped read the scripts and explain the tasks to the users. Jeff simulated the functionality of the device, providing beeping and switching the prototype versions when appropriate. Michael took the most elaborate notes on the testing process, including implicit/explicit user feedback. We all helped write up the discussion and blog post.

We had our users perform the following tasks respectively: attempt to leave the room without a tagged item, attempt to locate a lost tagged item within the room, and attempt to locate a lost tagged item outside of one’s room. These tasks are ordered by difficulty, from easy to medium to hard.

User 1 presses the "find" button.

User 1 presses the “find” button.

Demo & test scripts:
https://docs.google.com/document/d/1b2B5NOTYPpswJz7-M55SX8jZFXNKGVsP6iXeTWK93Tw/edit?usp=sharing

Summary of Results
User 1 is a senior who lives in a quad. She was able to perform the first task without a problem, although she was curious about alternate tag form factors (our prototype only features the credit card form factor for now). She was impressed by the usefulness of the second task and knew without being told that she should hit the FIND button, but she didn’t immediately realize that she was supposed to dismount the device from the wall. She also wanted to know if there was a way to disable the beeping after finding an item but before re-mounting the device. For the third task, she had no difficulty, which is not surprising given its similarity to the second task.

User 2 is a senior who lives in a single. For the first task, she wasn’t sure about the range of the sensor after syncing — does the user need to hold the tag close to the device? She also wanted to know if there was a way to tag only the prox, since she might not want to carry her entire wallet around. During the second task, she didn’t initially realize that she needed to press FIND, but was otherwise able to intuitively use the device. She suggested a FIND/FOUND toggle to stop the device from beeping after the lost item was found. The third task went more smoothly, although she did wonder if beeping speed would increase before the tag was in range (it won’t) and suggested that constant beeping might be annoying. She also suggested that the device might be easy to lose or forget to re-mount, and she wanted a way to disable the device — either an on/off switch or a sleep function.

User 3 is a junior who lives in a triple. He thought the device seemed useful and suggested that he would prefer a sleep function to an on/off toggle. He was able to complete all three tasks with basically no prompting or difficulty; he intuitively knew which buttons to press and what the beeping meant, and he even remembered to re-mount the device after finishing tasks two and three.

Discussion
Watching users attempt to use our lo-fi prototype with minimal intervention from us, we observed several flaws in our design. Ideally, the aim of this system is to be as intuitive as possible, but our users weren’t always able to intuit how to use our device. To fix this, we have decided to edit some aspects of our design. The find button will become a toggle switch, such that users know which state the device is in (“remind” or “find”). We also need to make it clearer to the user that they can remove the device from the wall and carry it around. This will likely take form as some reminder text on the device itself.

The users also provided information about possible new features. Some users expressed concern that they would lose their device when it is not mounted on the wall. In order to fix this, we will design the scanner to alert the user when it is neither in “find” mode nor mounted on the wall. This ensures the user remembers to re-mount the device. We also plan to add either an on/off switch or a snooze mode. Users pointed out that if they have guests over (and people are frequently coming and going) they would like to be able to turn off the system such that it isn’t going off all the time. A snooze mode is preferable to completely turning the system off, since the system returns to normal working order after the event is over. One user also suggested that the device beep in “find” mode only when the device is first switched to “find” and when the lost tag comes into range; otherwise, for task 3 especially, the beeping could become quite annoying.

Subsequent Testing
Based on the feedback we have received, we believe that we are ready to build a higher-fidelity prototype without further testing. The low fidelity testing revealed no catastrophic issues with our design. All of the other usability issues have been discussed within the team and with our test subjects and addressed adequately. As such, we feel confident that our design is ready to advance to a high fidelity prototype.

The Elite Four (#19) Lab 3

The Elite Four (#19)
Jae (jyltwo)
Clay (cwhetung)
Jeff (jasnyder)
Michael (menewman)

What We Built:
We built a robotic system to assist users who are working with breadboards. It is designed to deliver a breadboard across a table by using two servos that are attached to the breadboard and are controlled by a rotary pot. The servos use their horns to propel that breadboard across the table to the user who needs it. (For clarification, the breadboard-carrying robot is attached to another breadboard that contains the robot’s control circuit.) We liked that the final result was able to make the delivery successfully, albeit quite slowly. If we were to do it differently, the system could be better implemented by using two DC motors; this would make movement faster and easier. In addition, the breadboard robot could be improved by adding steering, which could be done by using a separate rotary pot to control each servo motor.

Brainstorm:
1. Use two DC motors to control two wheels on an axle and a servo motor to control the angle of the axle.
2. Use two servo motors that can rotate a full 360 degrees as “legs” on a robot.
3. “Fan-car” — a car with servo motors controlling the wheels and a DC motor in the back controlling a fan to propel it forward.
4. Make a motor that spins a cat toy around in a circle. Attach it to the back of a cat. The cat’s movement trying to get the toy will move the robot.
5. Helicopter robot where rotors are controlled with DC motor(s)
6. Make a robot row-boat with “oars” that are controlled by servos.
7. Build a robot that acts like a spinning top by using the motor to spin a disk with one point of contact.
8. A robot that throws a grappling hook forward using a servo catapult. The hook is connected to the robot by a line and the robot reels itself in towards the hook with a DC motor.
9. Zipline robot that uses a DC motor to move back and forth along a suspended string/wire
10. A jellyfish like-robot that propels itself through a fluid by flexing robot tentacles using a servo-motor.
11. Robo-bicycle with very wide wheels, powered by DC motor(s)
12. Attach metal rods to 2 servo motors and use them as “legs” that drag the robot forward in a single direction

Documentation of our system:


This is the design sketch for our breadboard bot.


This is the control circuit for our breadboard bot (also on a breadboard).


Side view of the breadboard bot. As seen, the DC motor is being used as a weight.


Front view of the breadboard bot.


Jeff demonstrates his masterful piloting skill in the video above.

Ingredients:
– 2 servo motors (with horns)
– 1 DC motor
– electrical tape
– 1 rotary pot
– 1 100 μF capacitor
– small breadboard
– large breadboard
– Arduino
– wires
– small Phillips head screwdriver

Recipe:
1. Attach the large straight horns to the servos using the small Phillips head screwdriver.
2. Tape two servo motors to the small breadboard using electrical tape. They should be back-to-back, facing outward on the breadboard’s shorter dimension, so that the horns hang over the edge. Center the motors with respect to the longer dimension of the breadboard.
3. Tape the DC motor to the breadboard so that it hangs off of one of the short edges. If you would like, you can create a sad face out of another color of electrical tape on the DC motor, but you should not make a happy face.
(3.5) In order to complete the following steps, you may find it helpful to connect the Arduino’s GND pin to the negative power rail on the breadboard, and the +5V pin to the positive power rail. Make the following connections using jumper wires.
4. Connect each servo’s brown wire to GND and the red wire to +5V.
5. Connect the orange wire of one servo to Pin 9 and the other to Pin 11 of Arduino.
6. Place the 100uF capacitor across GND and +5V. If it is polarized, make sure to connect the negative side to GND and the positive side to +5V.
7. Connect the one side of the rotary potentiometer to GND and the other to +5V.
8. Connect the middle pin of the rotary potentiometer to the A0 pin of the Arduino.

Code:

/*
  Authors: jasnyder, cwhetung, menewman, jyltwo
  Date: 3/25/2013
  COS 436 Lab L3: The Breadboard-Bot

  Our robot is set up using a rotary pot and two servo motors. 
  The pot reads a value from 0 to 1023, so we divide this value 
  by 6 to get an angle value from 0 to 170.5 that we send to the
  servo. The second servo's angle value is offset by 160 because
  it is facing in the opposite direction. An offset of 180 makes 
  the most sense, but after experimentation, we found that the 
  angles being slightly different made the walking smoother. Because 
  of this offset, however, the user controlling the pot must be 
  careful not to turn the pot to a value that would result in a
  negative value for the second servo. 
*/

#include  

int potPin = 0;  
int servoPin1 = 9;
int servoPin2 = 11;
Servo servo1; 
Servo servo2;

// offset of the second servo so that they move in symmetry
// this is needed since the servos are facing opposite directions
int offset = 160;

void setup() 
{ 
  servo1.attach(servoPin1);  
  servo2.attach(servoPin2);
} 

void loop() 
{ 
  int reading = analogRead(potPin);     // 0 to 1023
  int angle = reading / 6;              // 0 to 180-ish
  servo1.write(angle);
  servo2.write(offset-angle);
}

The Elite Four (#19) P3

The Elite Four (#19)
Jae (jyltwo)
Clay (cwhetung)
Jeff (jasnyder)
Michael (menewman)

Mission Statement:
We are developing a system that will ensure users do not leave their room/home without essential items such as keys, phones, or wallets. Our system will also assist users in locating lost tagged items. Currently, the burden of being prepared for the day is placed entirely on the user. Simple forgetfulness can often be troublesome in living situations with self-locking doors, such as dorms. Most users develop particular habits in order to try to remember their keys, but they often fail. By using a low-fidelity prototype, we hope to identify any obvious problems with our interface and establish how we want our system to generally be used. Hopefully, we can make this process easy and intuitive for the user.

Statement: We will develop a minimally inconvenient system to ensure that users remember to bring important items with them when they leave their residences; the system will also help users locate lost tagged items.

We all worked together to create the prototype and film the video. Jae provided the acting and product demo, Clay provided narration, Jeff was the wizard of Oz, and Michael was the cameraman. We answered the questions and wrote up the blog post together while we were still in the same room.

Prototype:
We created a cardboard prototype of our device. The device is meant to be mounted on the wall next to the exit door. Initially, the user will register separate RFID tags for each device he or she wants to keep track of. After that, the entire process will be automated. The device lights up blue in its natural state, and when the user walks past the device with all the registered RFID tags, the device lights up green and plays a happy noise. When the user walks past the device without some or any of the registered RFID tags, the device lights up red and plays a warning noise. The device is just a case that holds the Arduino, breadboard, speakers, RFID receiver, LEDs, and buttons for “Sync” and “Find” modes. The Arduino handles all of the RFID communication and will be programmed to control the LEDs and speakers. “Sync” mode will only be toggled when registering an RFID tag for the first time. “Find” mode will only be toggled when removing the device from the door in order to locate lost items.

The blue- and red-lit versions of the prototype, plus the card form-factor RFID tag

The blue- and red-lit versions of the prototype, plus the card form-factor RFID tag

The green- and red-lit versions of the prototype, plus the card form-factor RFID tag

The green- and red-lit versions of the prototype, plus the card form-factor RFID tag

Task 1 Description:
The first task (easy difficulty) is alerting the user if they try to leave the room without carrying their RFID-tagged items. For our prototype, the first step is syncing the important tagged item(s), which can be done by holding the tag near the device and holding the sync button until the lights change color. Next, the user can open the door with or without the tagged items in close proximity. If the tagged items are within the sensor’s range when the door is opened, the prototype is switched from its neutral color (blue) to its happy color (green), and the device emits happy noises (provided by Jeff). If the tagged items are not in range, the prototype is switched to its unhappy color (red), and unhappy noises are emitted (also provided by Jeff). This functionality can be seen in the first video.

The device is in door-mounted "neutral mode"; the user has not opened the door yet

The device is in door-mounted “neutral mode”; the user has not opened the door yet

When the door is opened but tagged items are not in proximity, the device lights up red and plays a warning noise

When the door is opened but tagged items are not in proximity, the device lights up red and plays a warning noise

When the tagged item(s) is/are in close proximity to the device and the door is opened, the device lights up green and plays a happy noise

When the tagged item(s) is/are in close proximity to the device and the door is opened, the device lights up green and plays a happy noise

Task 2 Description:
The second task (moderate difficulty) is finding lost tagged items within one’s room/home. For our prototype, this is accomplished by removing the device from the wall, pressing the “Find” button, and walking around with the device. The speed of beeping (provided by Jeff in the video) indicates the distance to the tagged item and increases as the user gets closer. This functionality is demonstrated in the first video.

The device can be removed from the wall and used to locate missing tagged items

The device can be removed from the wall and used to locate missing tagged items

Task 3 Description:
The third task (hard difficulty) is that of finding lost items outside of one’s residence. As before, the user removes the device from the wall and uses the frequency of beeps to locate the device. This task presents the additional challenge that the item may not be within the range of our transmitter/receiver pair. In order to overcome this, the user must have a general idea of where the object is. Our system can then help them find the lost item, with a range of up to eight meters. This range should be sufficient for most cases. This functionality is shown in the second video.

(Visually, this is identical to Task 2, so no additional photos are provided.)

Video Documentation:
Tasks 1 & 2: Syncing, forgotten item notification, & local item-finding

Task 3: Remote item-finding

Discussion:
Our project has a very simple user interface, since the device is intended to require as little user interaction as possible. There are no screens, so we used cardboard to build a lo-fi prototype of the device itself. There are three versions of the device; they differ only in the color of the LEDs as we have described above. “The device” is just a case (not necessarily closed) that holds the Arduino, breadboard, speakers, RFID receiver, LEDs, and buttons for “Sync” and “Find” modes. The functionality of each of these is described in the photos and videos. For our prototype we did not exactly come up with any new ways of prototyping, but we did rely heavily on “wizard of Oz” style prototyping, where one of our members provided sound effects and swapped different versions of the prototype in and out based on the situation.

It was somewhat difficult to find a way to effectively represent our system using only ourselves and cardboard. Since our system is not screen-based, “paper prototyping” wasn’t as easy as drawing up a web or mobile interface. The system’s interface consists mainly of button-pressing and proximity (for input) and LEDs/sound (for output), so we used a combination of cardboard/colored pen craftsmanship and human sound effects. The physical nature of the prototype worked well. It helped us visualize and understand how our device’s form factor would affect its usage. For example, using a credit card as an RFID tag (which is roughly the same size as the one we ordered) helped us understand the possible use cases for different tag form factors. While experimenting with different visual/auditory feedback for our item-finding mode, we realized that when no tagged item is detected, a slow beep, rather than no beeping at all, could help remind users that the device is still in item-finding mode.

Assignment 3: Craigslist

Michael (menewman@)
Neil (neilc@)
Andrew (acallaha@)

Site being evaluated: Craigslist

i. Most severe problems, how they fit into Nielsen’s heuristic categories, suggestions to fix UI, and how suggestions are related to heuristic categories

Craigslist’s functionality is based on a user’s ability to search for old posts and create new posts. Unfortunately, for both searching and posting, there is a lot of noise (H8). Users might find it difficult to find what they want when sifting through verbose postings. There are hints on how to post, but one has to actively seek them out in the help section. Additionally, there aren’t really any suggestions on how to search. If your search gets 0 hits, there aren’t really any recommendations on how to improve or alter your search — it’s a very binary response, matches or no matches. Between inefficient searching and confusing posting, the site can be difficult for a user to navigate.

Most of the searching problems fall under H7 and H8, with users frequently unable to filter out postings that are useless to them. For example, a user searching for an apartment cannot restrict basic categories, such as specific neighborhood, size, number of bedrooms/bathrooms, and lease terms/duration. A user searching for a job likewise cannot filter for even basic categories like expected salary. Craigslist could greatly accelerate the process of finding what you’re looking for by including feature lists specific to the category you’re browsing. This is something Amazon does very naturally: http://imgur.com/cGls5vK

In addition to the obvious aesthetic problems with the site, we took issue with the error messages received when trying to submit a post without certain required fields. There is apparently a minimum description length, but even after getting an error message the site didn’t specify how long the description needed to be for the post to get through. This violates not only Nielsen’s H9 (help users recognize, diagnose, and recover from errors), but also H5 (error prevention), since the site does not give prior warning that those fields are necessary to submit a post. A better way to handle this would be to explicitly spell out mandatory field requirements to users when they’re typing up their posts — and if a user does leave out a field or type an overly short post, Craigslist should be more specific about what needs to be corrected before the post can go through.

ii. Problems that were made easier to find/correct by list of Nielson’s heuristics

We believe that Nielson’s heuristics prepared us to find problems with aesthetics and error prevention/messages in particular. In general, the list of heuristics definitely allows a systematic approach to finding errors. H8, for example, provides insight into a fundamental usability concern of any system — reducing noise. The heuristics help you look for fundamental errors by creating broad and easily understandable categories for different types of problems.

iii. Usability problems not included under any of Nielsen’s heuristics, and proposed additional heuristics

Search functionality isn’t specifically included under any of the heuristics (more generally, the ability to find things on the site), although obviously the heuristics are broad enough to encompass the general idea. A new, more specific heuristic might be something like “ability to search intuitively and specifically for content.”

Also, the problem of terrible posts (expired, weird, incomprehensible) due to lack of oversight/moderation doesn’t fall neatly into a specific heuristic — perhaps there should be a heuristic for the curating of user-submitted content.

iv. Useful class discussion/final exam questions related to heuristic evaluation

Are some of the heuristics more intrinsically important than others? (On Craigslist, for example, it seems that aesthetics violations are by far the worst offenders, but does that mean that aesthetics are more important than, say, error prevention or similarity to the real world?)

Does the number of heuristics violated predict the usability (or lack thereof) of a site? (That is, if a site violates a bunch of different heuristics, but only slightly, is that better or worse than a different site that violates a single heuristic but violates it very badly?)

Links to individual heuristic assessments:
Neil:
https://docs.google.com/file/d/0BxcDocSdJf-JT1lZS2t3c0hJTm8/edit?usp=sharing

Michael:
https://docs.google.com/file/d/0B-Bz7iQadqOFZmlYOW0ybGRVZUU/edit?usp=sharing

Andrew:

Click to access P3.pdf

Lab 2 (The Elite Four)

The Elite Four (#24)
Clay Whetung (cwhetung@)
Jae Young Lee (jyltwo@)
Jeff Snyder (jasnyder@)
Michael Newman (menewman@)

What we built and why:
We built a softpot-based instrument that plays totally rocking guitar solos. It uses a softpot to select frequency and a button that allows sound to be played when pressed. We are collectively fans of not just one specific band, but rather the whole genre of rock ‘n’ roll. We wanted to make sure that all aspects of our instrument went up to 11, right across the board. Therefore, we modified our softpot-based prototype to use the most rocking of all pitch mappings: the blues scale. We were able to achieve a good approximation of many rock classics with our instrument, including “Tonight I’m Gonna Rock You Tonight” and “Stonehenge.” The thing we liked most about the final iteration was its ability to play sick guitar solos as well as classic riffs. Pitch was a little difficult to control precisely with a finger, as we needed a range of two octaves to really rock out, but it was easy to control with precision using a pencil or other stylus-like object. In a future iteration, the ability to play multiple notes at once would help us to rock out even harder. Specifically, the ability to play power chords would help us cement our status as one of F114’s loudest lab groups.

Prototypes:

Prototype 1

Jeff demonstrates our first prototype, a softpot-based instrument.

Jeff demonstrates our first prototype, a softpot-based instrument.

This prototype features a softpot that controls frequency (broken up into discrete notes) and a button that, when clicked, plays a note. By moving a finger along the softpot and simultaneously pressing the button, it’s possible to play simple melodies.

Prototype 2

By flexing his finger, Clay can change the frequency of this instrument.

By flexing his finger, Clay can change the frequency of this instrument.

This prototype features a flex sensor that controls frequency and a button that, when clicked, plays a note. We attached the flex sensor to our subject’s finger so that he was able to play different melodies simply by bending his finger while pressing the button.

Prototype 3

In this prototype, frequency is controlled by a force sensor, and clicking a button allows a note to be played. One can play a tune by squeezing the force sensor with varying degrees of force while simultaneously pressing the button.

The final system:
For the final system, we chose to work with our first prototype: the softpot-based instrument. As before, the button controls when a note is being played, but the mapping of softpot to frequency was altered to allow playing “guitar solos.” Below, we have photos and video of the system in action.

The entire system

The entire system

The final system's Arduino connections

The final system’s Arduino connections

Closeup of the breadboard, with button and speaker

Closeup of the breadboard, with button and speaker

finalphoto5

Closeup of the frequency-controlling softpot

As seen in the video, the system has been refined to allow rockin’ riffs instead of just simple melodies. This change was made by altering the system’s code, not by changing the hardware.

Ingredients:
1 Softpot
1 Speaker
1 Large Button
1 Arduino
Breadboard(s)
Jumper Wires
Tape

Recipe:
0. Insert the softpot, speaker, and button into the breadboard. The speaker and button are most easily inserted spanning the middle divider. You may find it helpful for the following steps to connect ground and +5V to the power rails of the breadboard.
1. Attach the far left pin of the softpot to ground and the far right to +5V. Connect the middle pin to the A0 pin of the Arduino.
2. Connect one side of the speaker to ground and the other to one side of the button. Connect the other side of the button to pin 8 of the Arduino.
3. For added stability, tape the softpot to a hard surface (like the table).

Source code:

/* 
  Authors: jasnyder, cwhetung, menewman, jyltwo
  Date: 3/4/2013
  COS 436 Lab L2: Awesome Electric Guitar Instrument

  Our instrument: By using a softpot, we created something similar
  to a keyboard. We first experimented with a typical scale, and eventually
  chose notes to make a solo electric guitar. There are 10 possible pitches
  mapped by the softpot, and the sound is outputted through the speaker as
  values are continously read in. 
*/

#include "pitches.h"

// Pitches on our guitar
int pitches[] = {NOTE_G5, NOTE_AS5, NOTE_C6, NOTE_DS6, NOTE_F6, 
                 NOTE_FS6, NOTE_G6, NOTE_AS6, NOTE_C7, NOTE_DS7};

//  Musical constants
const int NOTE_DELAY = 300; // ms
const int NOTE_DUR = 250;   // ms

//  Pin connection constants
const int softpot = A1;
const int speaker = 8;

// Softpot reading
int softpotValue = 0;
// Mapped value of softpot
int note = 0;

// Continuously read values from the softpot and output the corresponding tone
void loop() {
  softpotValue = analogRead(softpot);
  note = map(softpotValue, 0, 1023, 0, 9);

  tone(speaker, pitches[note], 1);
}

Assignment 2 (Michael Newman)

Name: Michael Newman (menewman@)

My observations:
Every Tuesday and Thursday, I have two consecutive classes in the same room (Aaron Burr 219), as well as two consecutive classes in the CS Building (105 and 104). Consequently, I was able to observe the behavior of students/faculty between classes for the full 10-minute changing period twice a day on Tues/Thurs for the last couple of weeks. I observed that my peers tend to spend the extra time going to the water fountain and/or the bathroom, pulling out preparatory materials for class (laptops, books, printed notes, notebooks), conversing with the professor (particularly after class, not before), conversing with each other (occasionally, but not always, about course-related material), and using their phones – to text, call, browse the web, play games, or listen to music. Depending on the time of day (and the location), students may acquire/consume food or beverages – for example, I’ve seen COS students run to the tea room for coffee or to the vending machines for soda/snacks. This seems more likely to happen in the afternoon than in the morning. Professors, on the other hand, are less likely to spend the time socializing; in general they seem to roll into class with just enough time to set up their slides/projector and begin the lecture. After lecture, they tend to converse with students, pack up, and disappear. In general, both students and professors seem to spend the in-between time performing some combination of social interaction (in-person or via phone), personal refreshment (e.g., eating, going to the bathroom), and/or preparation for the class – not including, of course, travel time between classes.

Brainstormed ideas:
1. Online/mobile app that lets students anonymously rate the lecture they just attended, and/or provide direct feedback to the professor.
2. Mobile app that lets you know if your friends are planning to skip class; you can either coordinate so that someone always goes, or skip class if they are also skipping.
3. Mobile app that finds location on campus using GPS/Wifi, directs to nearest bathroom/food/water.
4. Mobile app that calculates distance to next class and estimates how long it will take you to get there.
5. Web app that lets you anonymously chat with those in the same lecture as you; you can ask questions and get immediate feedback without feeling embarrassed or put on the spot.
6. Kinect-based “stretching station” where students who have been sitting down too long can work out their stiffness with the help of a stretching game/program.
7. Mobile/web app where professor can upload class notes and student can send them all to All_Clusters with a single click (also provides printer location information).
8. Web app where students can anonymously gossip about their classmates (sorted by class, lecture time for convenience) and read gossip about themselvers.
9. Mobile app that uses current location data and time/location of next class to determine if it’s feasible to go get coffee before the next class starts.
10. Mobile app that plays soothing instrumental music and shows calming visuals (e.g., ocean waves) to help students relax between classes.
11. Web/mobile app that lets professors know what equipment/connections they should be prepared for in a given lecture hall (e.g., VGA adaptor only, HDMI connection, etc.)
12. Web/mobile app that provides a calendar of assignment due dates and exams; students can check to see if they have something to turn in for their next class.
13. Web/mobile app where professors can upload short outlines/background info on the upcoming lecture, which students can check on their phones before class.
14. “Assassins” mobile app: participating students can receive the names of targets to “assassinate” (with water pistols) between classes, and the last student still “alive” receives a prize.
15. Web/mobile app where student can log how much time they’ve spent outside each day; app reminds them to go outside between classes so they can get some sunlight and vitamin D.

The ideas I chose to prototype:
Online/mobile app that lets students anonymously rate the lecture they just attended, and/or provide direct feedback to the professor.
I like this one because it lets the student ask questions or suggest improvements while the lecture is still fresh in his/her mind; the professor can then respond to issues s/he otherwise might not even have known about.

Mobile app that finds location on campus using GPS/Wifi, directs to nearest bathroom/food/water.
This is useful because students often use their short breaks relieving/refreshing themselves, but they have only 10 minutes to walk to their next class, acquire/consume a snack, and/or use the bathroom – and in a strange building, students might have a hard time finding vending machines or a bathroom.

Prototype 1: Anonymous Lecture Feedback

Home page. User can either browse others' reviews or submit a review.

Home page. User can either browse others’ reviews or submit a review.

The user can use this form to submit a review for a lecture.

The user can use this form to submit a review for a lecture.

User gets this screen after submitting a review. It links back to the home page.

User gets this screen after submitting a review. It links back to the home page.

The user searches for reviews by department, course number, and section.

The user searches for reviews by department, course number, and section.

After the user chooses a course and section, s/he can browse the reviews from most to least recent.

After the user chooses a course and section, s/he can browse the reviews from most to least recent.

Prototype 2: Refreshment Buddy

Home screen. User must first acquire location, then look for food/water/bathrooms.

Home screen. User must first acquire location, then look for food/water/bathrooms.

If user tries to find food/water/bathroom without first acquiring location. they get this message.

If user tries to find food/water/bathroom without first acquiring location. they get this message.

The user gets this screen once the app has found their location.

The user gets this screen once the app has found their location.

The app shows nearby places to get food when the user clicks "find food."

The app shows nearby places to get food when the user clicks “find food.”

The app shows nearby water fountains when the user clicks "find water."

The app shows nearby water fountains when the user clicks “find water.”

The app shows nearby bathrooms when the user clicks "find bathrooms."

The app shows nearby bathrooms when the user clicks “find bathrooms.”

Map view shows the user's location and the location of nearby food/water/bathrooms.

Map view shows the user’s location and the location of nearby food/water/bathrooms.

User Testing:
I chose to test my second prototype, “Refreshment Buddy,” with the help of three fellow students: Katie, Charles, and Osei. During this process, they interacted with my paper “screens” as if they were using a mobile device; when they clicked a button, I would give them the appropriate piece of paper to account for that action. They provided feedback, both directly and indirectly (through observation); the insights thus derived are listed in the section below.

Katie and Charles both clicked through pretty much every screen of the prototype (Acquire Location -> Find Food -> See Map -> Back -> Back -> Find Water -> See Map -> Back -> Back -> Find Bathrooms _> See Map -> Back -> Back). Osei, on the other hand, went through the process of finding food but stopped there, without looking for water/bathrooms. I provided the next screen for them after each “click” and let them know when they were trying to click something that wasn’t clickable, but otherwise I provided no prompting or instructions. All of them seemed confused by the purpose of the “Acquire Location” button, and Charles and Osei expressed an interest in having additional information about the food locations.

Katie clicks "acquire location."

Katie clicks “acquire location.”

Osei attempts to find food without acquiring his location first.

Osei attempts to find food without acquiring his location first.

When Charles clicks "see on campus map," I switch to the map screen.

When Charles clicks “see on campus map,” I switch to the map screen.

My hastily scrawled notes from user testing.

My hastily scrawled notes from user testing.

Insights from testing:
Katie
-It’s not immediately obvious what the app means by “acquire location.” What location? Should be more specific.
-It would be preferable to show one’s location on the map after acquiring it, and then just have nearby food/water/bathroom icons pop up on the map.
-The prototype doesn’t provide a way to change or re-acquire one’s location; having a constantly updated map display would solve that problem.

Charles
-It might be better to have more specific food locations, or to provide extra information about food (e.g., show only nearby free food).
-Liked the water fountain-finding functionality.
-Like Katie, wasn’t immediately sure what the location in “acquire location” meant. Should clarify the meaning.

Osei
-Wasn’t sure which elements of the app were clickable (e.g., tried to click on “Frist Gallery” under “Find Food” but could not).
-Would like extra details, such as information about the food available (menus? vending machine items?) at each location.
-Since I force him to click “Acquire Location” first anyway, I might as well just auto-acquire the location, or not show the links for finding food/water/bathrooms until after location has been acquired.

Nightlight/Wake-up-Alarm Combo, by the Elite Four (Lab 1)

Group Name: The Elite Four (# 24)

Members:
Clay Whetung (cwhetung@)
Jae Young Lee (jyltwo@)
Jeff Snyder (jasnyder@)
Michael Newman (menewman@)

What we built:
We chose to build a nightlight combined with a wake-up alarm. Our nightlight features not one, not two, not three, not four, not five, but SIX — yes, SIX! — LEDs that turn on when a photosensor detects a decreased amount of ambient light. Not only that, but we also included a buzzer that plays a friendly tune whenever our system detects that ambient light levels have increased again. The purpose of this system is twofold: First, by providing light when its surroundings are dark, it reassures and comforts those who are afraid of the dark. Second, it audibly announces the return of light to those who might have closed their eyes or otherwise lost sensory input (e.g., the sleeping or suddenly blind). Our system is a smashing success, as it correctly lights up in the dark and plays a tune, as specified. We particularly liked the reassuring charm of the system’s adorable lights and catchy jingle. A possible improvement would be implementing a continuous alarm that the user can turn off (for example, by turning a potentiometer) — more like a typical alarm clock. We could even include a snooze button.

Design sketches:

IMAG0130

Arduino Orchestra Instrument: Pitch is controlled with soft pot, and volume is controlled with FSR.

IMAG0132

Etch-a-Sketch: Potentiometers control the x and y coordinates of the “pen,” and a drawing is rendered onscreen using Processing.

IMAG0135

Nightlight/Alarm Clock: LEDs turn on when the light dims, and buzzer goes off when light is restored.

Storyboard:
IMAG0133

IMAG0134

Photos of our system:

The entire system

The entire system

Arduino's connections

Arduino’s connections

Big breadboard connections

Big breadboard connections

Little breadboard

Little breadboard

LEDs during the day

LEDs during the day

LEDs when ambient light levels decrease

LEDs when ambient light levels decrease

Video of our system in action:

Ingredients:
– 6 LEDS (3 yel­low, 3 red)
– 1 speaker
– 1 photoresis­tor
– 1 Arduino
– jumper wires
– 2 bread­boards
– 6 330-ohm resis­tors
– 1 10k-ohm resis­tor
– 1 lap­top with usb cable

Recipe:

Circuit diagram

Circuit diagram

1. Set up the LEDs in a line on a bread­board next to the photoresistor. Place the speaker across the cen­ter divider of the other bread­board. You may find it help­ful to con­nect ground and +5V to the power rails of the bread­board for the fol­low­ing steps.

2. Make the fol­low­ing con­nec­tions:
– Con­nect the anodes of the 6 leds to pins 0-5 of the arduino.
– Con­nect the cath­ode of each LED to ground via a 330 ohm resis­tor.
– Con­nect one pin of the speaker to pin 8 and the other to ground via a 330 ohm resis­tor.
– Con­nect one side of the photoresistor to a +5V pin.
– Con­nect the other side both to A0 and to ground via a 10 kilo-ohm resistor.

3. Check the val­ues out­put by the photoresistor using the ser­ial mon­i­tor and the Serial.println() func­tion. In the code, change the PHOTO_MAX and PHOTO_MIN val­ues as appropriate.

4. Enjoy the comfort and security of living with the sweet alarm nightlight.

Source Code:

/* 
  Authors: jasnyder, cwhetung, menewman, jyltwo
  Date: 2/25/2013
  COS 436 Lab L1: The Nightlight Alarm

  The nightlight alarm: lights turn on when it's dark, and when it
  gets bright again, the lights turn off and an alarm goes off to 
  wake you up!
*/

#include "pitches.h"

const int FALSE = 0;
const int TRUE = 1;

//  Input / Output Constants
const int PHOTO_MIN = 100;  // set me as appropriate!
const int PHOTO_MAX = 1023;  // set me as appropriate!
const int DARKNESS = 500;  // set me as appropriate!
const int LIGHT = 700;  // set me as appropriate!

//  Musical Constants
const int NOTE_DELAY = 300; // (ms)
const int NOTE_DUR = 250;

//  Pin Connection Constants
const int photo = A0;
const int red1 = 5;
const int red2 = 3;
const int red3 = 1;
const int yellow1 = 4;
const int yellow2 = 2;
const int yellow3 = 0;
const int speaker = 8;

//  Variables
boolean islight = false;
int photovalue = 0;  //  value returned by photo sensor

//  Set internal pull-ups for output on LED pins
void setup()
{
  pinMode(red1, OUTPUT);
  pinMode(red2, OUTPUT);
  pinMode(red3, OUTPUT);
  pinMode(yellow1, OUTPUT);
  pinMode(yellow2, OUTPUT);
  pinMode(yellow3, OUTPUT);
}

void loop() {
  //  Grab the light value
  photovalue = analogRead(photo);

  // If it has recently become dark, turn on nightlight
  if (photovalue < DARKNESS && islight) {     
    digitalWrite(0, HIGH);     
    digitalWrite(1, HIGH);     
    digitalWrite(2, HIGH);     
    digitalWrite(3, HIGH);     
    digitalWrite(4, HIGH);     
    digitalWrite(5, HIGH);     
    islight = false;   
  }      
  // If it has recently become light, turn off nightlight and play alarm   
  else if (photovalue > LIGHT && !islight) {
    digitalWrite(0, LOW);
    digitalWrite(1, LOW);
    digitalWrite(2, LOW);
    digitalWrite(3, LOW);
    digitalWrite(4, LOW);
    digitalWrite(5, LOW);
    playAMerryWakingUpSong();
    islight = true;
  }
}

//  Play a classic little ditty!
void playAMerryWakingUpSong() {
  tone(speaker, NOTE_C5, NOTE_DUR);
  delay(NOTE_DELAY);
  tone(speaker, NOTE_C5, NOTE_DUR);
  delay(NOTE_DELAY);
  tone(speaker, NOTE_AS4, NOTE_DUR);
  delay(NOTE_DELAY);
  tone(speaker, NOTE_C5, NOTE_DUR*.75);
  delay(NOTE_DELAY*2);
  tone(speaker, NOTE_G4, NOTE_DUR*1.5);
  delay(NOTE_DELAY*2);
  tone(speaker, NOTE_G4, NOTE_DUR);
  delay(NOTE_DELAY); 
  tone(speaker, NOTE_C5, NOTE_DUR);
  delay(NOTE_DELAY); 
  tone(speaker, NOTE_F5, NOTE_DUR);
  delay(NOTE_DELAY); 
  tone(speaker, NOTE_E5, NOTE_DUR);
  delay(NOTE_DELAY); 
  tone(speaker, NOTE_C5, NOTE_DUR);
  delay(NOTE_DELAY); 
}

Elite Four Brainstorming

Group Name: The Elite Four

Members:
Clay Whetung (cwhetung@)
Jae Young Lee (jyltwo@)
Jeff Snyder (jasnyder@)
Michael Newman (menewman@)

Brainstorming Ideas:

1. Create an interface for Magic: The Gathering or a similar game that maintains an internal representation of the game, enforces rules, and provides graphical feedback on game state to users.
2. Use a Kinect to train users in martial arts, dance, yoga, tai chi, etc. at a low cost by tracking the user’s skeleton and comparing their forms to those of expert users. The application can give them feedback on exactly where they’re going wrong.
3. Use pitch detection and score following to help musicians/singers know which notes they play out of tune while practicing and give them graphical feedback including direction and pitch distance.
4. An automated metronome with score following for practicing — when a musician plays a section correctly, the metronome automatically increases speed. If they play it incorrectly, the metronome shows them their mistakes and slows speed down.
5. A transparent device that can be overlaid on computer monitors (or televisions) of multiple sizes and transforms them into a pseudo-tablet so that artists using the system in Photoshop etc. get immediate visual feedback.
6. A drum pad for percussion practice in low-noise situations that uses a practice pad with piezo sensors inside to trigger drum sounds through headphones. The device would be similar to a practice mute for brass instruments and could be customized for varying sensitivities and with a range of sounds.
7. Interface to use basic functions of a computer while prone (i.e. in bed) — the device would project the interface onto the ceiling or wall, and use gestural control via Kinect or Wiimote. Avoids the common problems of using a laptop in bed – neck strain, hot surfaces, sharp corners, no surface to mouse on, etc.
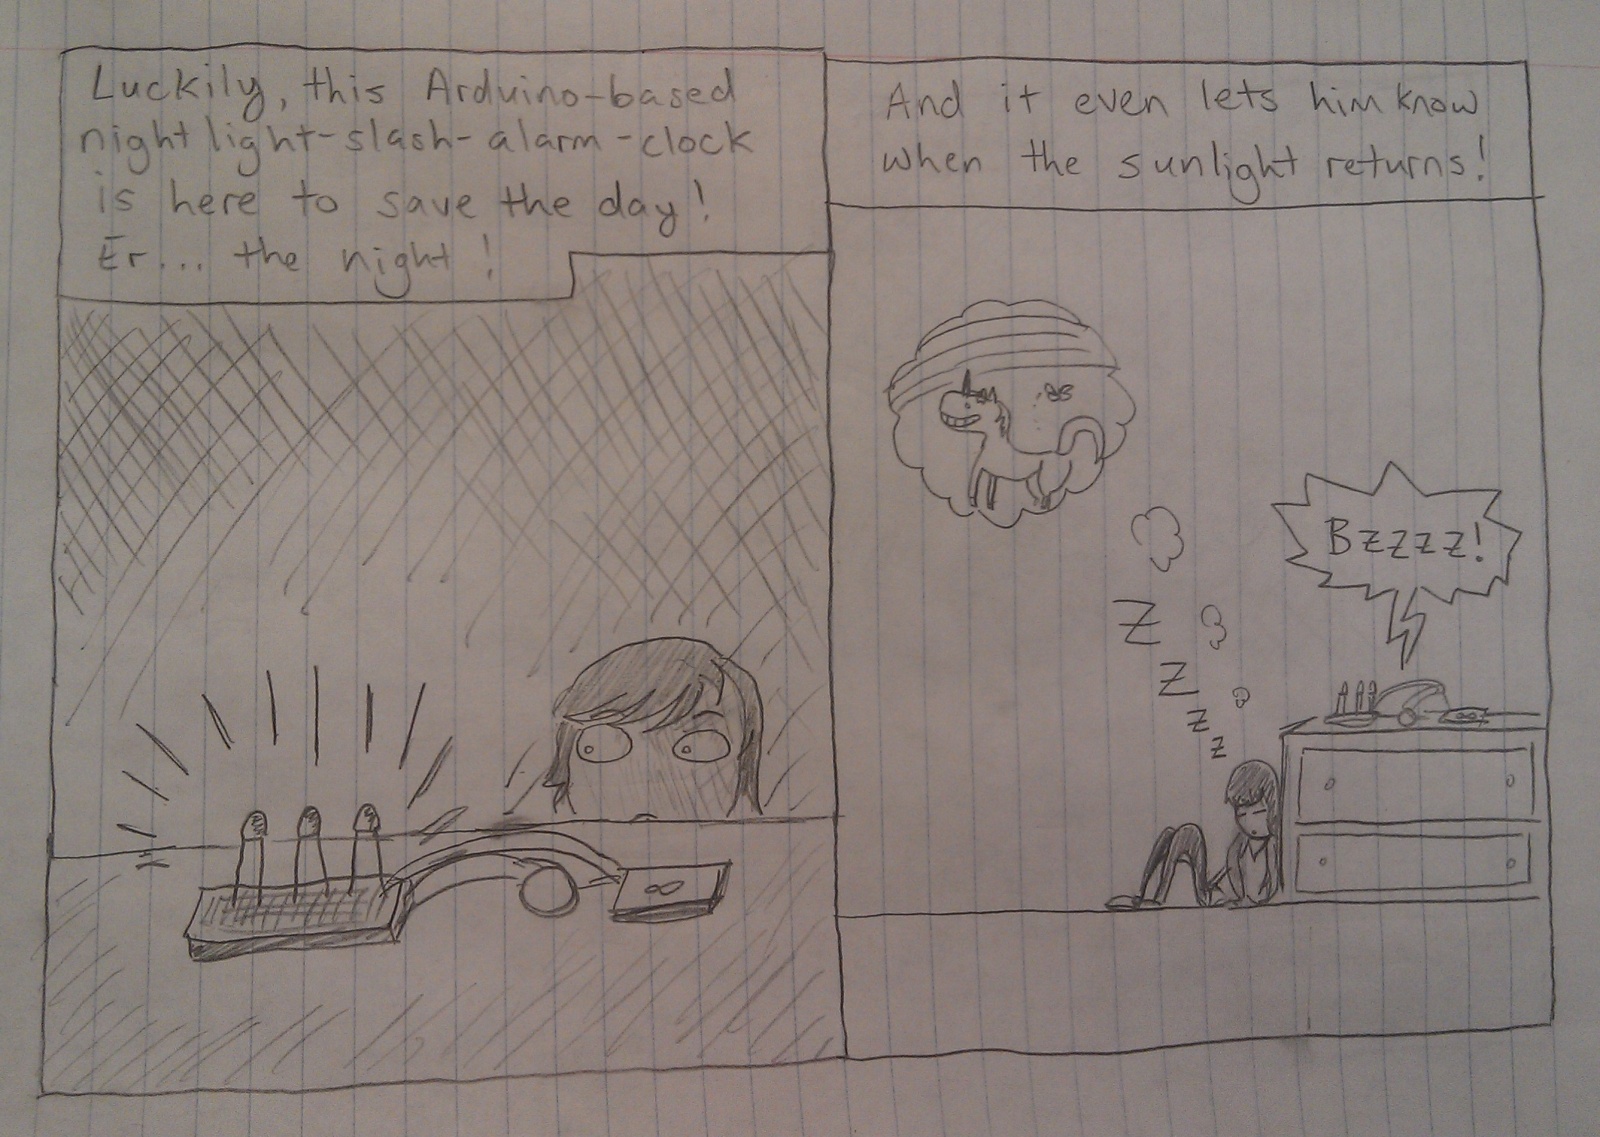
8. A silent alarm clock that raises your shade for those who prefer to wake up with natural light, but want to do so later than the sun rises.
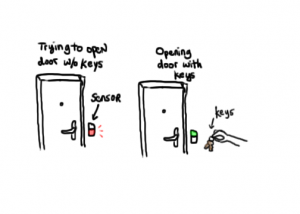
9. Voice recognition system to open doors. Allows for secure access by multiple people.
10. Make a self-control type device using the Kinect that locks users out of banned applications (i.e. World of Warcraft) or specific websites until they perform some physical task, for example a specific number of push-ups or a yoga routine.
11. A frisbee-throwing robot to help users practice Ultimate Frisbee skills. This allows users to practice catching when another human isn’t available, and it can throw consistently at specific speeds, heights, etc.
12. A system that actuates a laser or other toy to exercise your cat or another pet in your absence.
13. A similar device could use a treadmill to exercise your dog or other larger pet. For motivation, the animal could be receive a treat for running for a certain time or distance.
14. A voice-controlled kitchen helper that can automatically measure and dispense frequently-used ingredients.
15. A system that listens on a certain phone/Google Voice number for text messages and calls and allows you to remotely start arbitrary electronic appliances by connecting them to mains, for example to start coffee brewing 30 mins before you arrive home.
16. A device that aids disabled users in basic computer use by automatically scrolling based on the position of your eyes and having activated eye gestures for basic commands.
17. An Arduino-based system that makes the entire bathroom process hands-free (turning on the sink, dispensing soap, opening the door, etc.) — people don’t want to get their hands dirty again.
18. Go-to-sleep button: Press it when you want to sleep and it does everything you should before bed (i.e. hibernates computer, turns lights off, sets alarm clock).  Then when your alarm goes off everything turns back on!
19. Automatic bike lock — when you put the kickstand down, the bike automatically locks itself. Alternatively, a coiled lock system that automatically retracts the lock when you get close to it.
20. Mixology robot: When you go up to it and place an order verbally, it mixes the drink for you (makes much more complicated drinks for parties without hiring a bartender).
21. Heart rate sensor that controls the speed of a treadmill and plays ambient music with appropriate (and motivational) BPM.
22. Proximity sensor that can be attached to objects, so if you lose it then you can use the range sensor to find them.
23. Automatic transcription of music — you sing something and the device outputs the pitches and rhythms that you sang.
24. An interface that personalizes your entire house — scan your fingerprint and it does things like set the temperature, turn on certain lights in the house, etc.
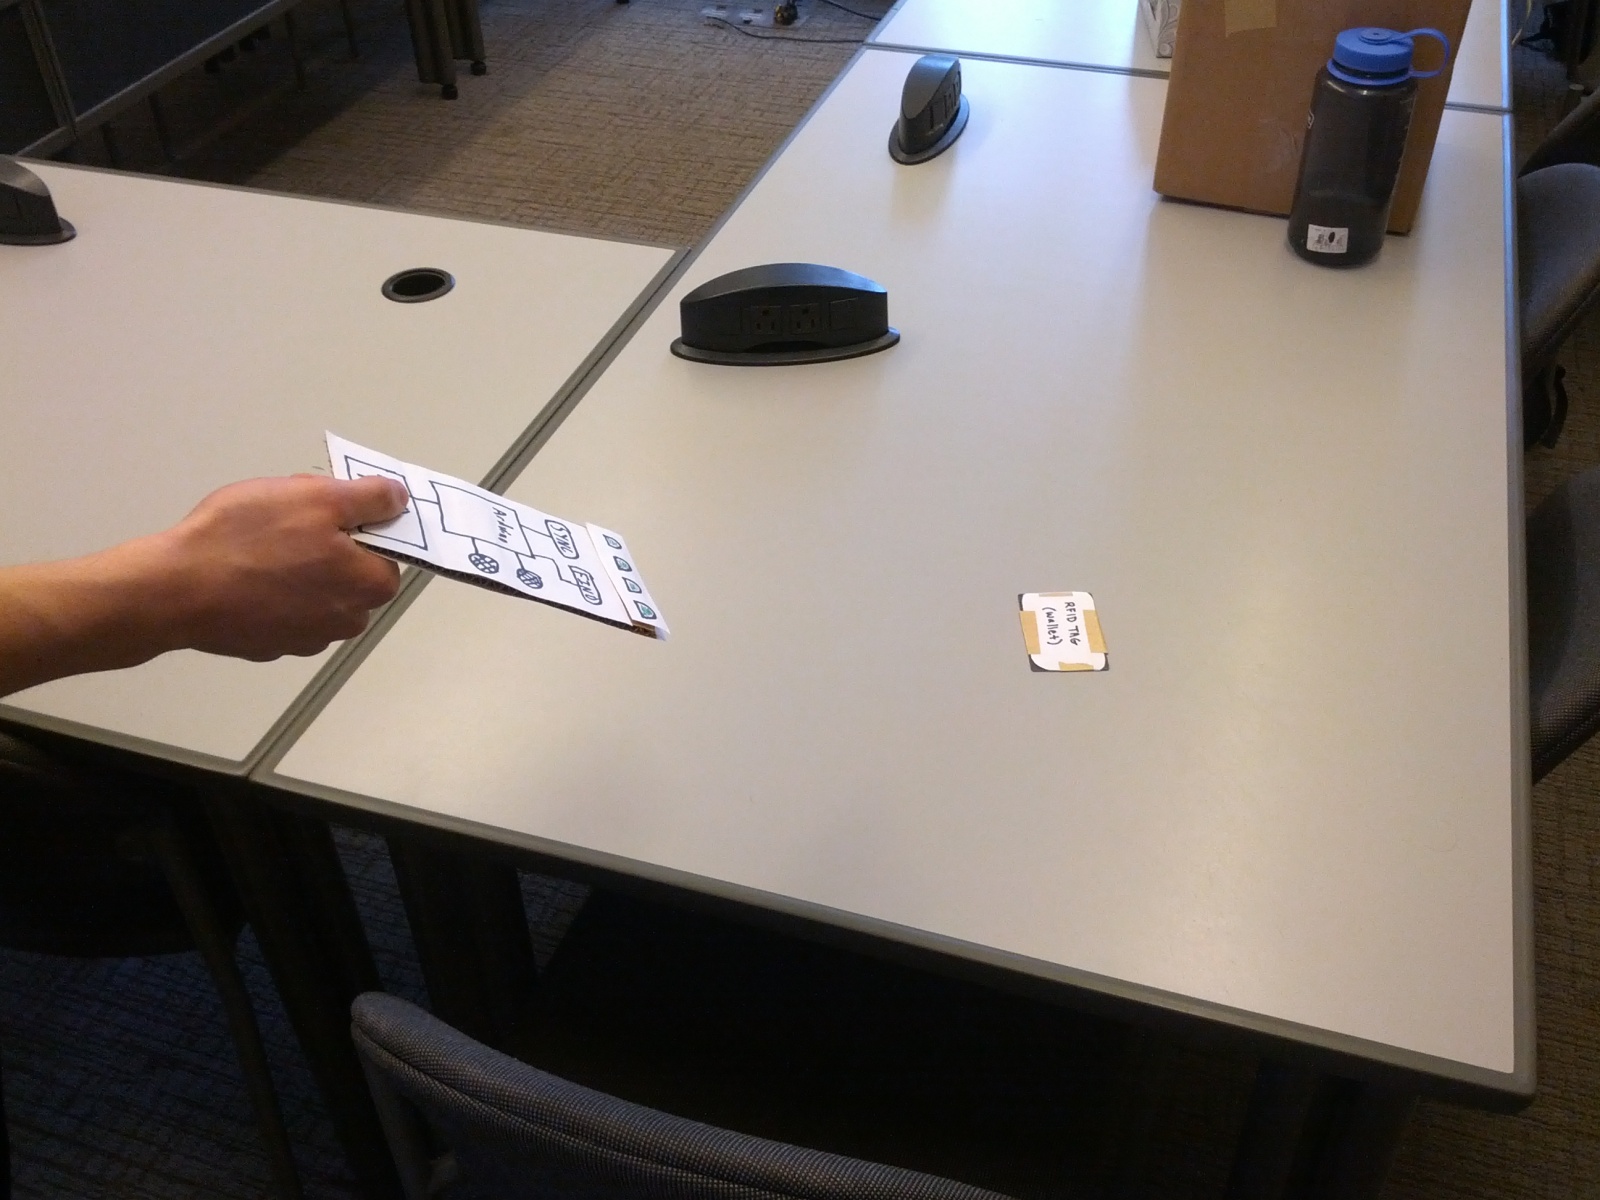
25. System that uses RFID tags to track small informal transactions between friends so that money is kept even (i.e. Joe buys Frank a coffee and it gets logged, so maybe next time Frank will know to pay for Joe).
26. Smoke-controlled music player that plays progressively more progressive/alternative music as the amount of smoke in the room increases.
27. A weather sensor that detects brightness or dryness of the outside and dispenses sunscreen if it is very bright or lotion if it is very dry.
28. Alarm clock that syncs with your Google Calendar and wakes you up before your first appointment of the day, even if you forget to manually set an alarm. Also detects if you are awake already and won’t wake you up.
29. Freestyle rapping/poetry companion device that automatically performs voice recognition (very quickly) and suggests rhymes and/or insults based on previous words.
30. Musical routing system that automatically routes instrument inputs to amplifiers based on a performance schedule without the need to plug/unplug.
31. Silent band practice system with individual headphone mixes.
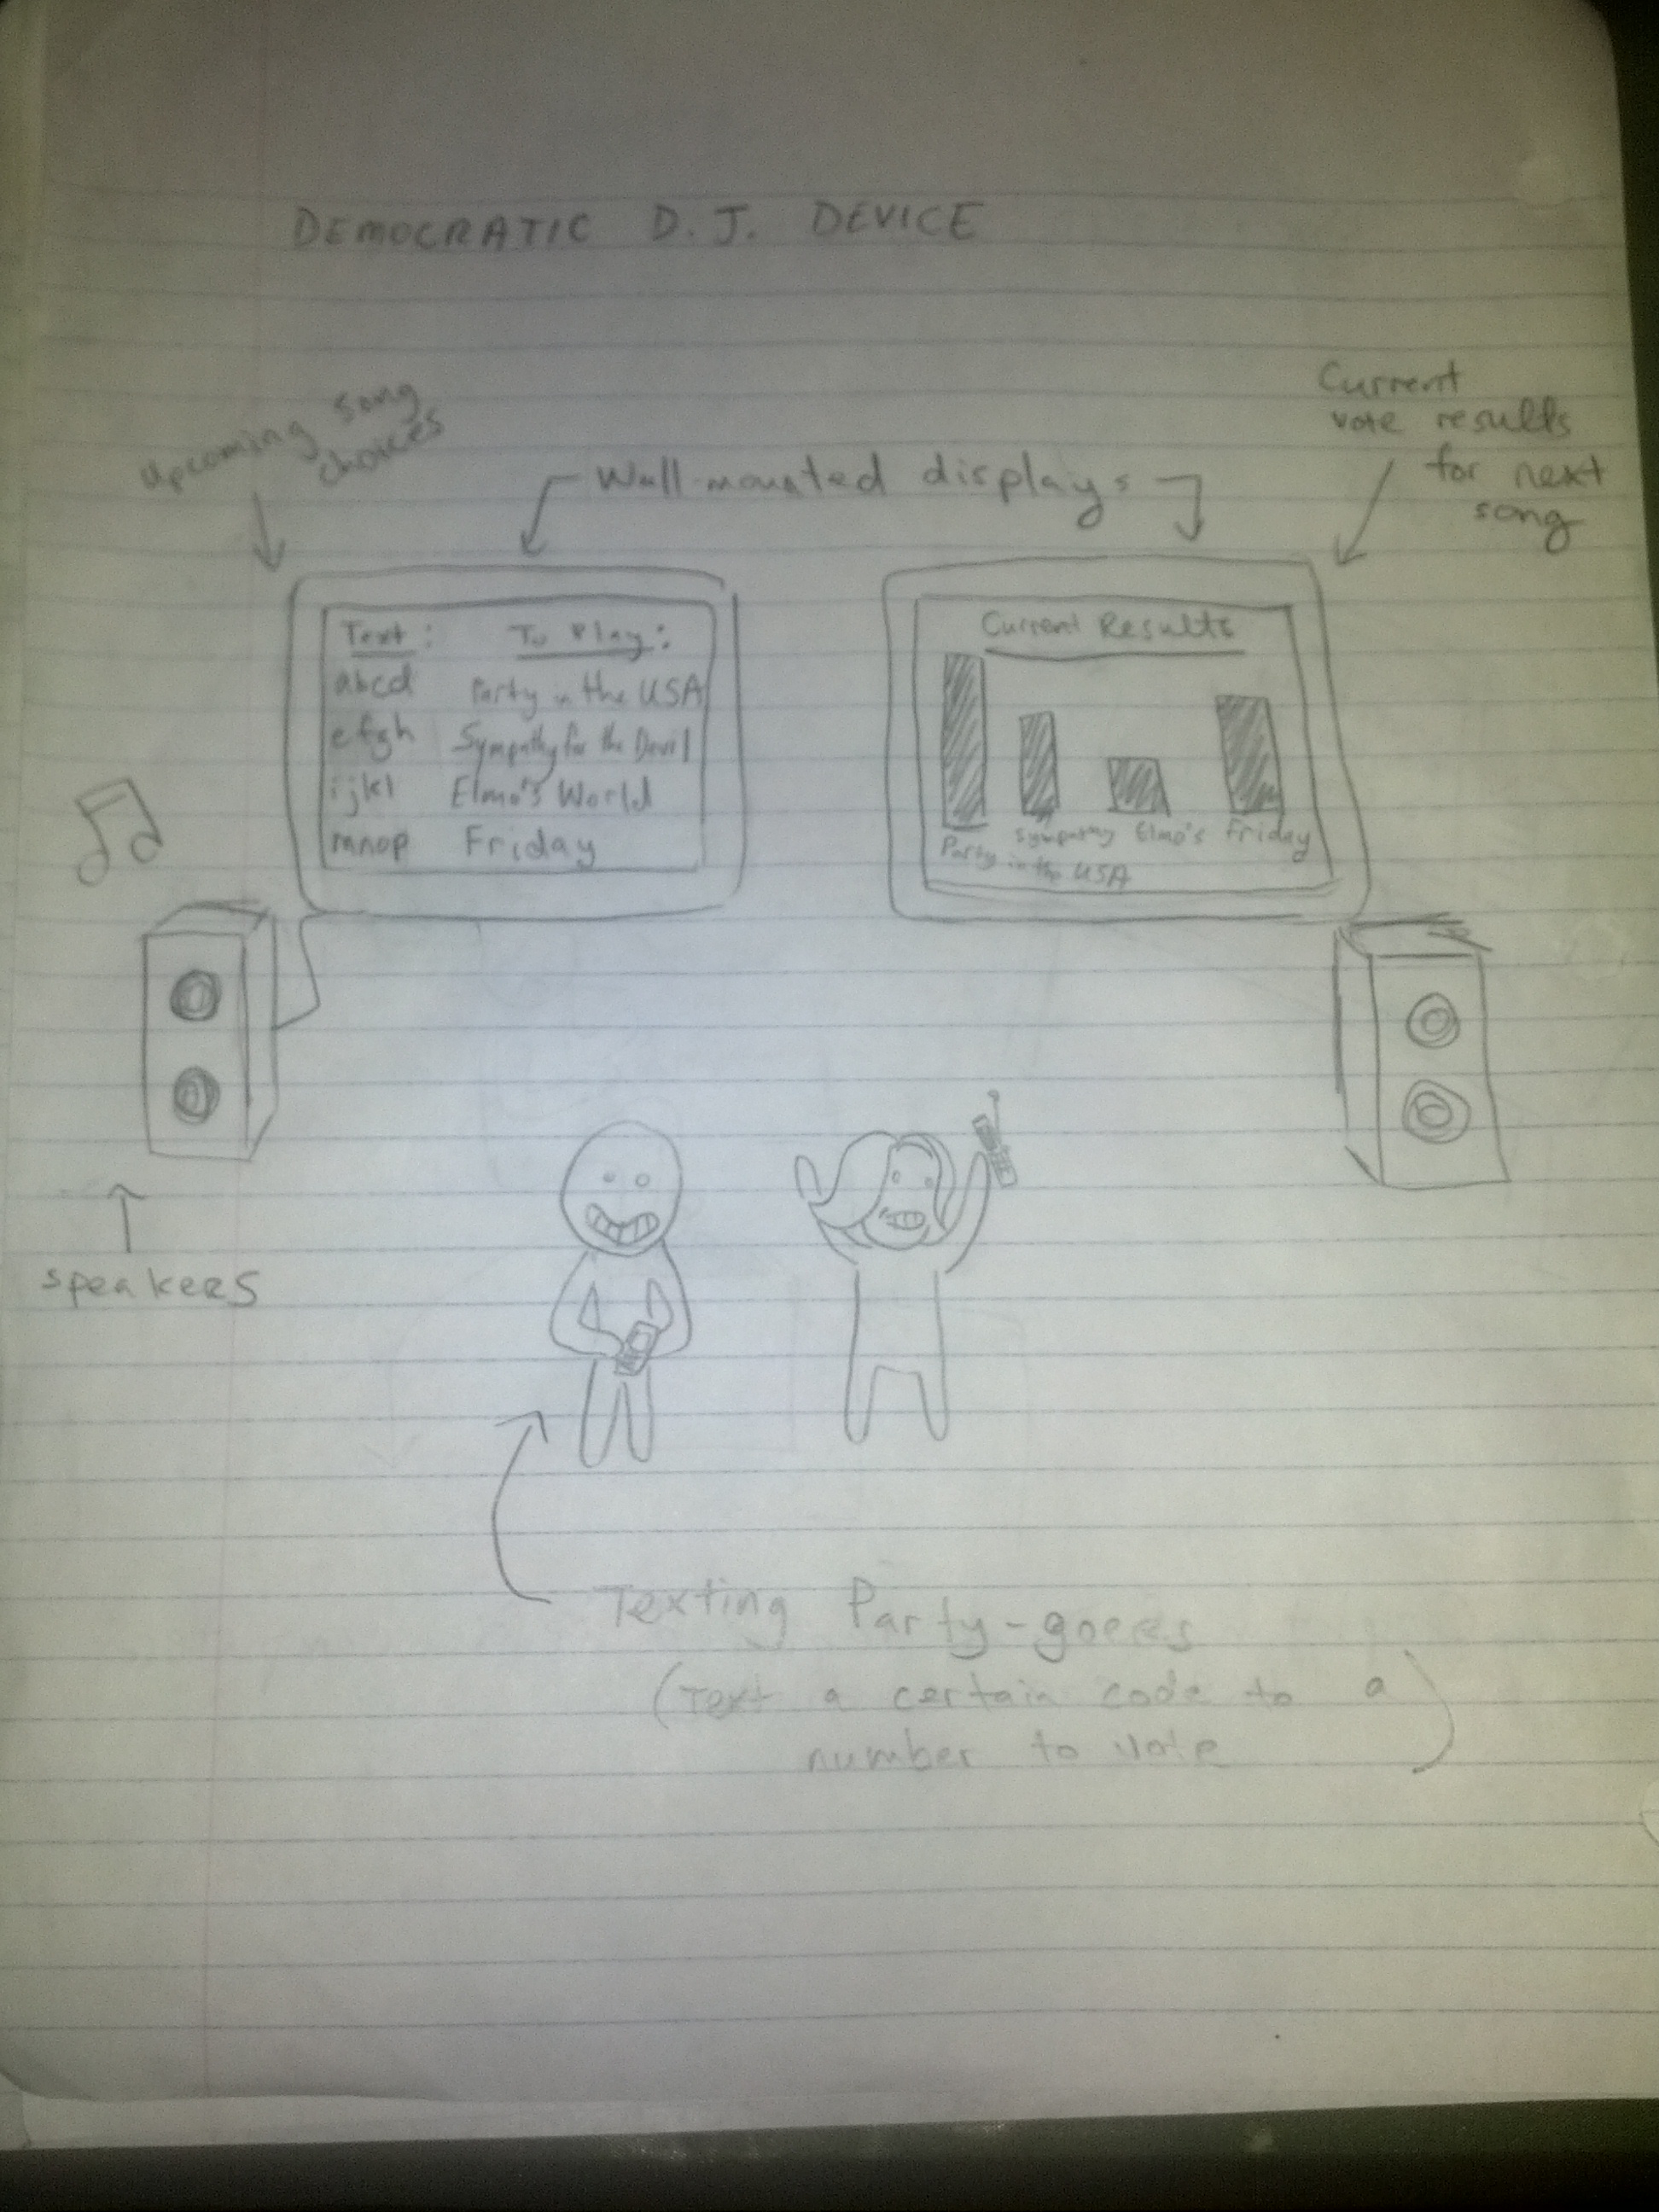
32. Party robot – allows attendees to vote by text on which of a few songs to play next, displays live tallies and automatically beat-matches and crossfades between songs to ensure that there are never silent moments.
33. Biometric sensor that detects which finger is being held to the sensor and opens certain applications and/or performs particular actions associated with each finger (e.g., different workspaces, a “gaming” finger, a multimedia finger…)
34. Alarm clock that is somehow synced with your sleep cycle (through movement, for example) in order to wake you up at the end of a sleep cycle before a certain time.
35. Fingerprint system that protects food/resources from roommates. Can also be used to “book” shared appliances like the oven or washing machine.
36. A credit-card or key fob form-factor sensor system that detects if you try to leave your room without your keys, wallet, or phone. If you forget them, it beeps and/or flashes a light to alert you.
37. A better way to flip through channels. Could use a Kinect and certain gestures, or a trackpad to scroll or detect blinking. Much easier than pressing the channel up/down buttons on a  remote.
38. Chair that detects your posture (e.g., how much you’re slouching, where your shoulders are, how much of your back is in contact with your chair) and automatically adjusts itself (with motorized cushions) to accommodate you.
39. Use a Kinect and projector to make an interactive desktop (like Jarvis from Iron Man)
40. Fingerprint scanning bike lock.
41. Shoes that inflate (or let in more air, like in those Nike air pockets) when you’re higher up in the air (when you jump) to cushion your landing.
42. Smartphone keyboard that adjusts based on how you’re holding it — if you’re holding it with one hand, for example, then the keyboard will automatically adjust to make it easier to type.
43. Television device that can sense when a laptop or other device with a screen is in front of it, then gives you the option of projecting that screen onto the TV, almost like a wireless external monitor.
44. External monitors that have a sense of physical location relative to other monitors that they are hooked up to — so if you have one monitor on the left and one on the right, you can swap their position and the mouse would still move correctly from the left screen to the right screen.
45. A device that enables any screen to be projected into a bigger size while maintaining any special properties it has (such as a touch screen) — a smartphone screen could be projected onto a table and essentially turned into a tabletop tablet.
46. A device in your shoes that measure how straight your steps are and sends the results to your phone — might be helpful for detecting when you’ve had too much to drink.
47. A glove that that can measure body temperature and control the room temperature accordingly. Additionally, gestures can be used to turn on speakers, turn lights off, etc.
48. Glasses/goggles with an infrared sensor that provide a heads-up display identifying living (and other warm) things in your field of view, classifying them based on their general shape and size (could be useful for detecting wildlife or stalkers).
49. Toilet that keeps track of the size/consistency/color of your stools, rating them on the Bristol stool scale and letting you know of potential health problems.
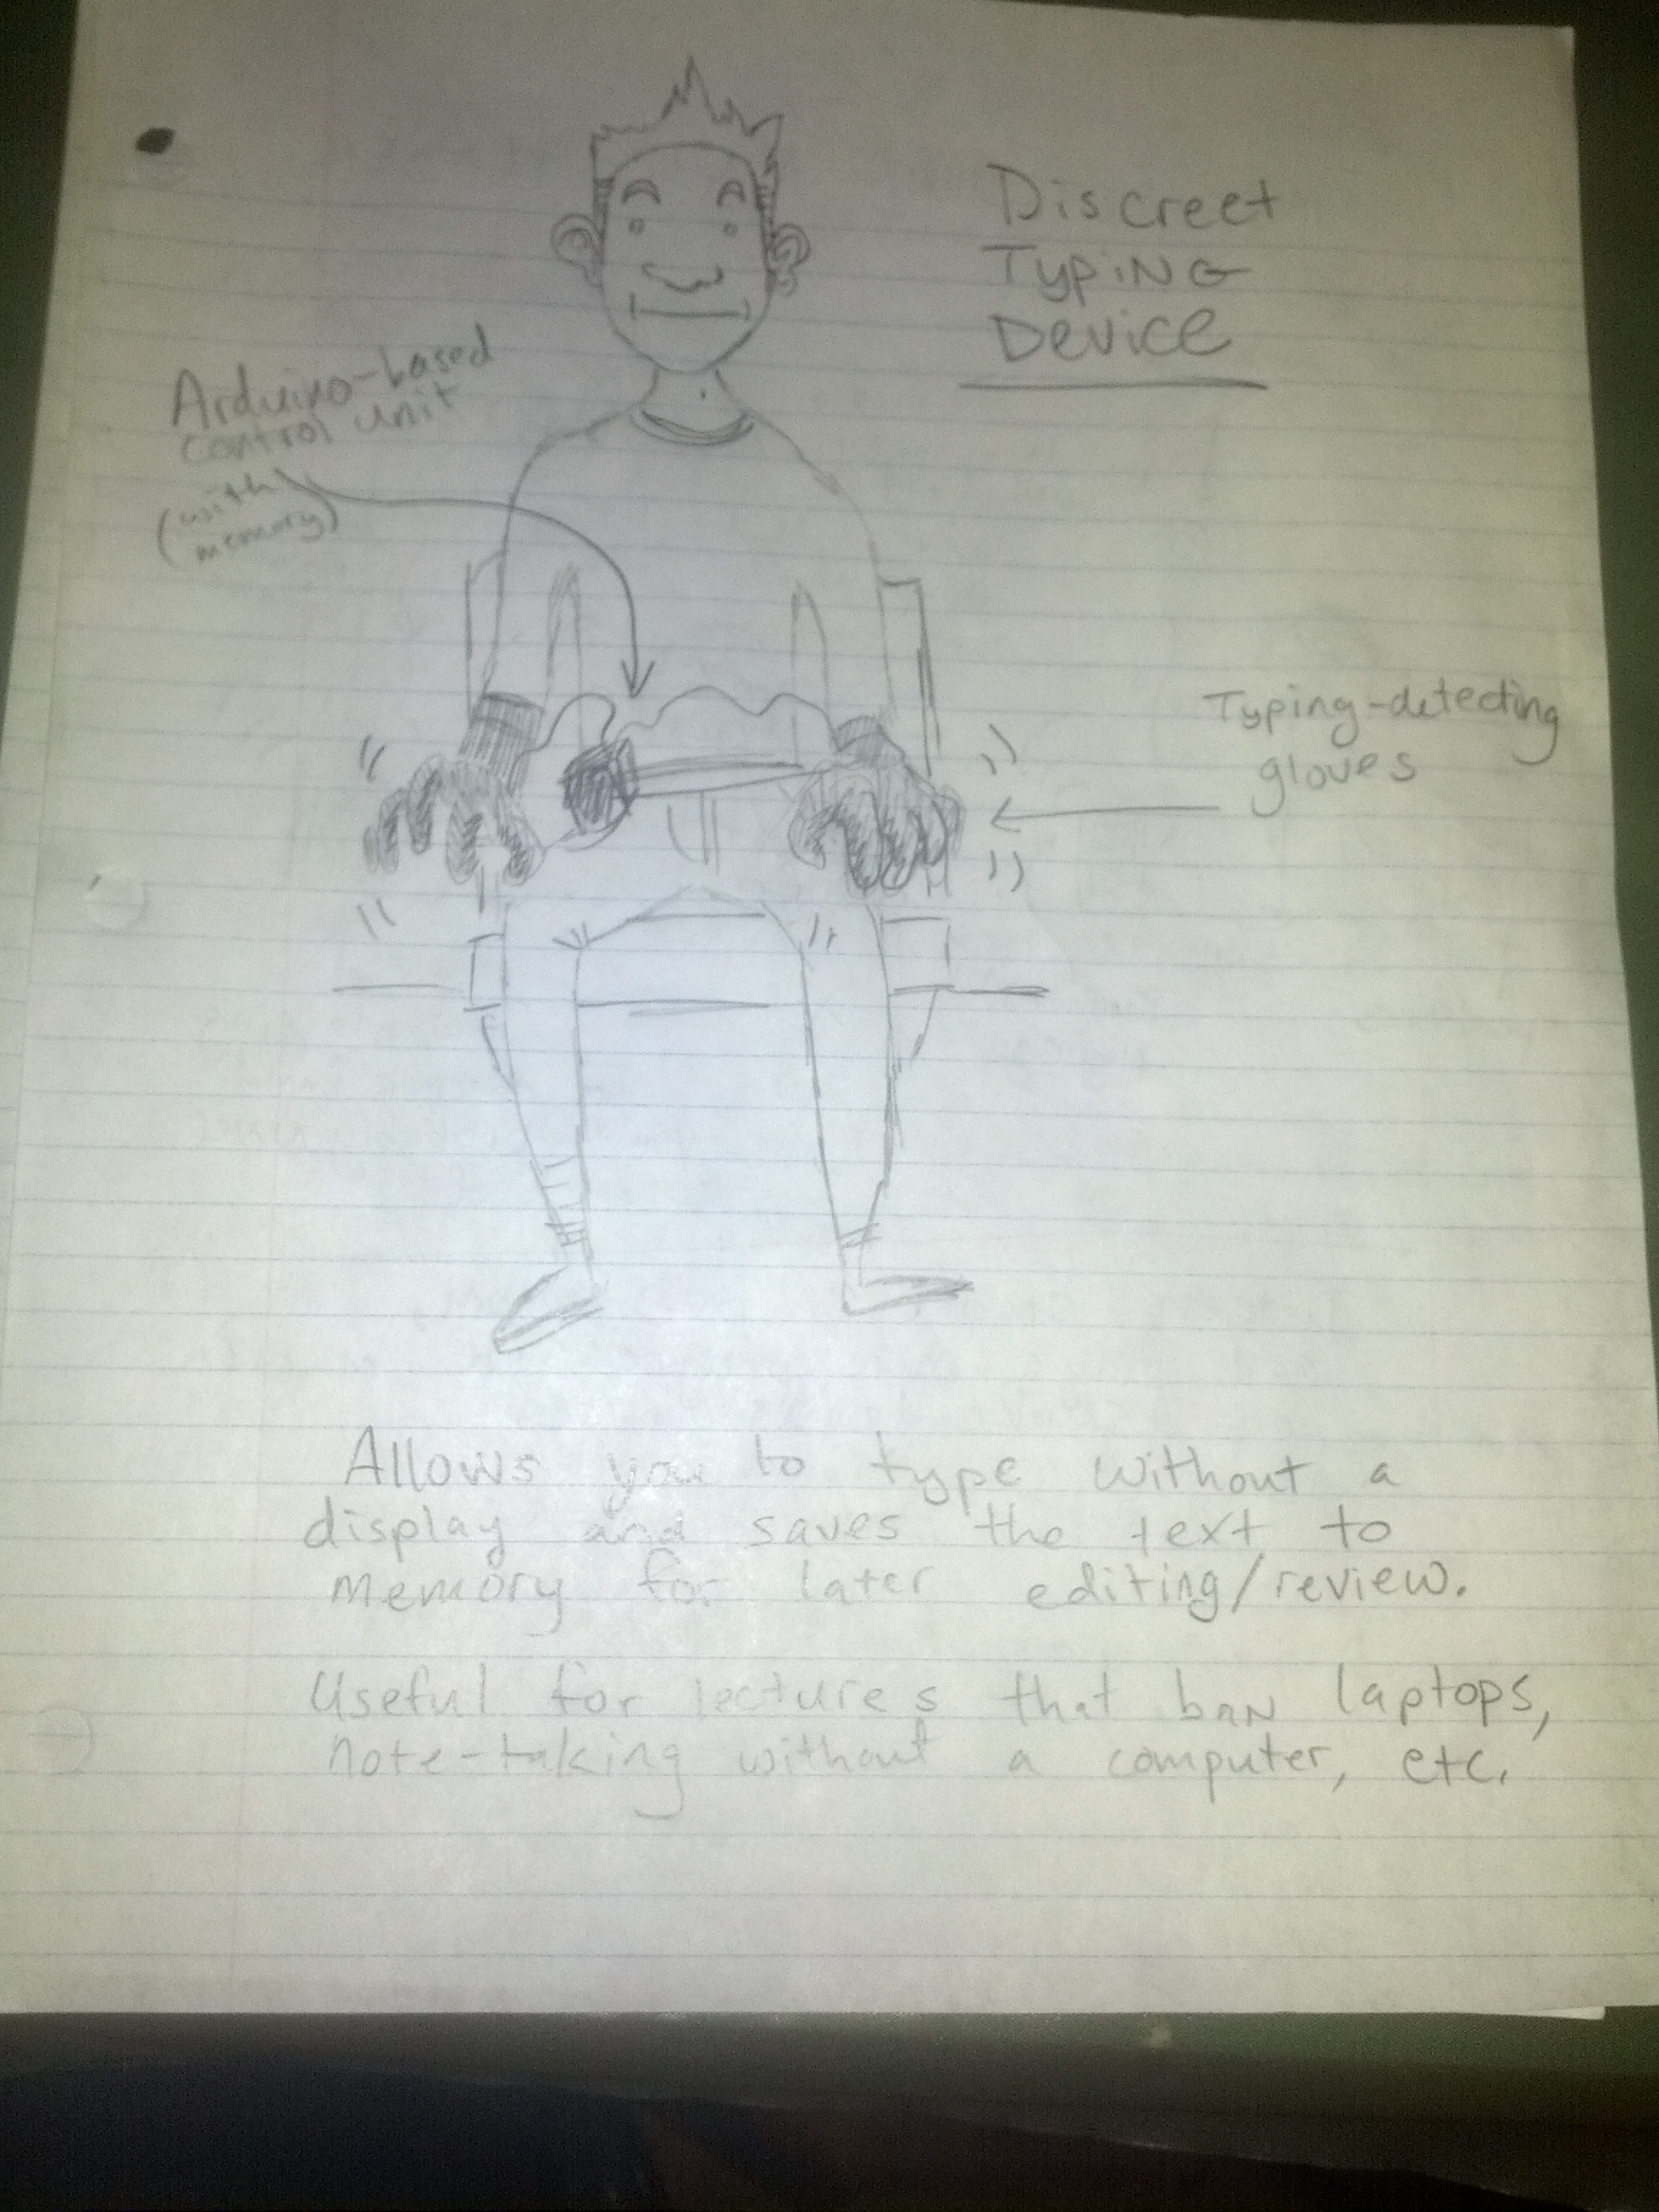
50. Either sensing gloves or a flat keyboard without a display that can be used to perform typing motions in the absence of a laptop, display, or proper keyboard — useful for situations where it’s not feasible to have a laptop out, or (for example) in a class where laptops are banned.

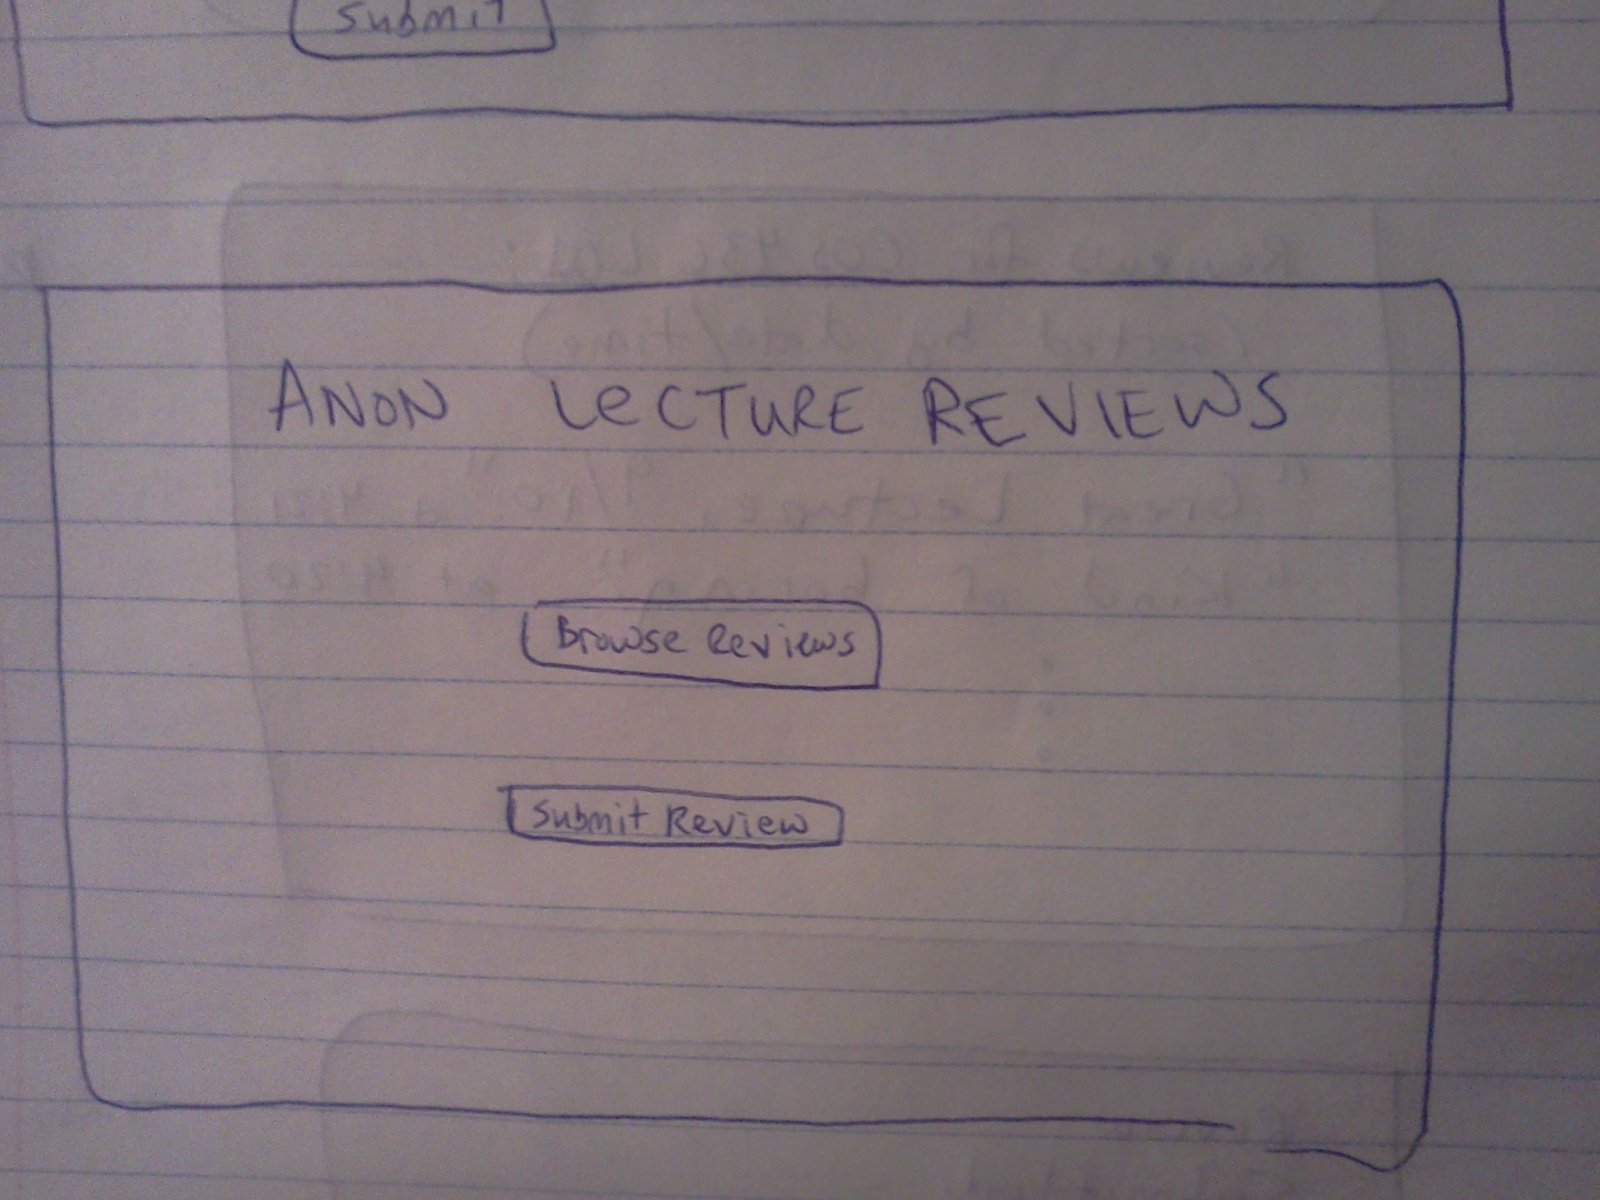
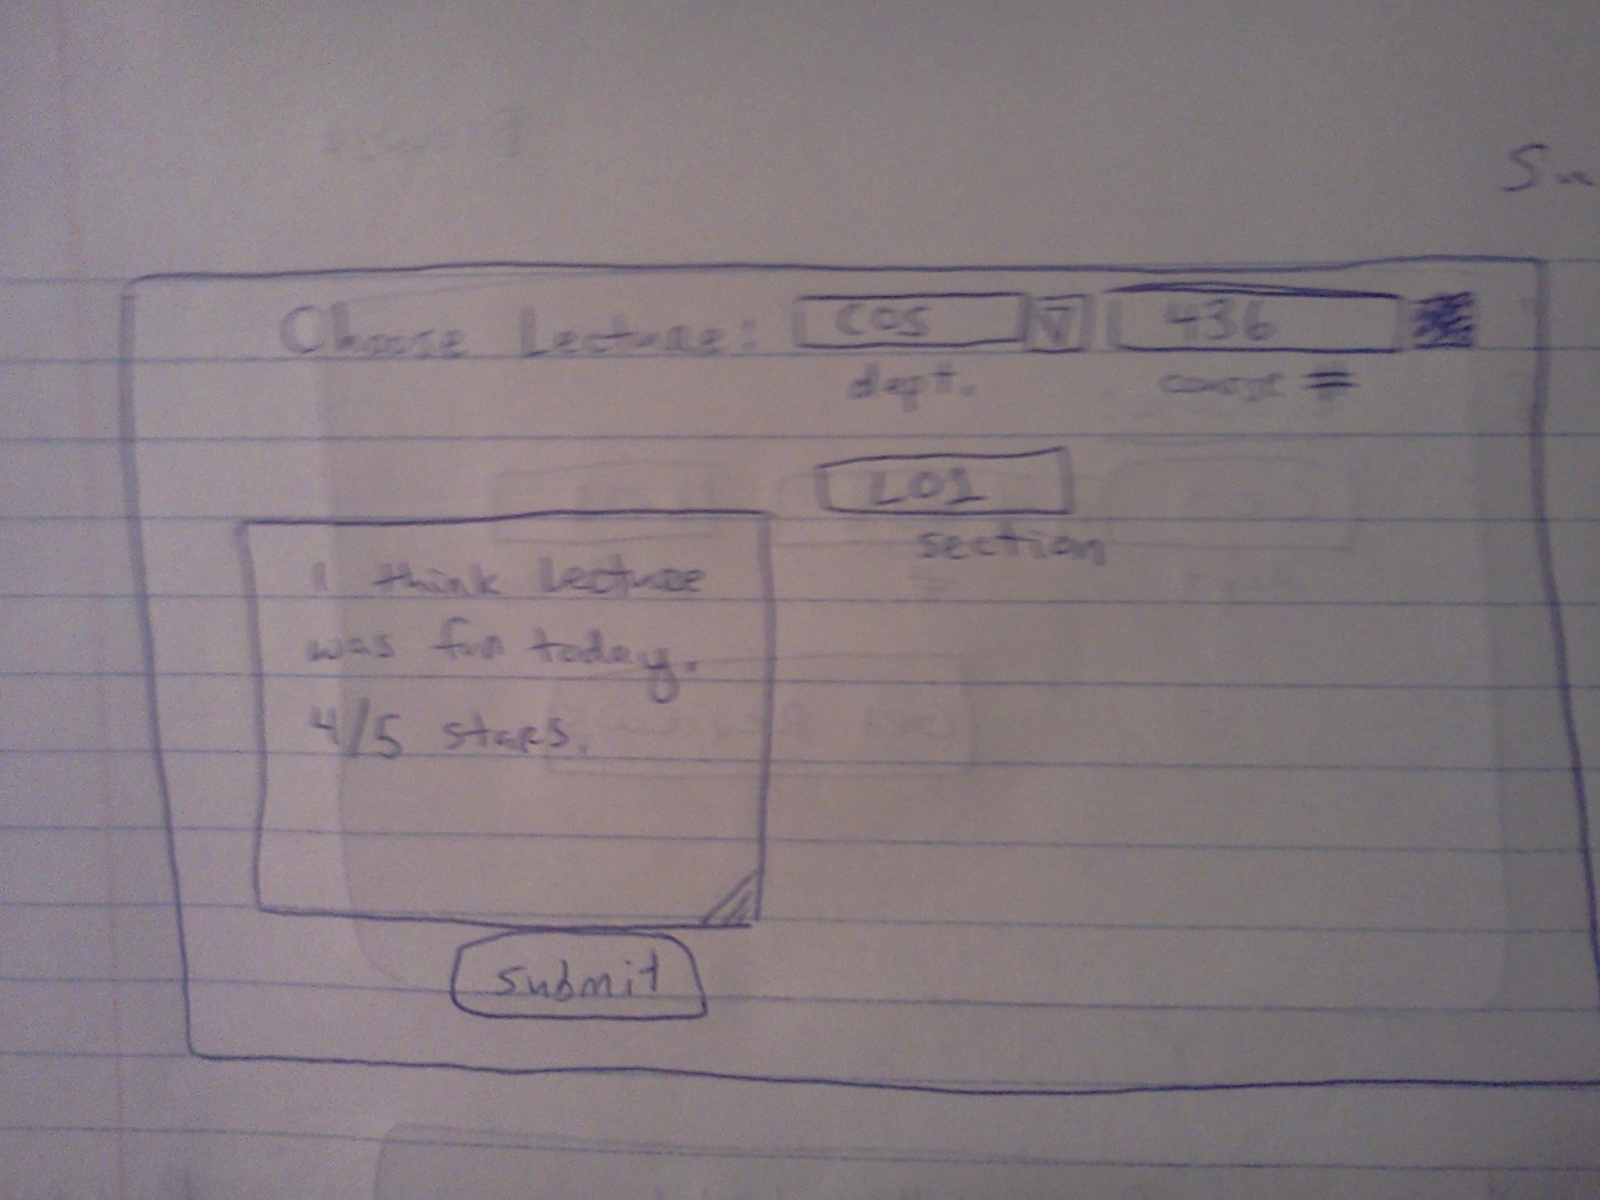
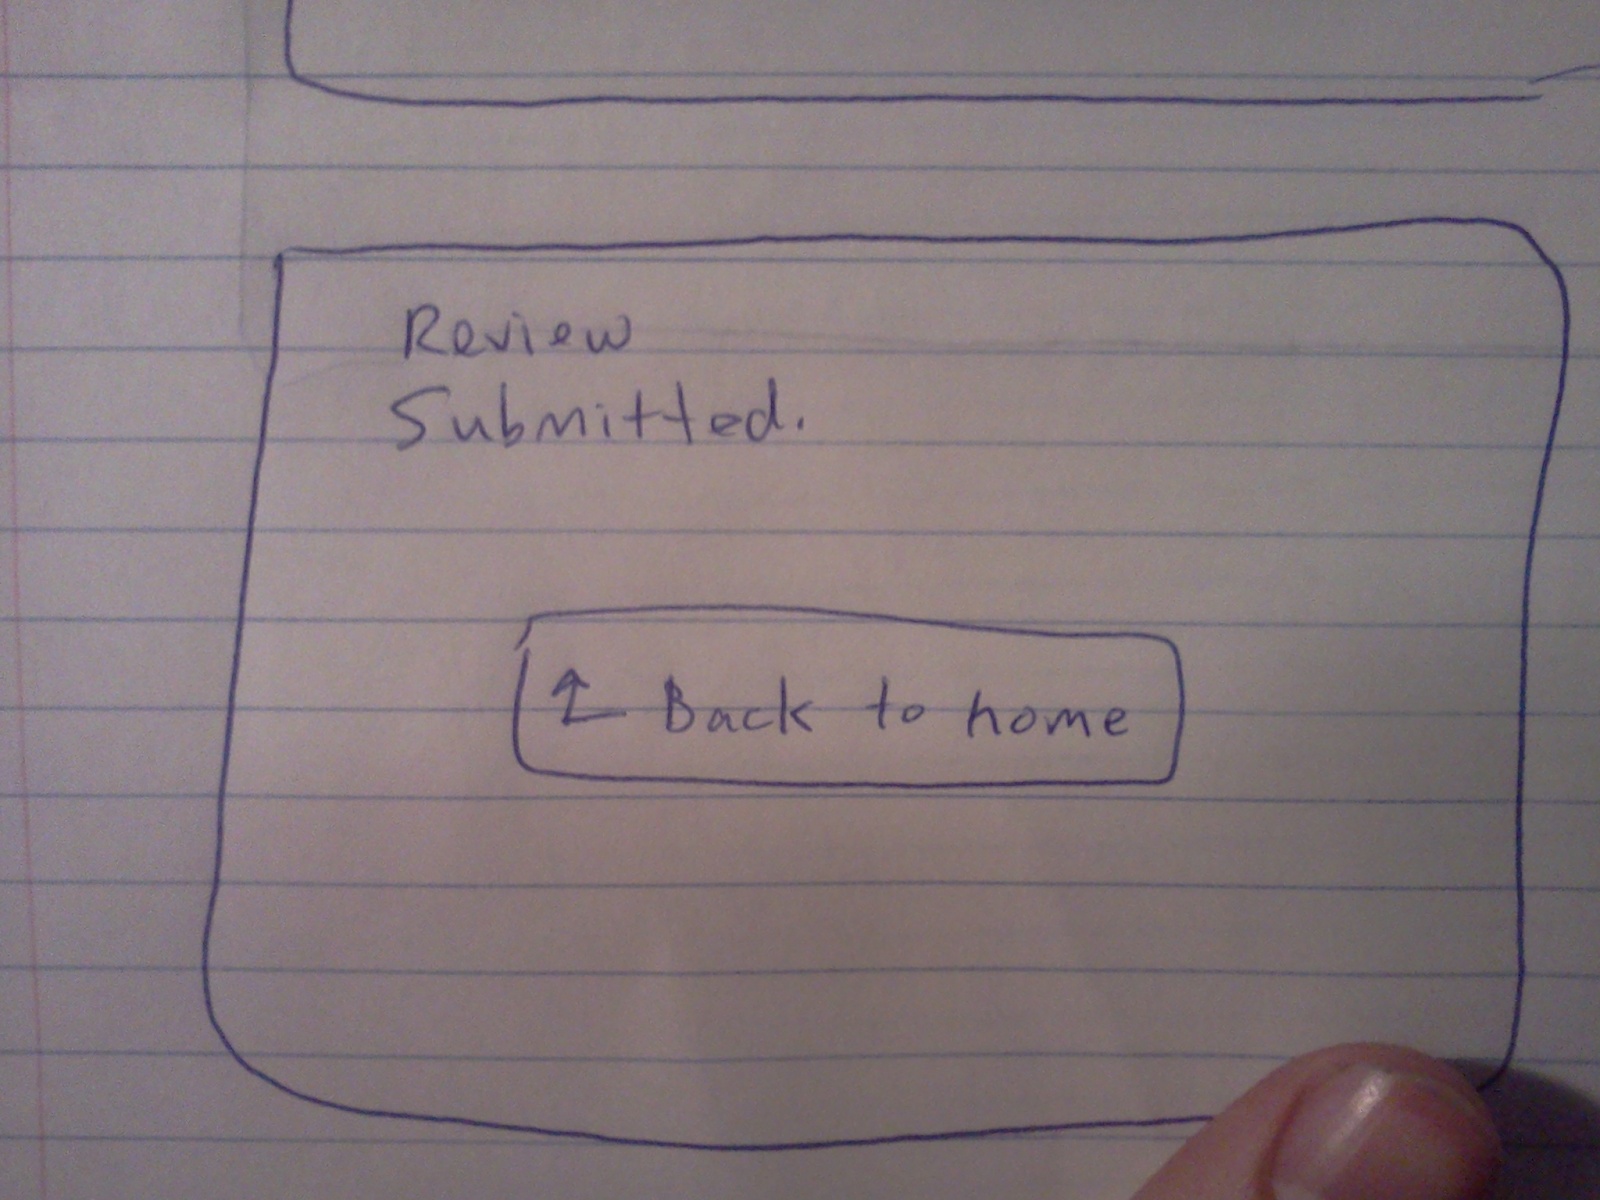
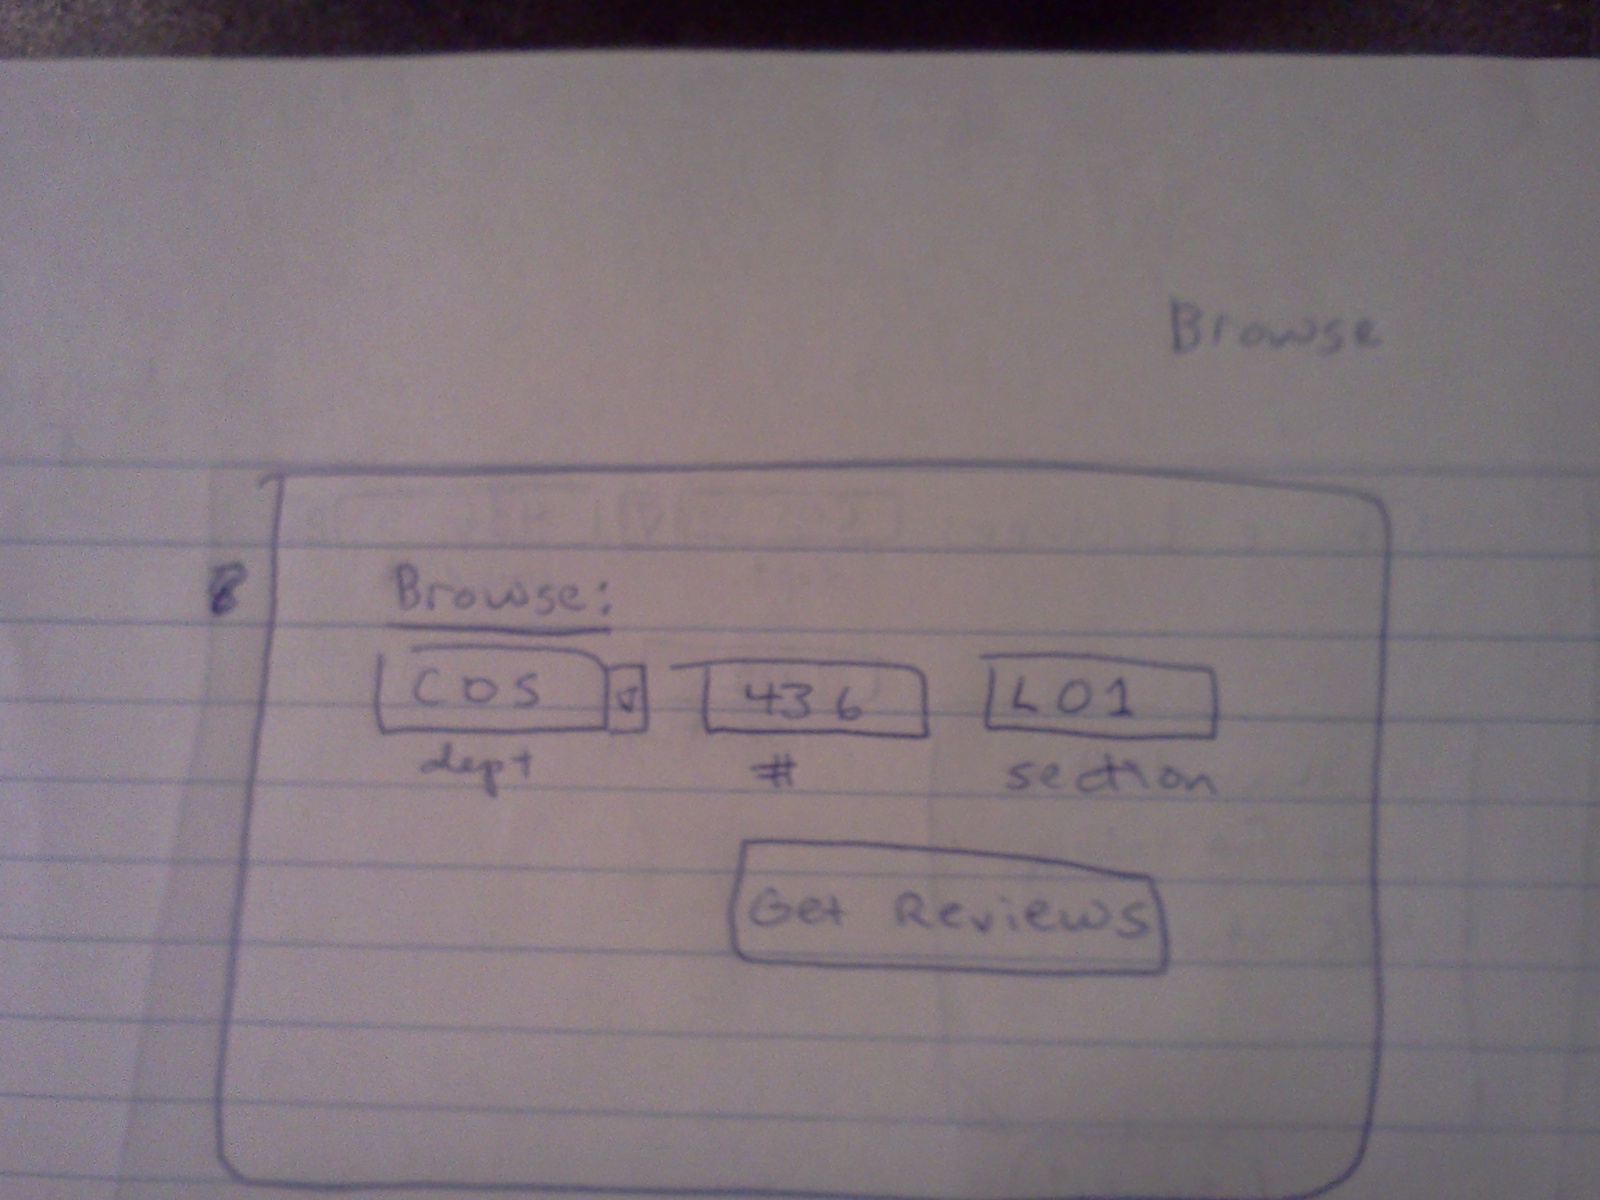
Brainstorming Sketches:
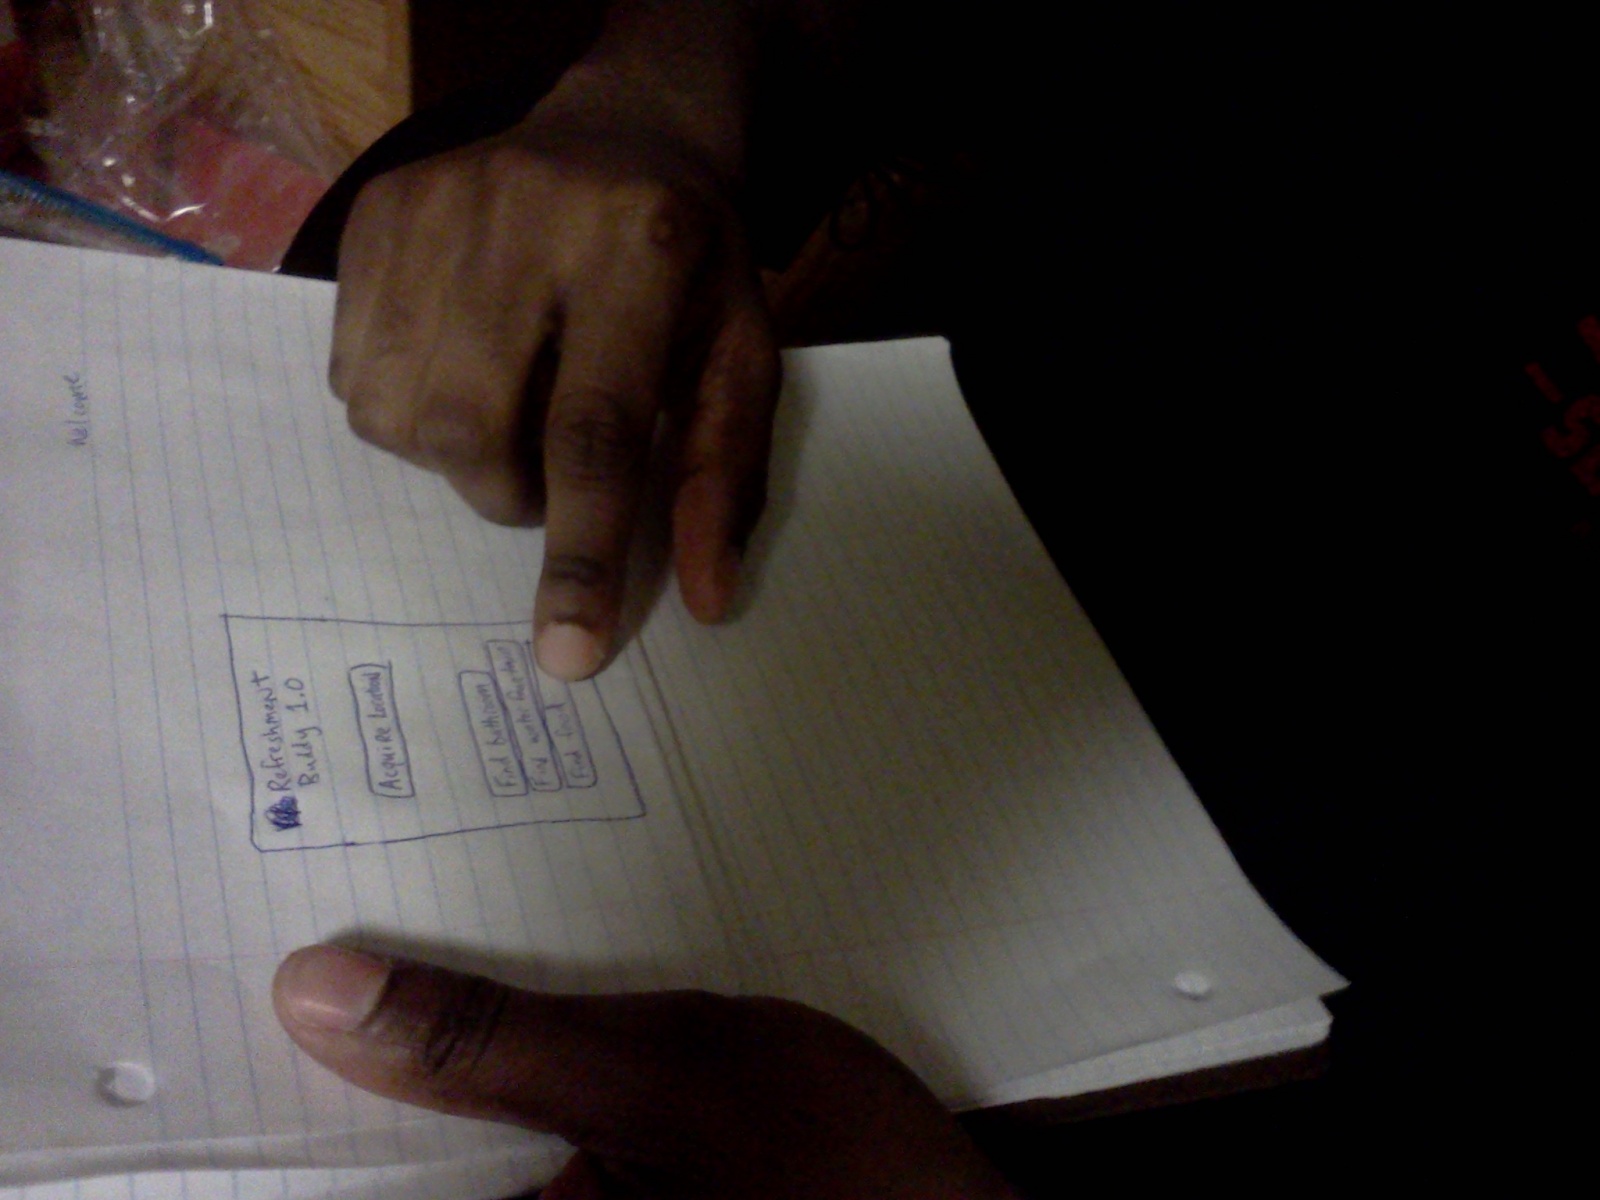
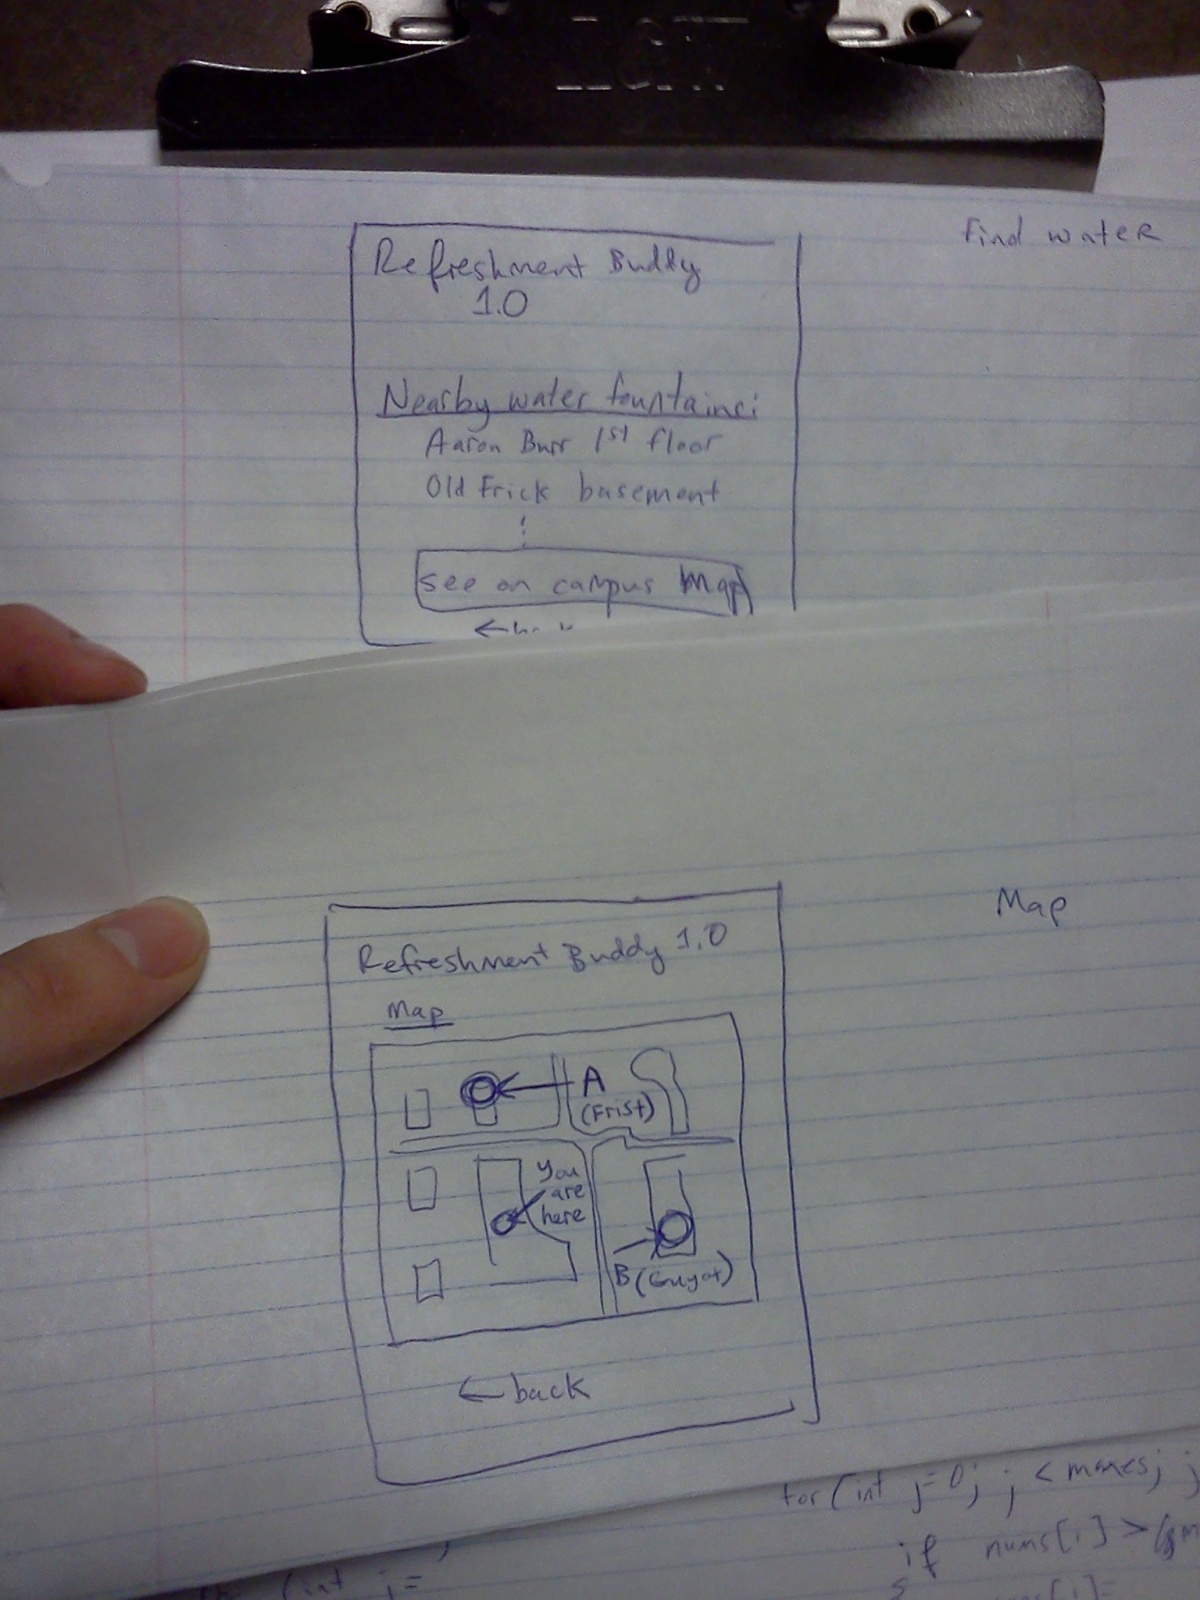
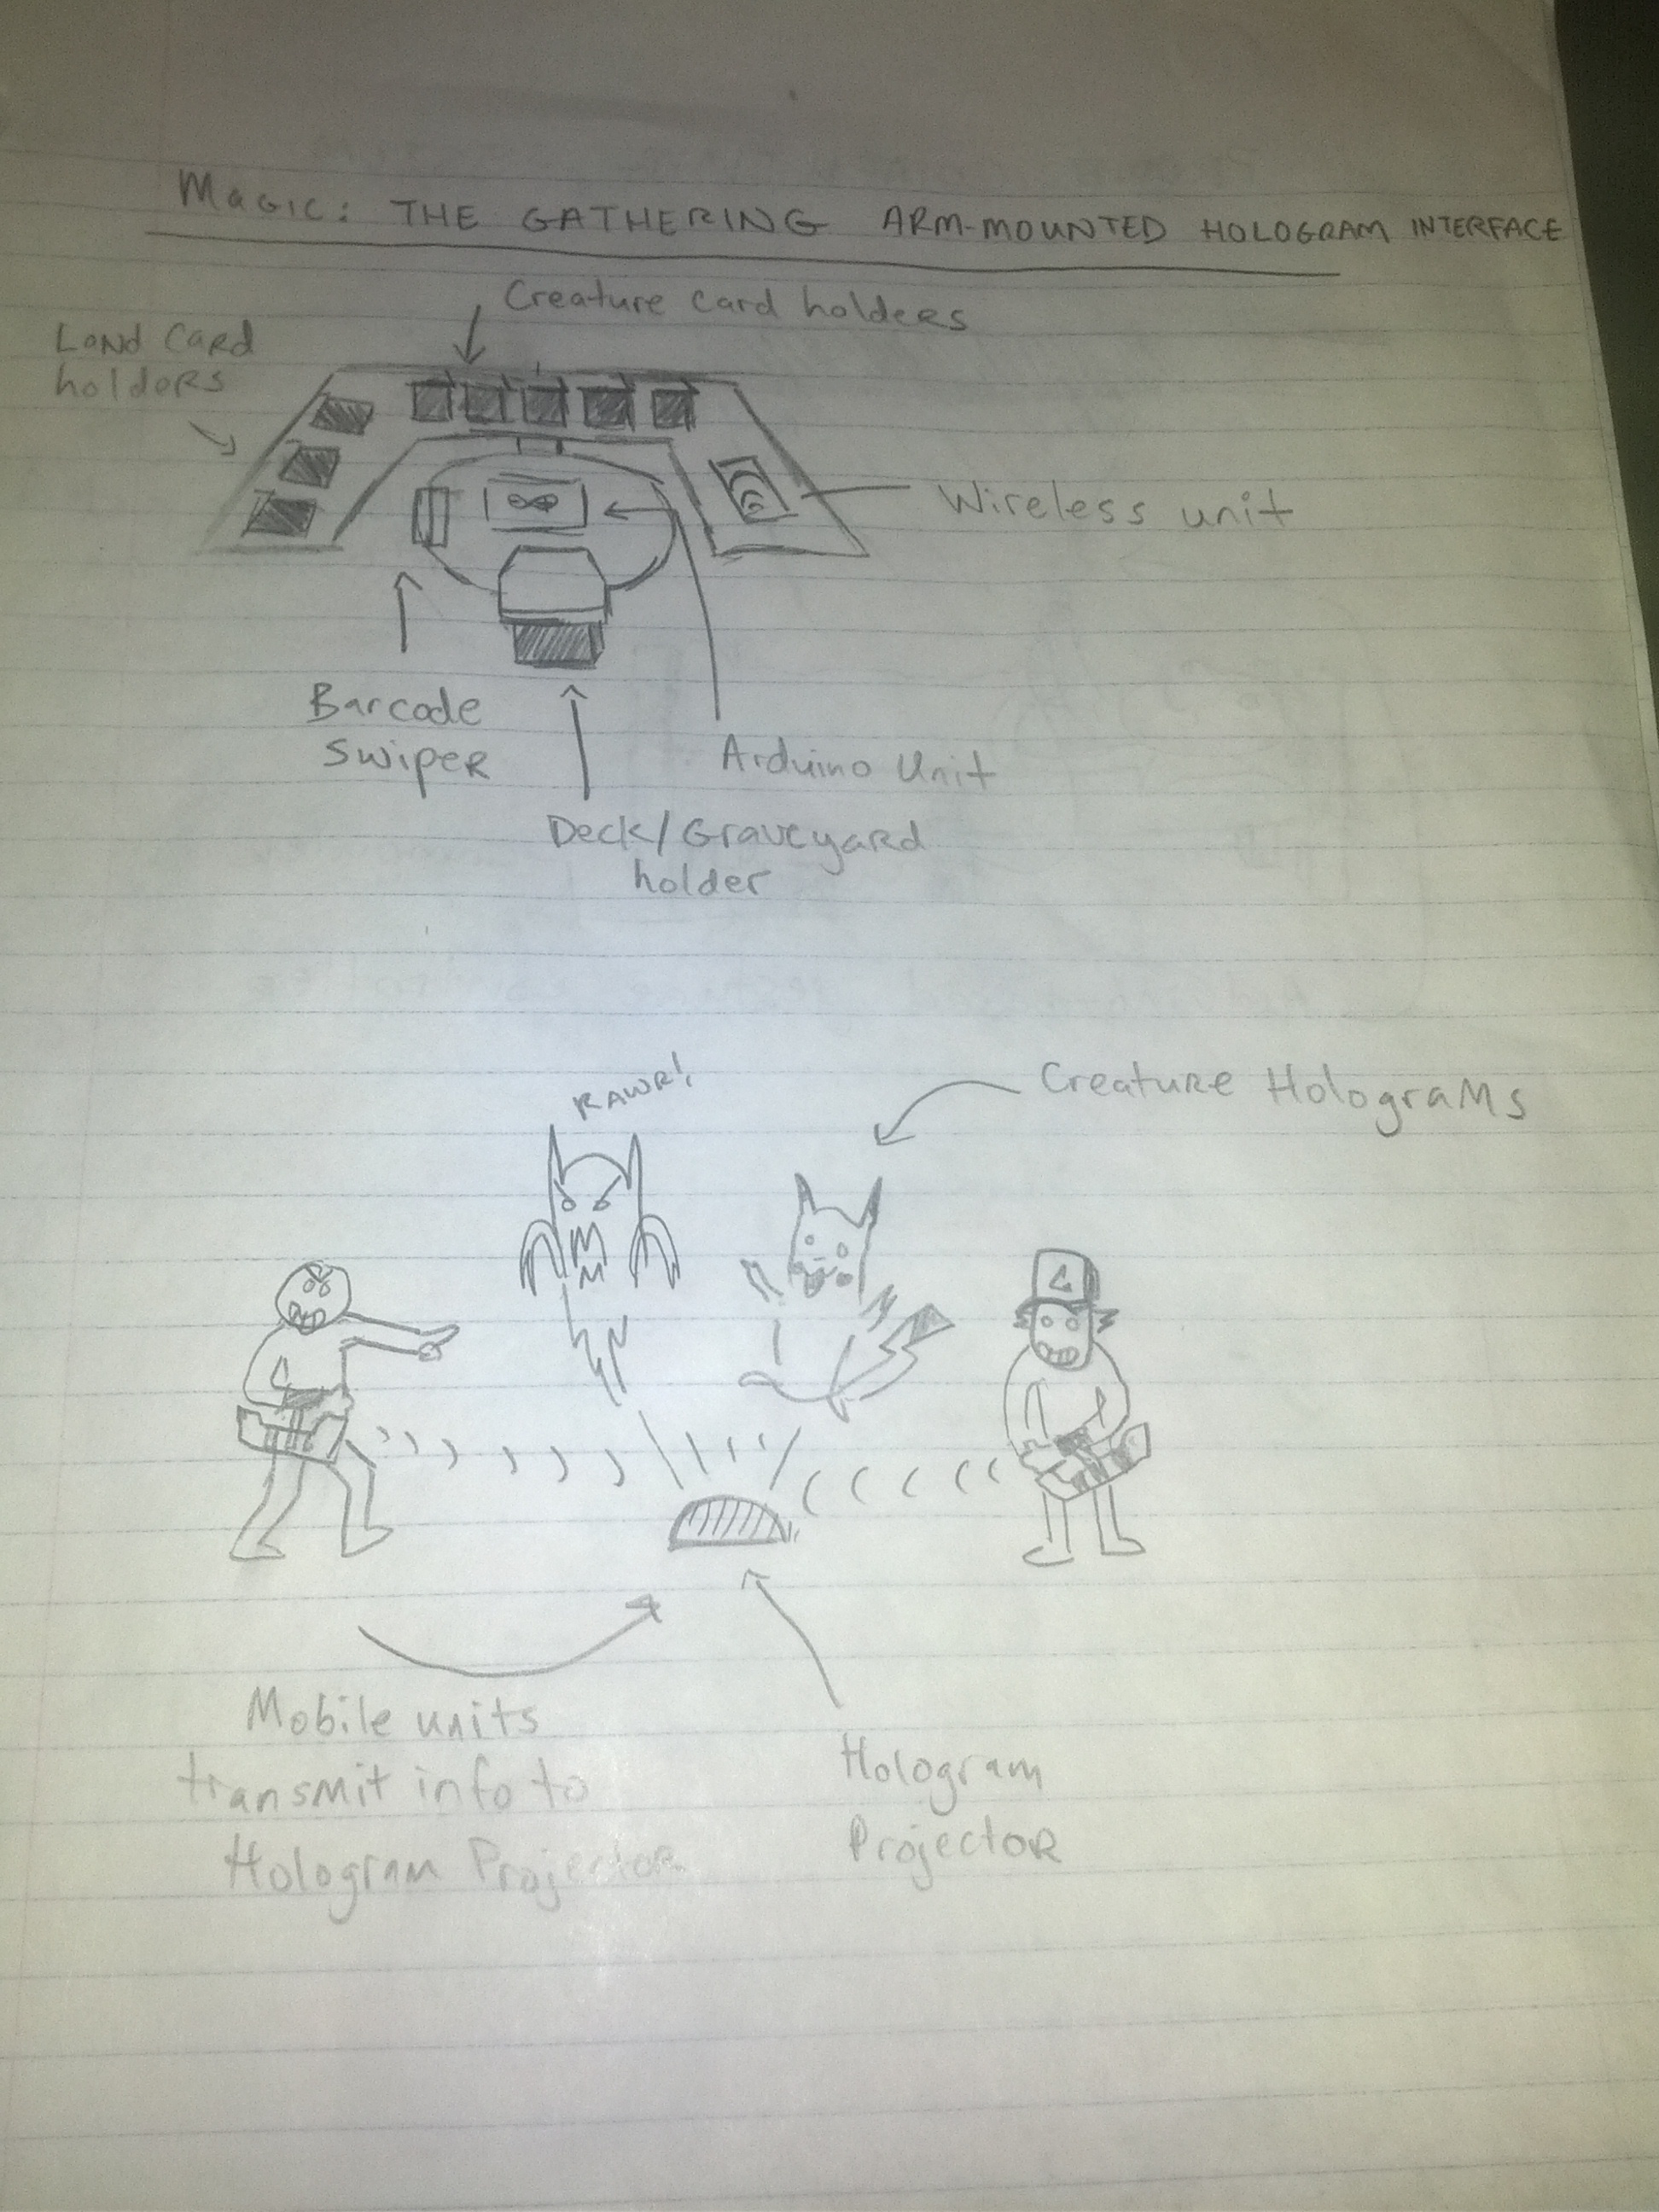
1) Interface for Magic: The Gathering or a similar game that maintains an internal representation of the game, enforces rules, and provides graphical feedback on game state to users.
duelDisk

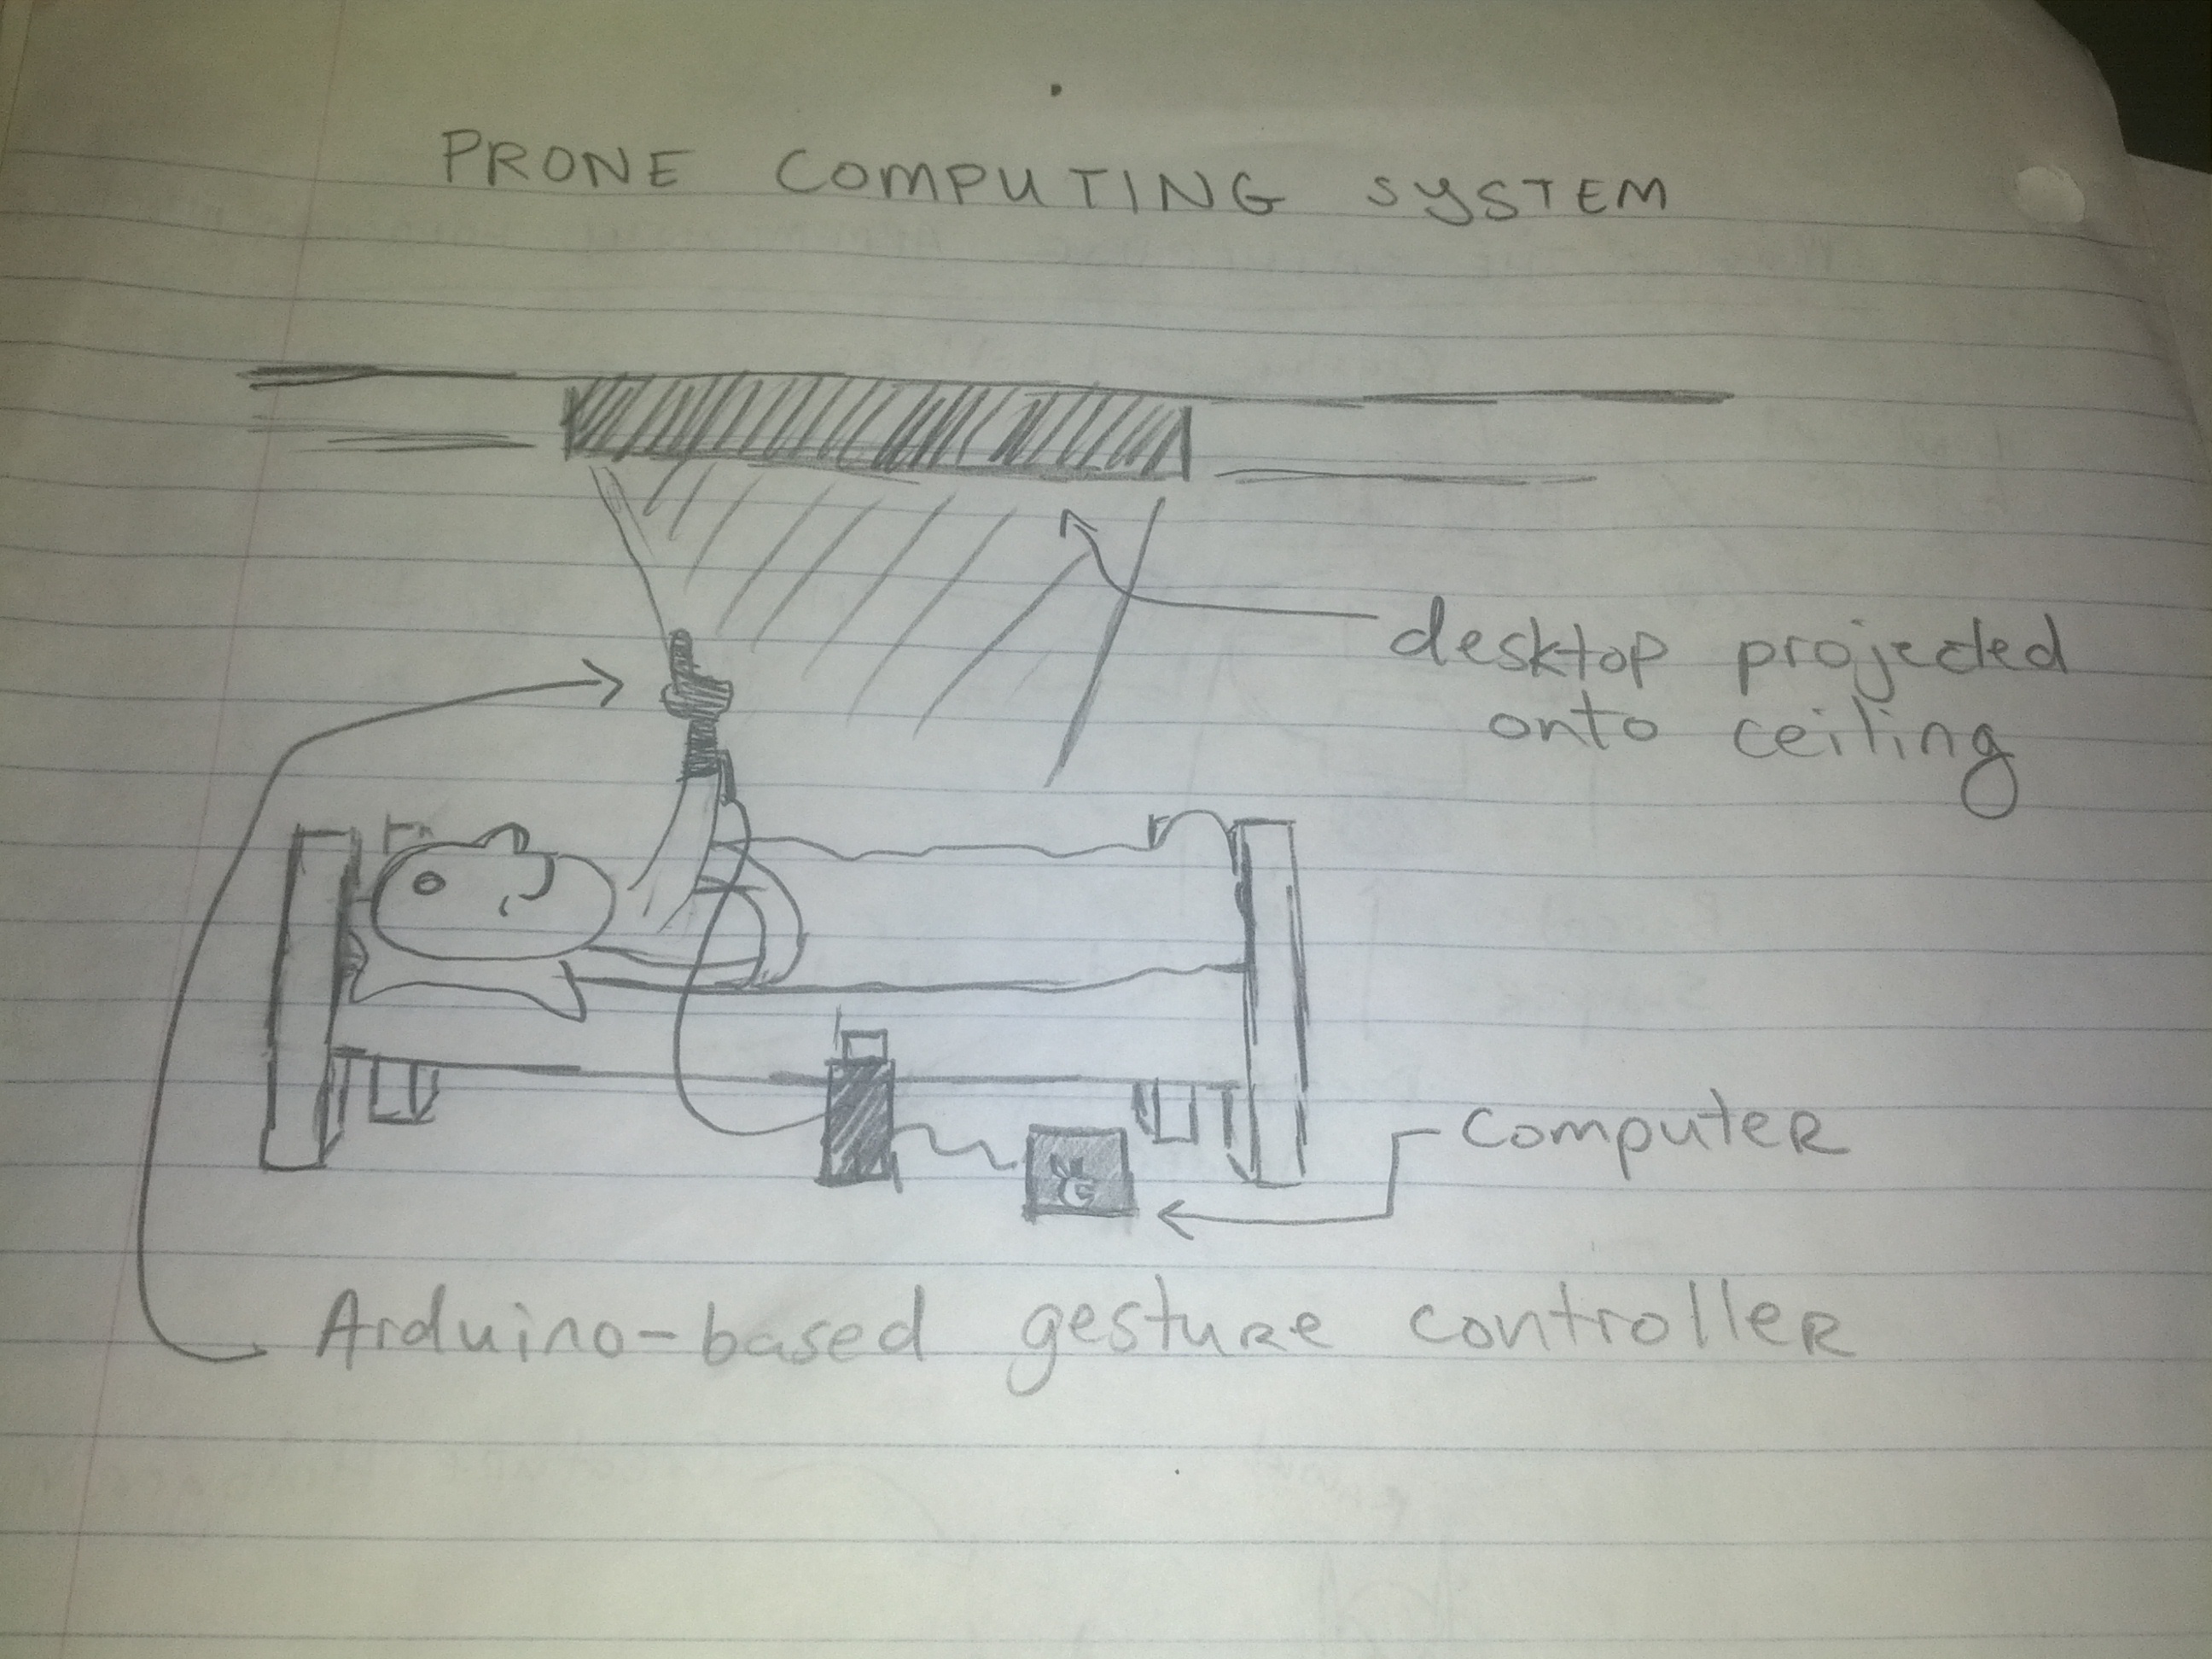
7) Interface to use basic functions of a computer while prone.
proneComputing

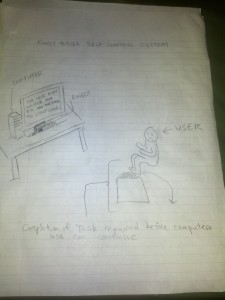
10) Make a self-control type device using the Kinect that locks users out of banned appli­ca­tions or spe­cific web­sites until they per­form some phys­i­cal task.
fitnessSelfControl

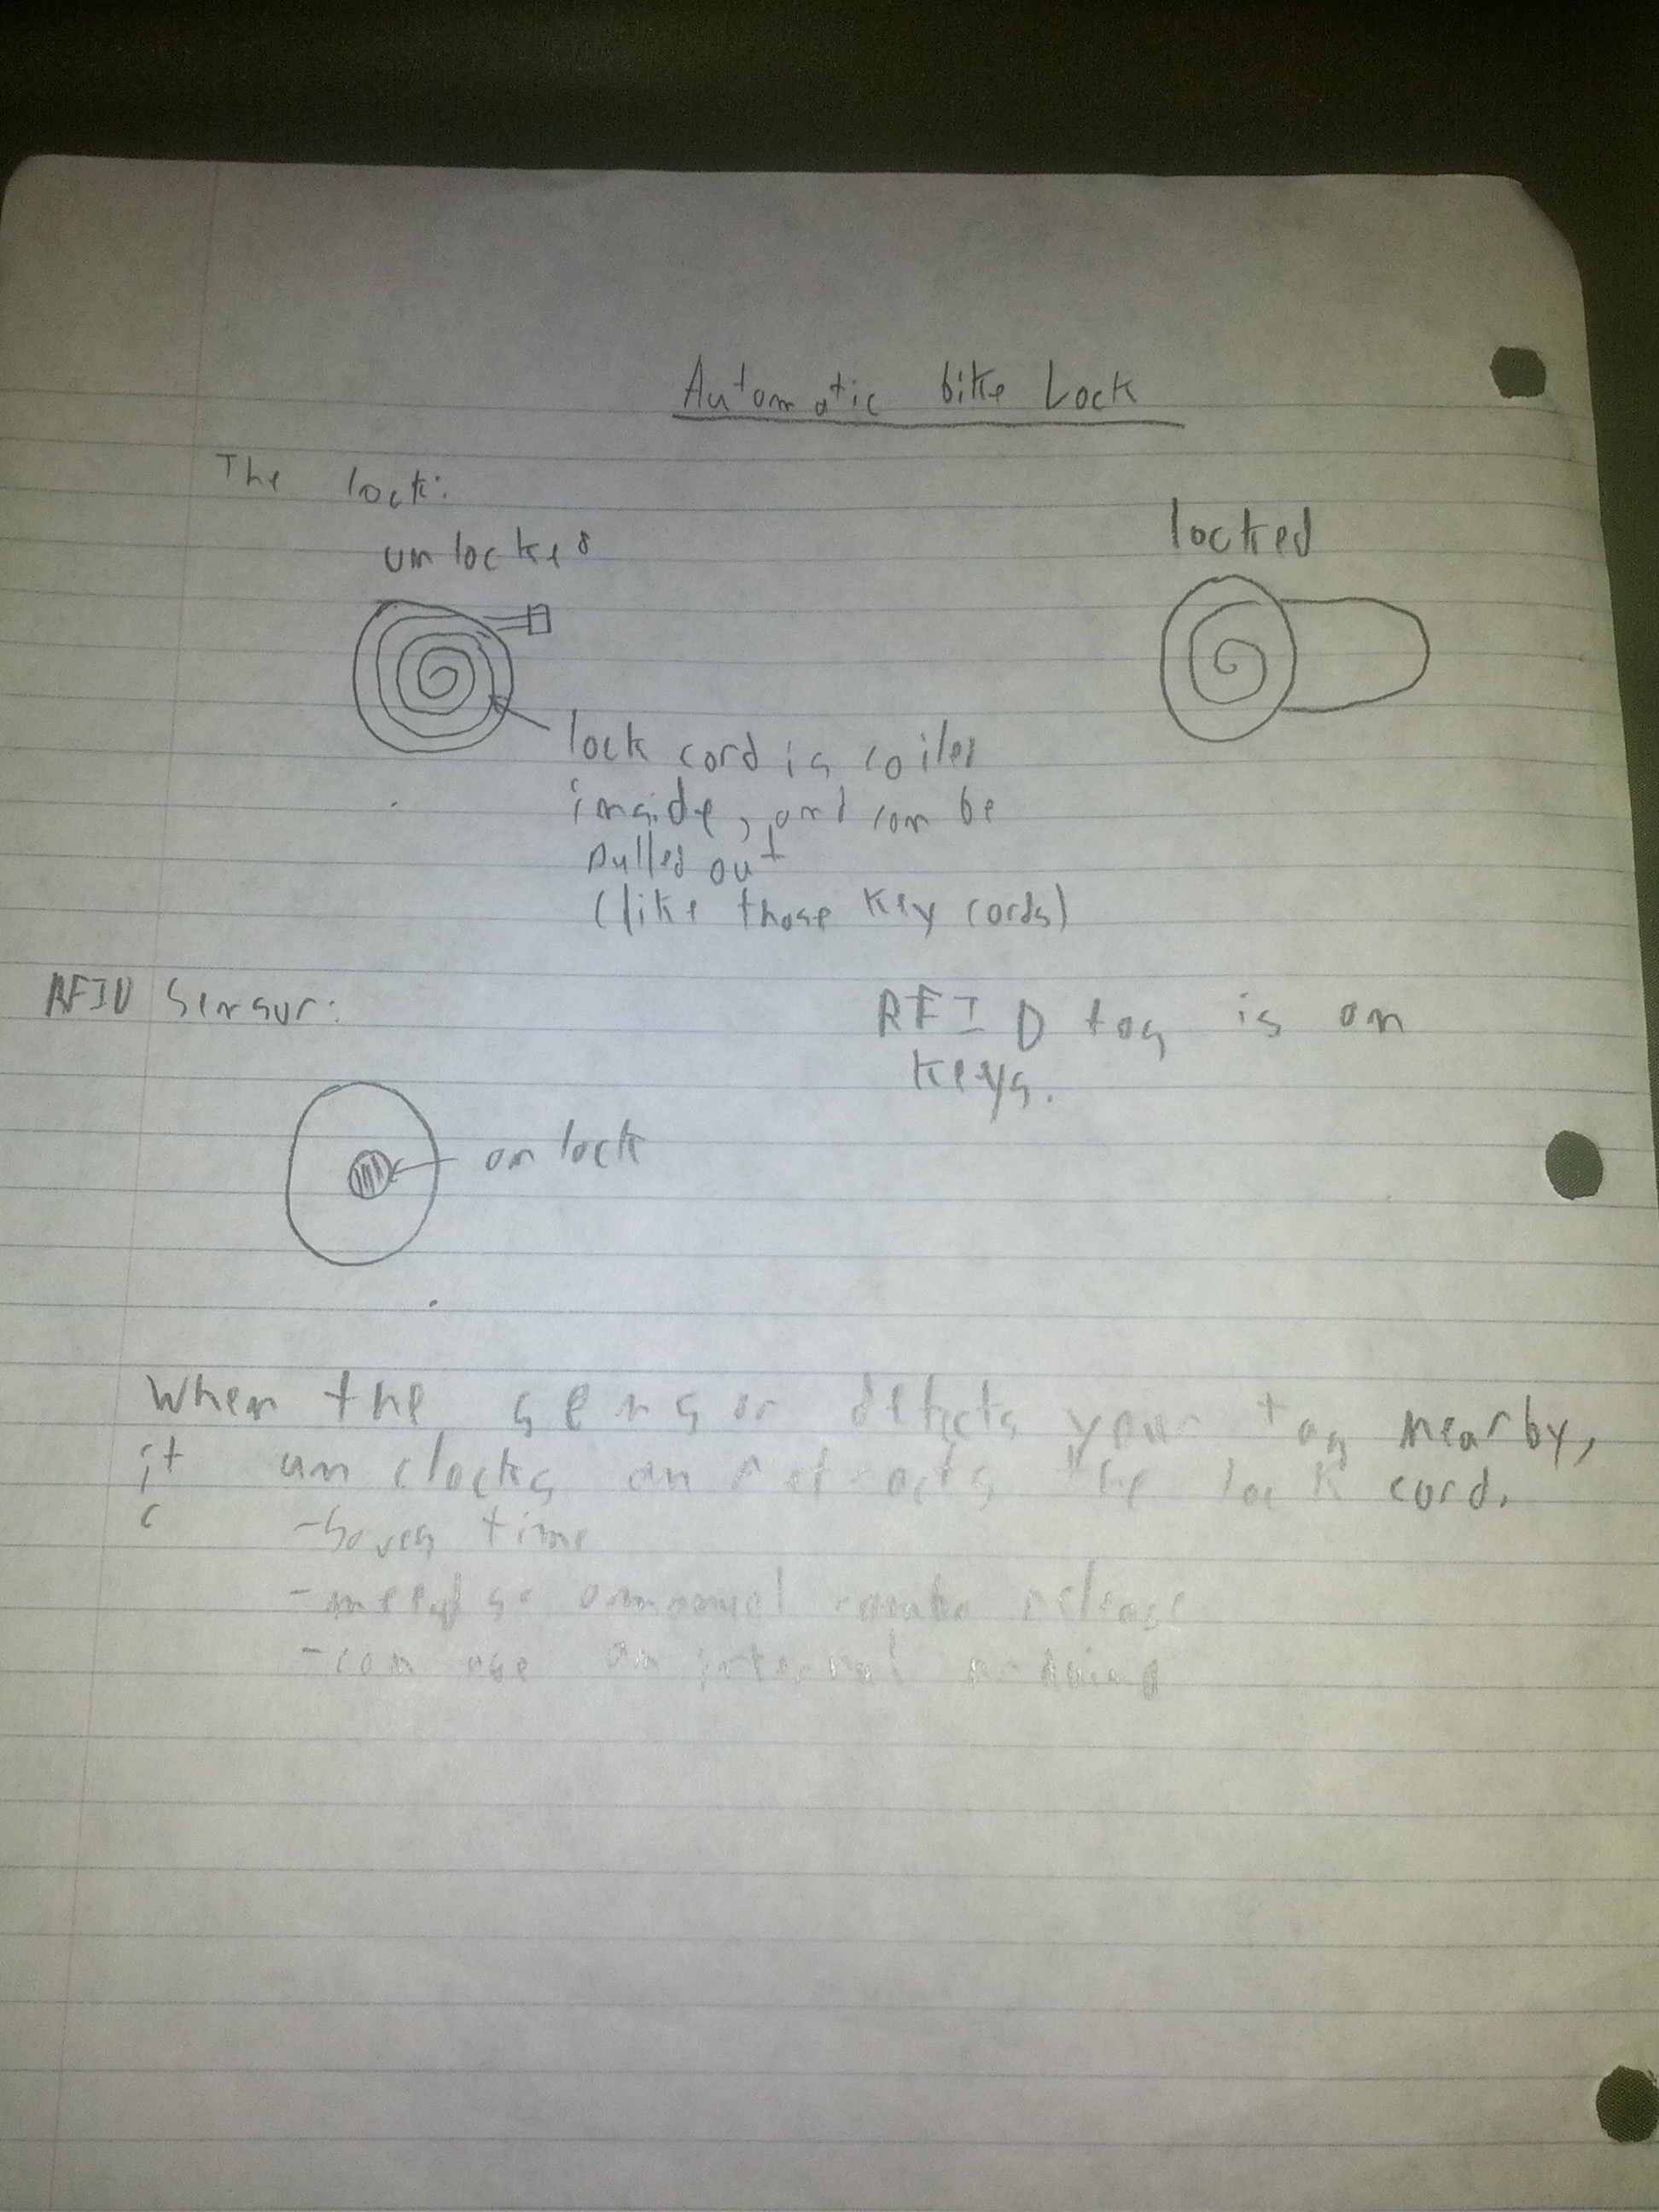
19) Automatic bike lock — A coiled lock system that automatically retracts the lock when you get close to it.
bikelockR

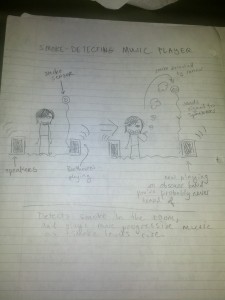
26) Smoke-controlled music player.
smoke

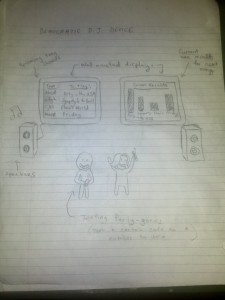
32) Party robot – allows attendees to vote by text on which of a few songs to play next.
partyRobot

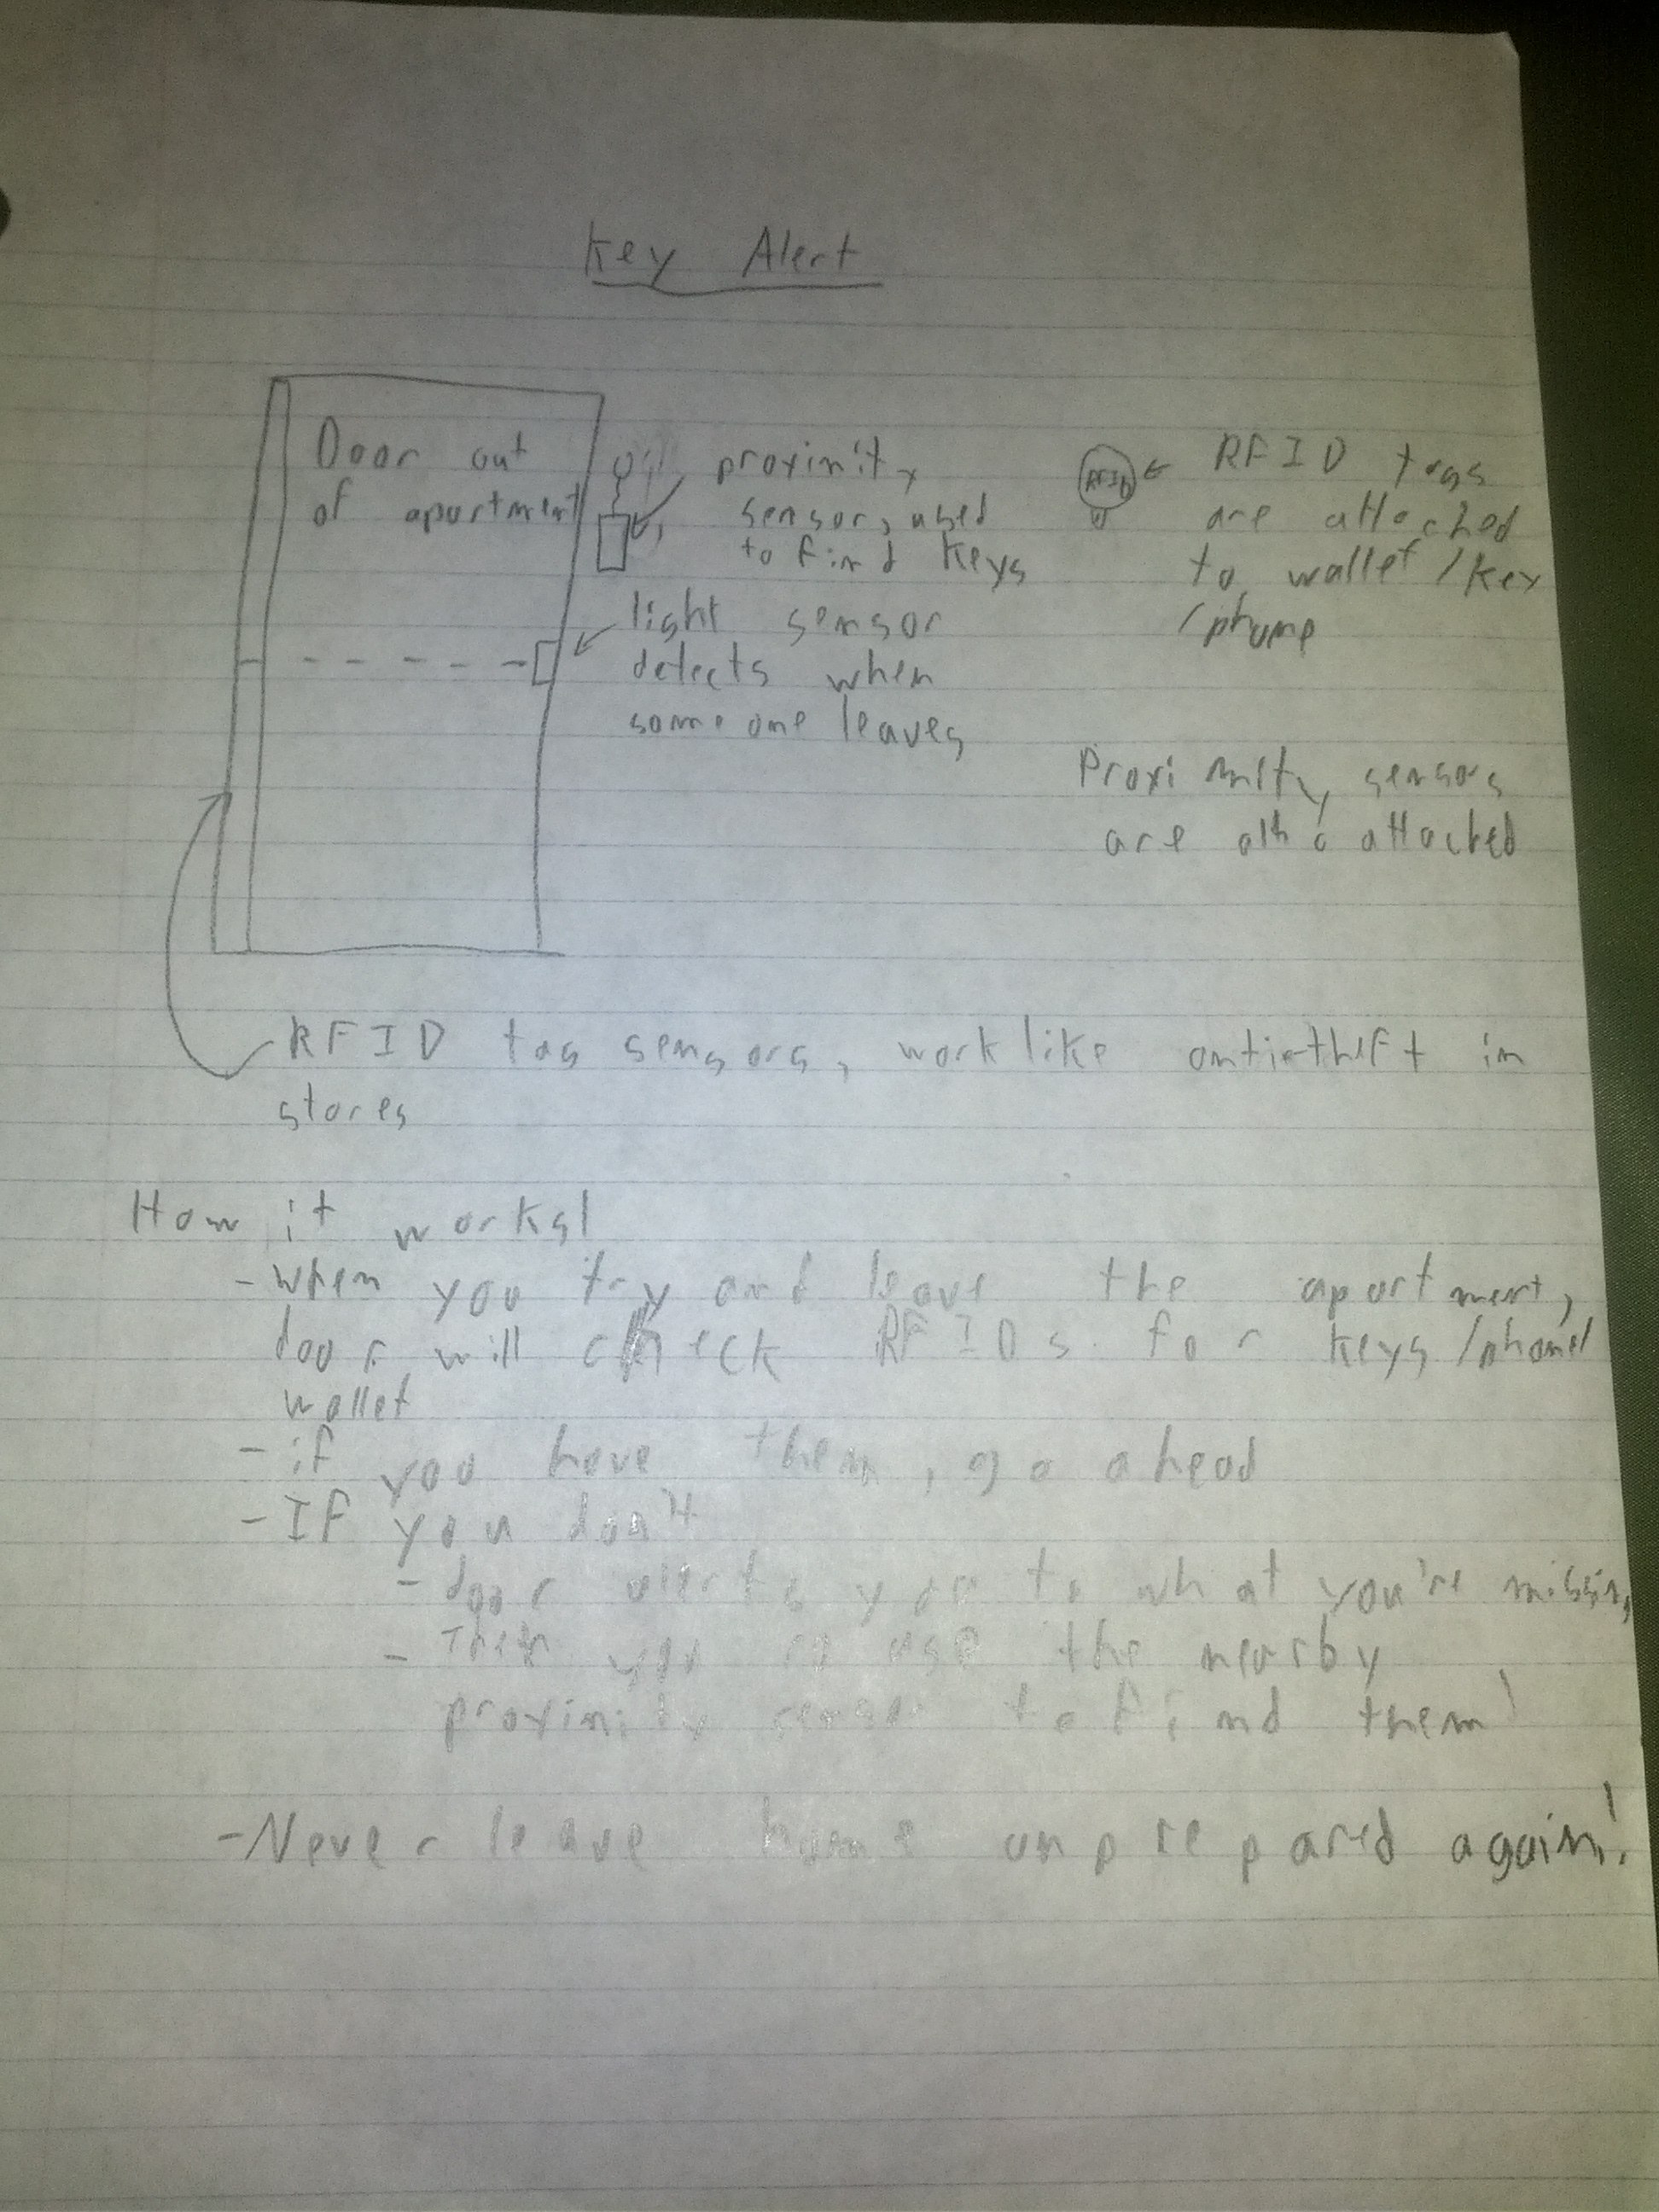
36) A credit-card or key fob form-factor sensor system that detects if you try to leave your room without your keys, wallet, or phone.
keyfobR

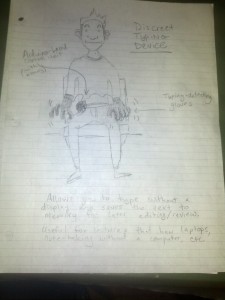
50) Sensing gloves that can be used to perform typing motions in the absence of a laptop, display, or proper keyboard.
typingGloves

Our idea:
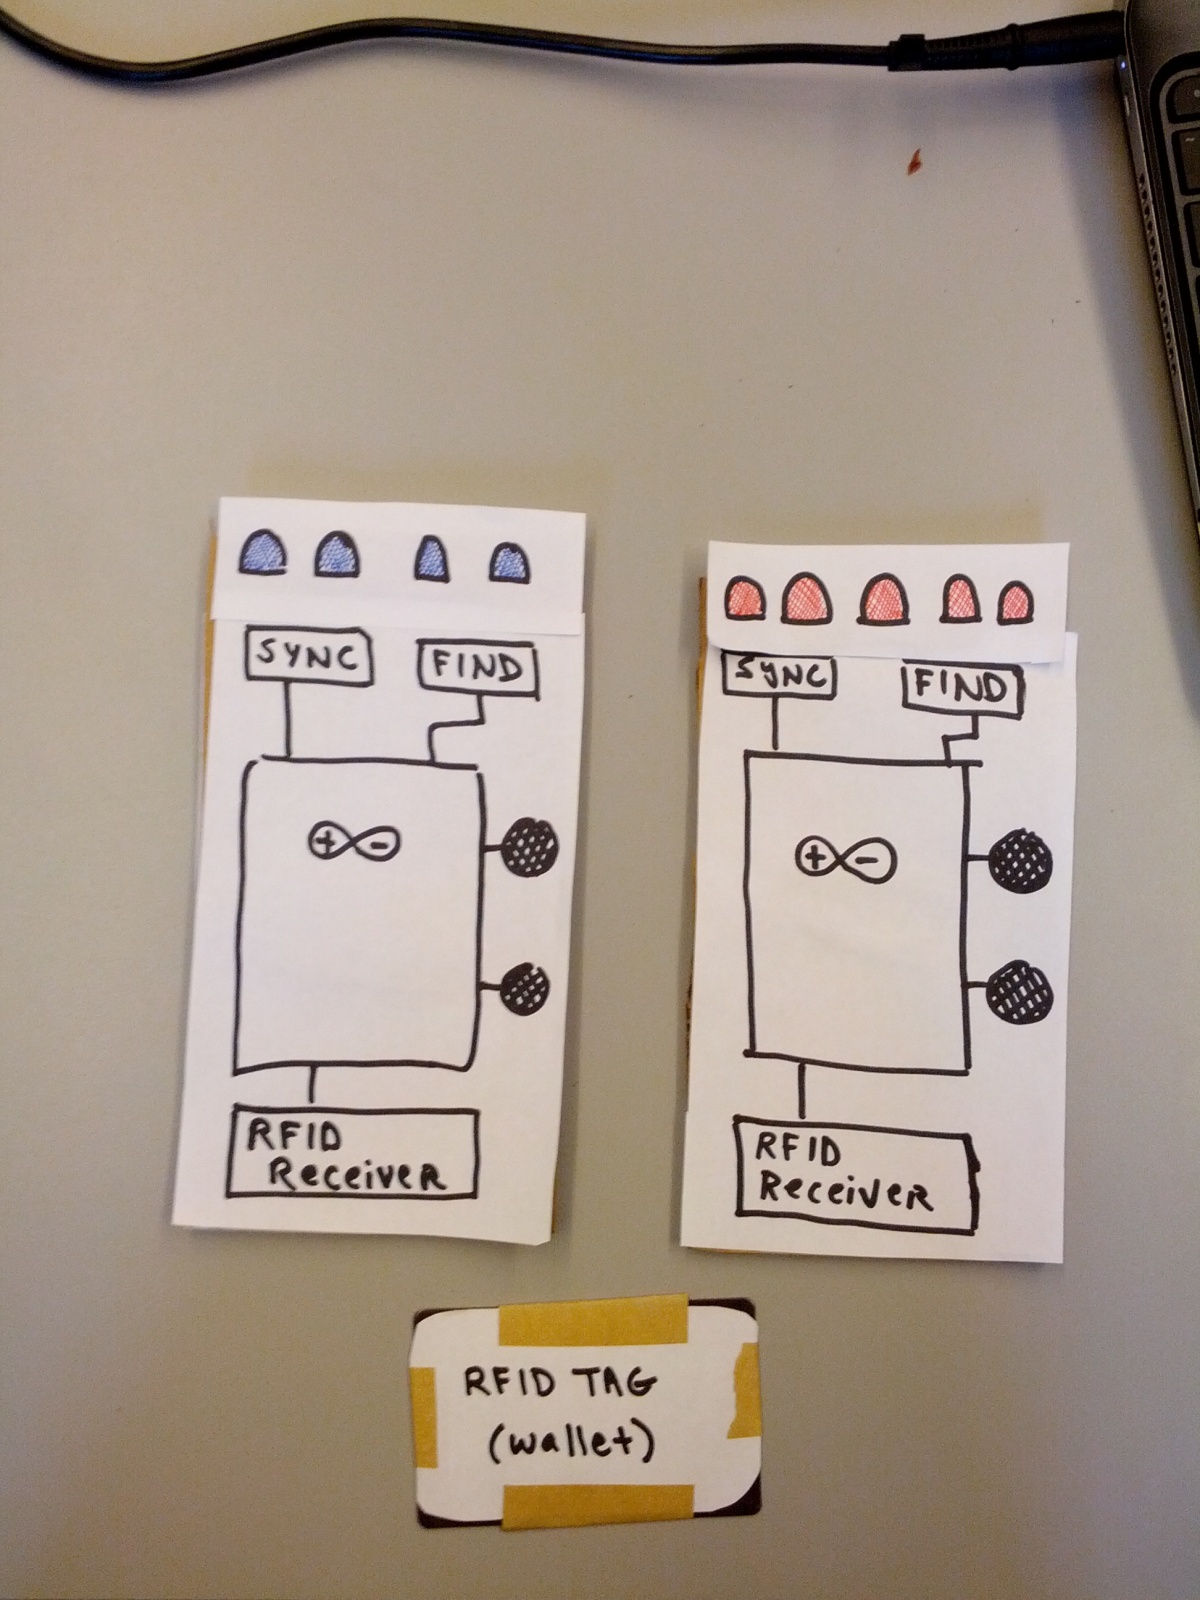
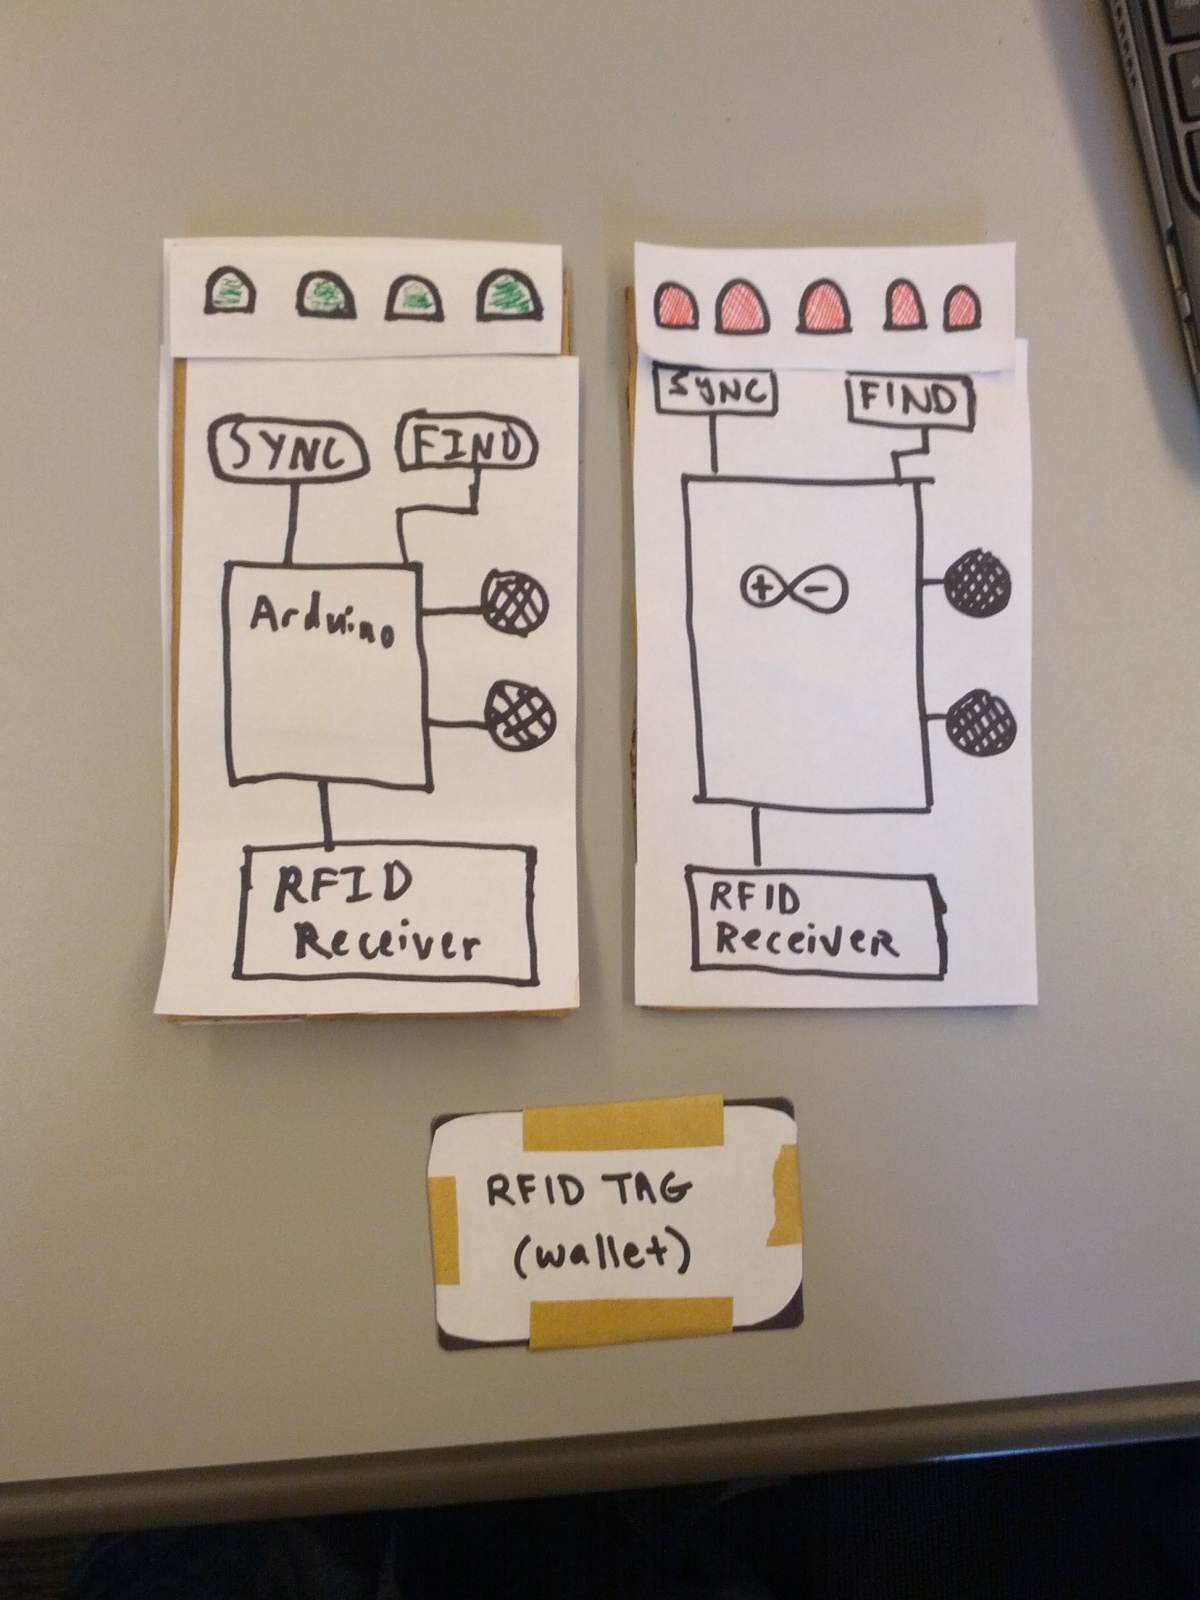
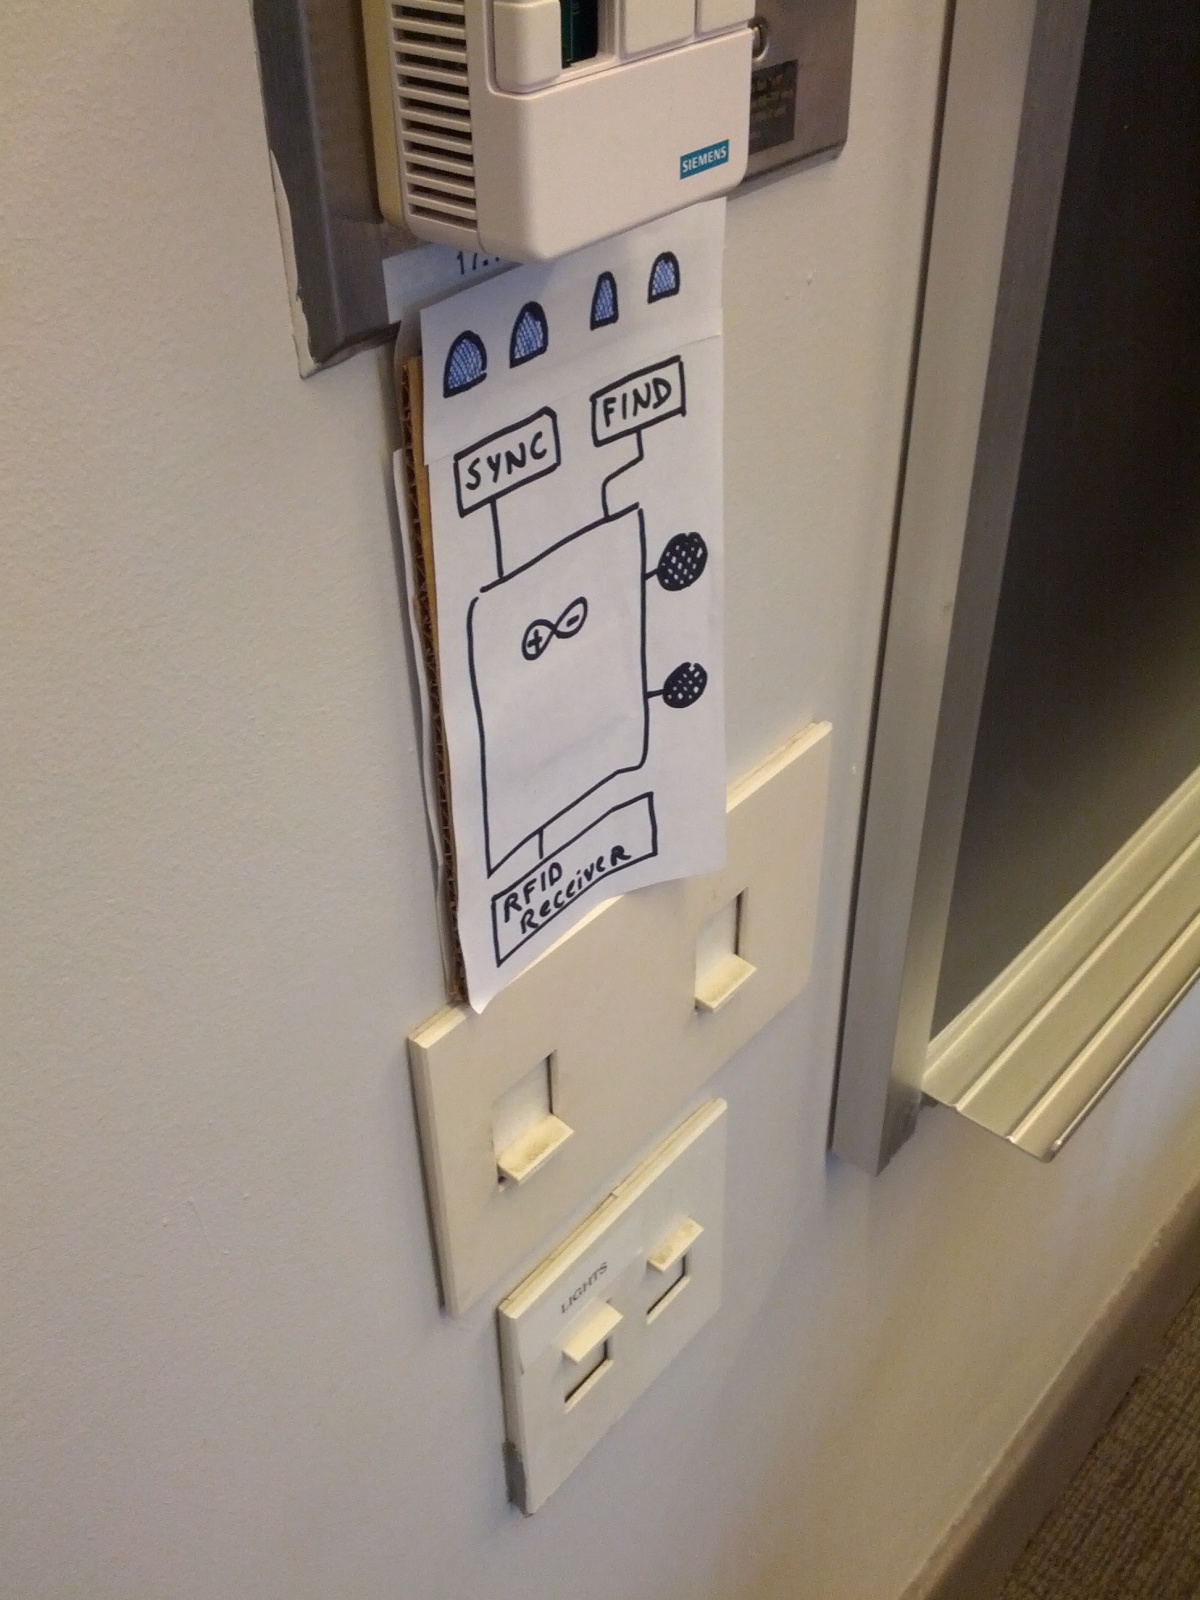
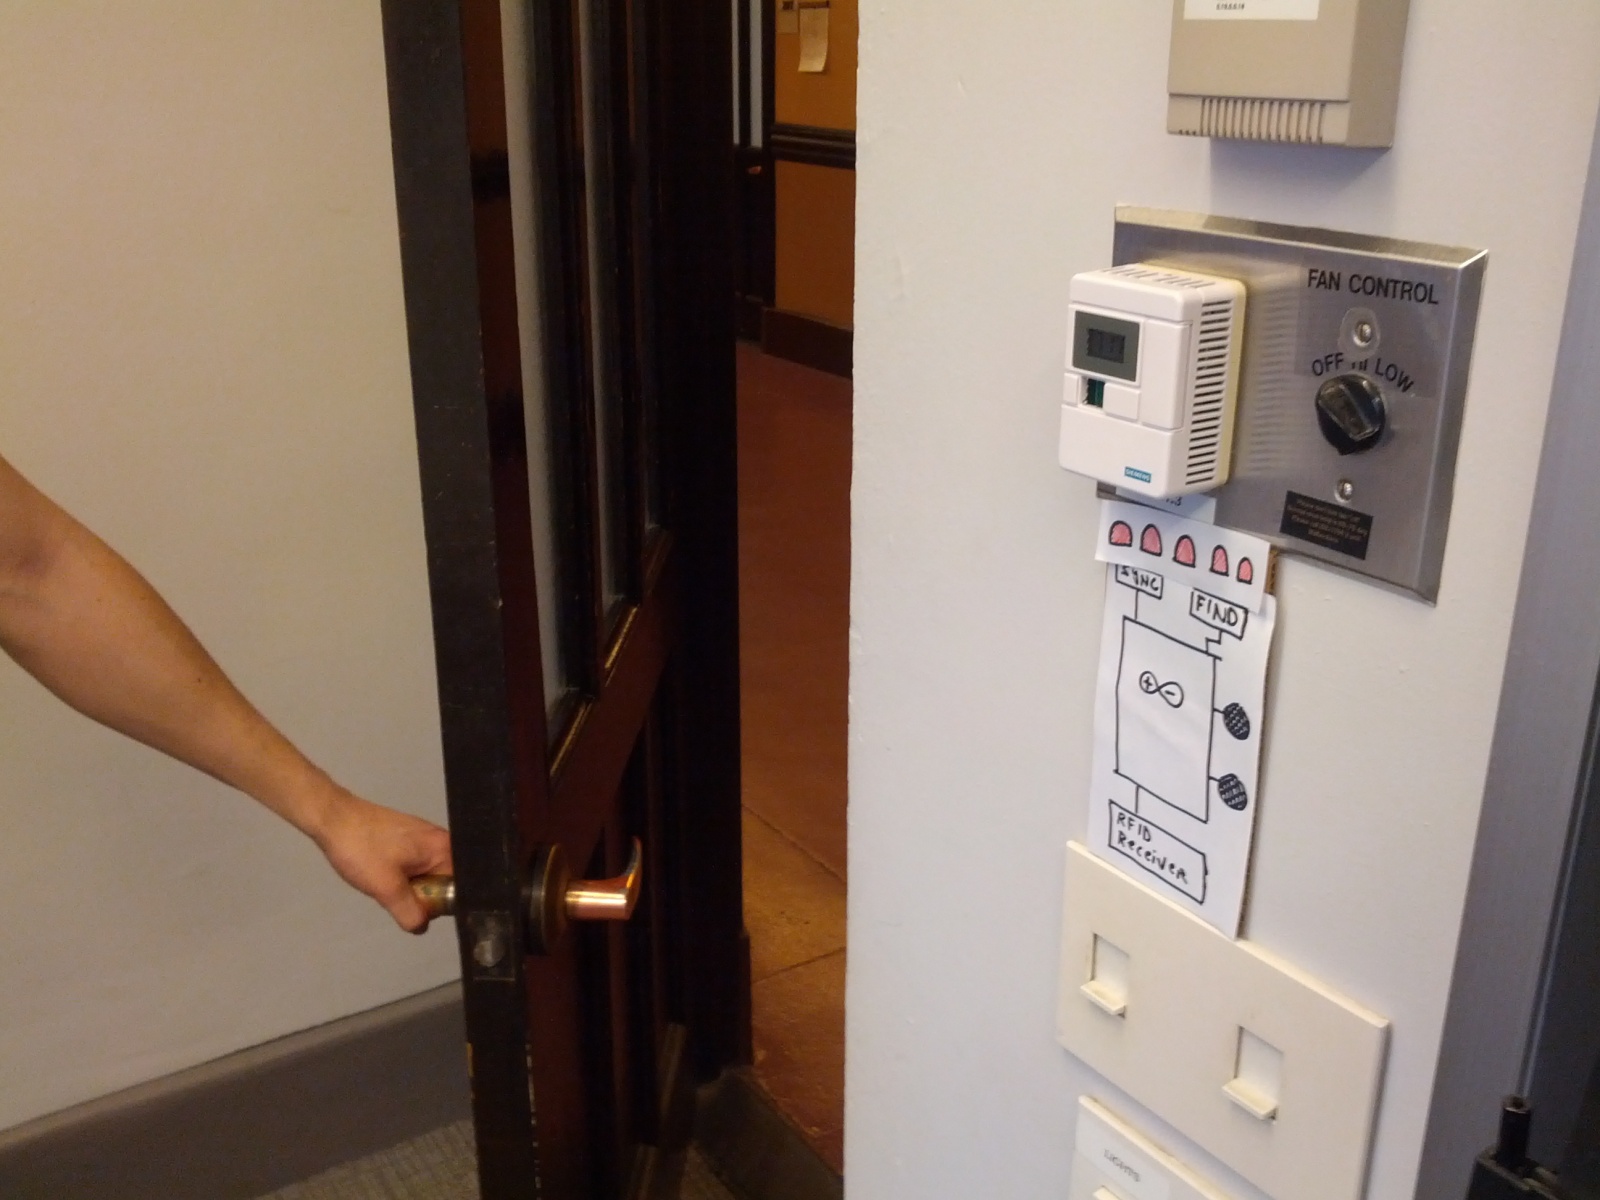
We chose to work on the key alert system that will alert users if they try to leave their house/room without their keys/wallet/phone. We chose this idea because it solves a common problem: leaving home unprepared and getting locked out or worse. The proximity sensor will also allow users to find their lost necessities with ease. Usually this is done only for cell phones through a desktop or web app that will make the phone ring or give its GPS coordinates. With our system, however, all a user needs to do is grab the proximity finder that is hanging nearby and walk through her house until she finds the missing item(s). This project is somewhat open-ended; for example, the proximity technology could be carried outside of one’s domicile and used to find lost objects anywhere. This project also allows us to explore making user interfaces that have minimal use of traditional interfaces.

Target User Group:
This project is aimed primarily at people who have self-locking doors — a type of lock extremely common on college campuses. The primary issue with these doors is that if you leave your room without your key, you will promptly be locked out, often requiring a call to security and having to wait for their arrival. This is a massive inconvenience that costs the user time, comfort, and — in some cases — money. With our system, students (or even the university itself) would be able to install a very simple system and feel secure in their preparedness. This user group can quite often be disorganized, hurried, and stressed; these issues can compound to make remembering the little things, such as one’s keys, quite difficult.

Problem Description & Context:
The high level goal of this project is to ensure that users can feel confident that they haven’t forgotten anything when they leave the house — in particular, we are addressing the problem of forgetful students getting locked out by self-locking doors. A technical solution could improve the situation by alerting students when they try to leave their room without their keys. This is superior to a non-technical solution, such as simply leaving a reminder note, because the automated system will never “forget” to alert the user, whereas a student might forget to leave/read a note. Thus, it is important that the system be as automatic and simple as possible — after all, the goal of this project is to make users’ lives easier, not more difficult. In addition, we need to consider that these projects will be implemented in dorms or other places where the user does not have actual ownership of the building. As such, our solution must not require a destructive installation. Rather, it should be simple to install and remove. Since our target user group lives in a busy, high-stress environment, we do not want the solution to require much maintenance on their part. Instead, it should be more of an “install-once-and-forget-about-it” solution. A similar problem has been solved by using a beeper system that helps users find keys. But our goal here is not just to help users keep track of their keys, but to protect them from absentmindedness in general.

Platform:
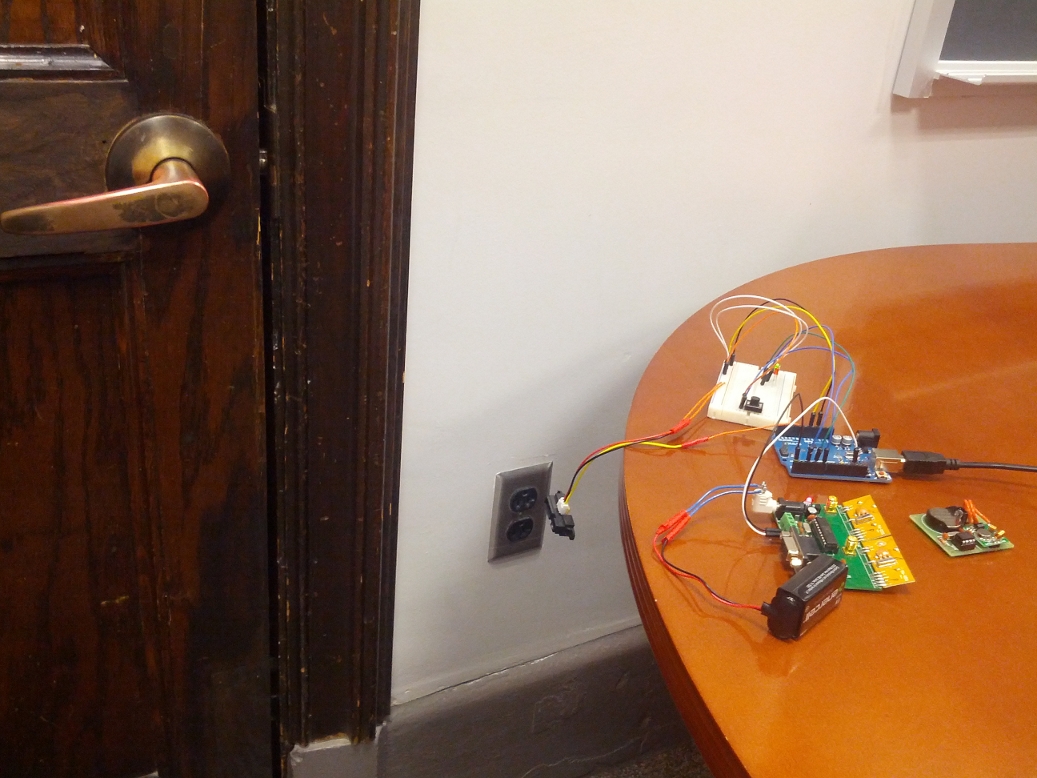
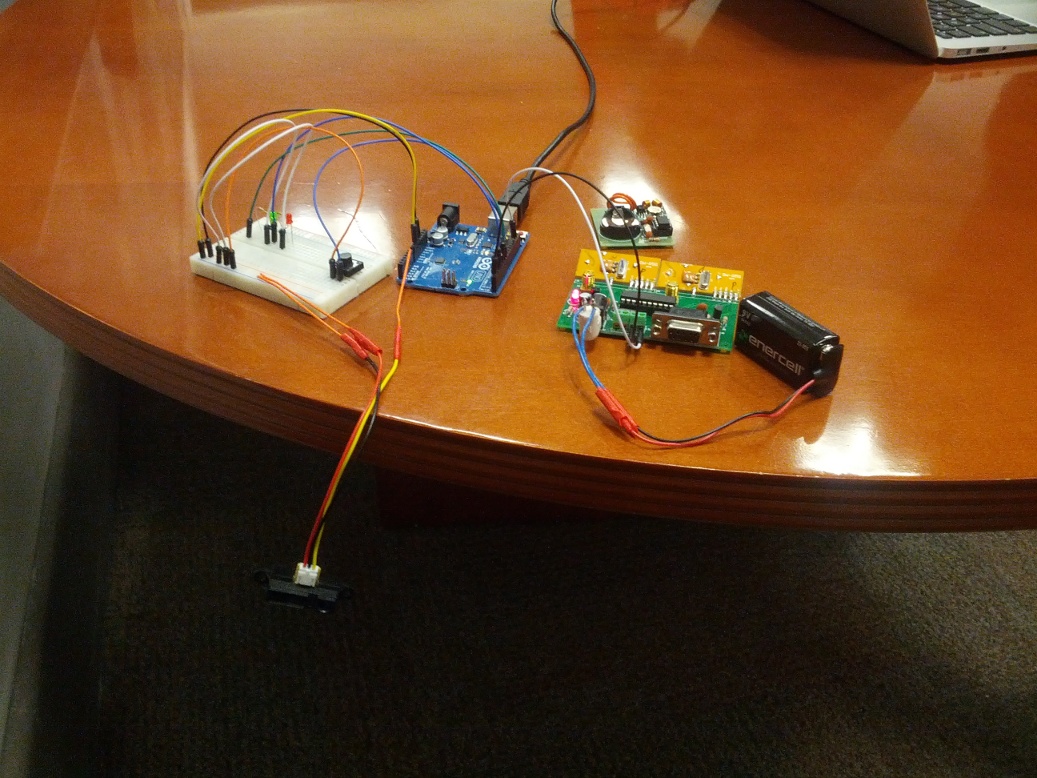
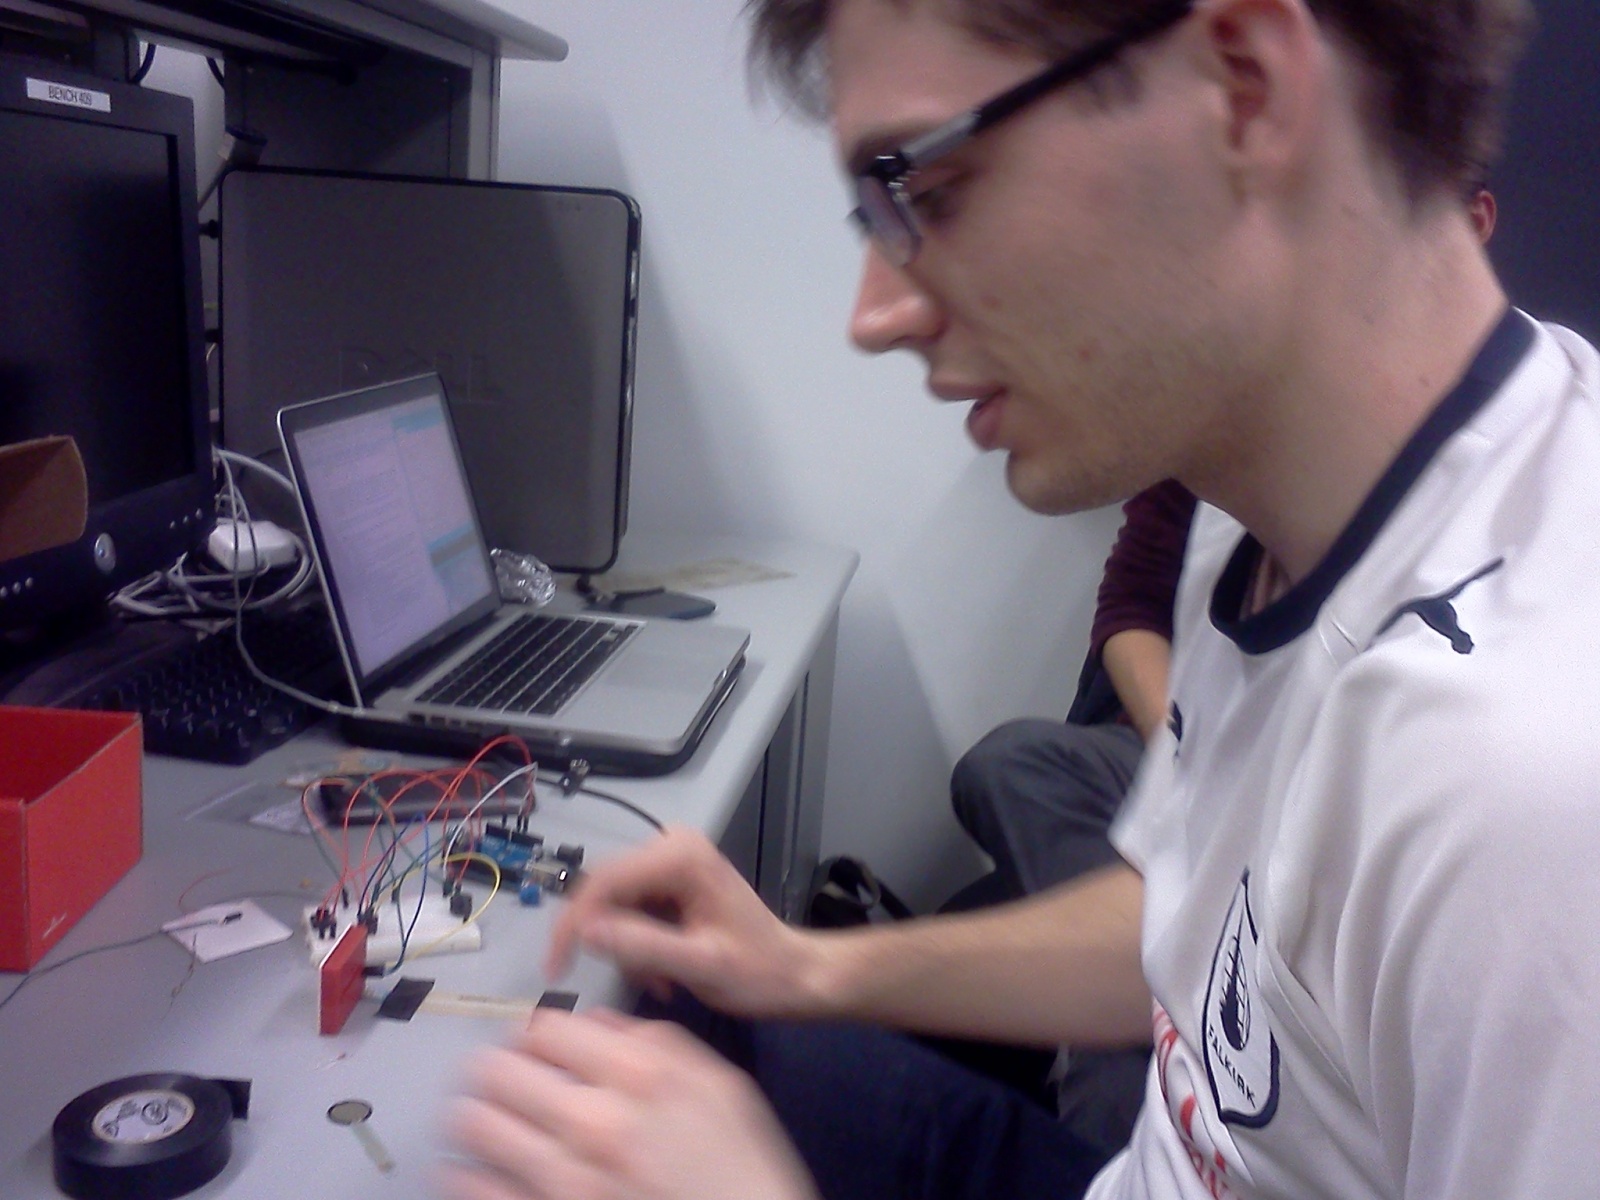
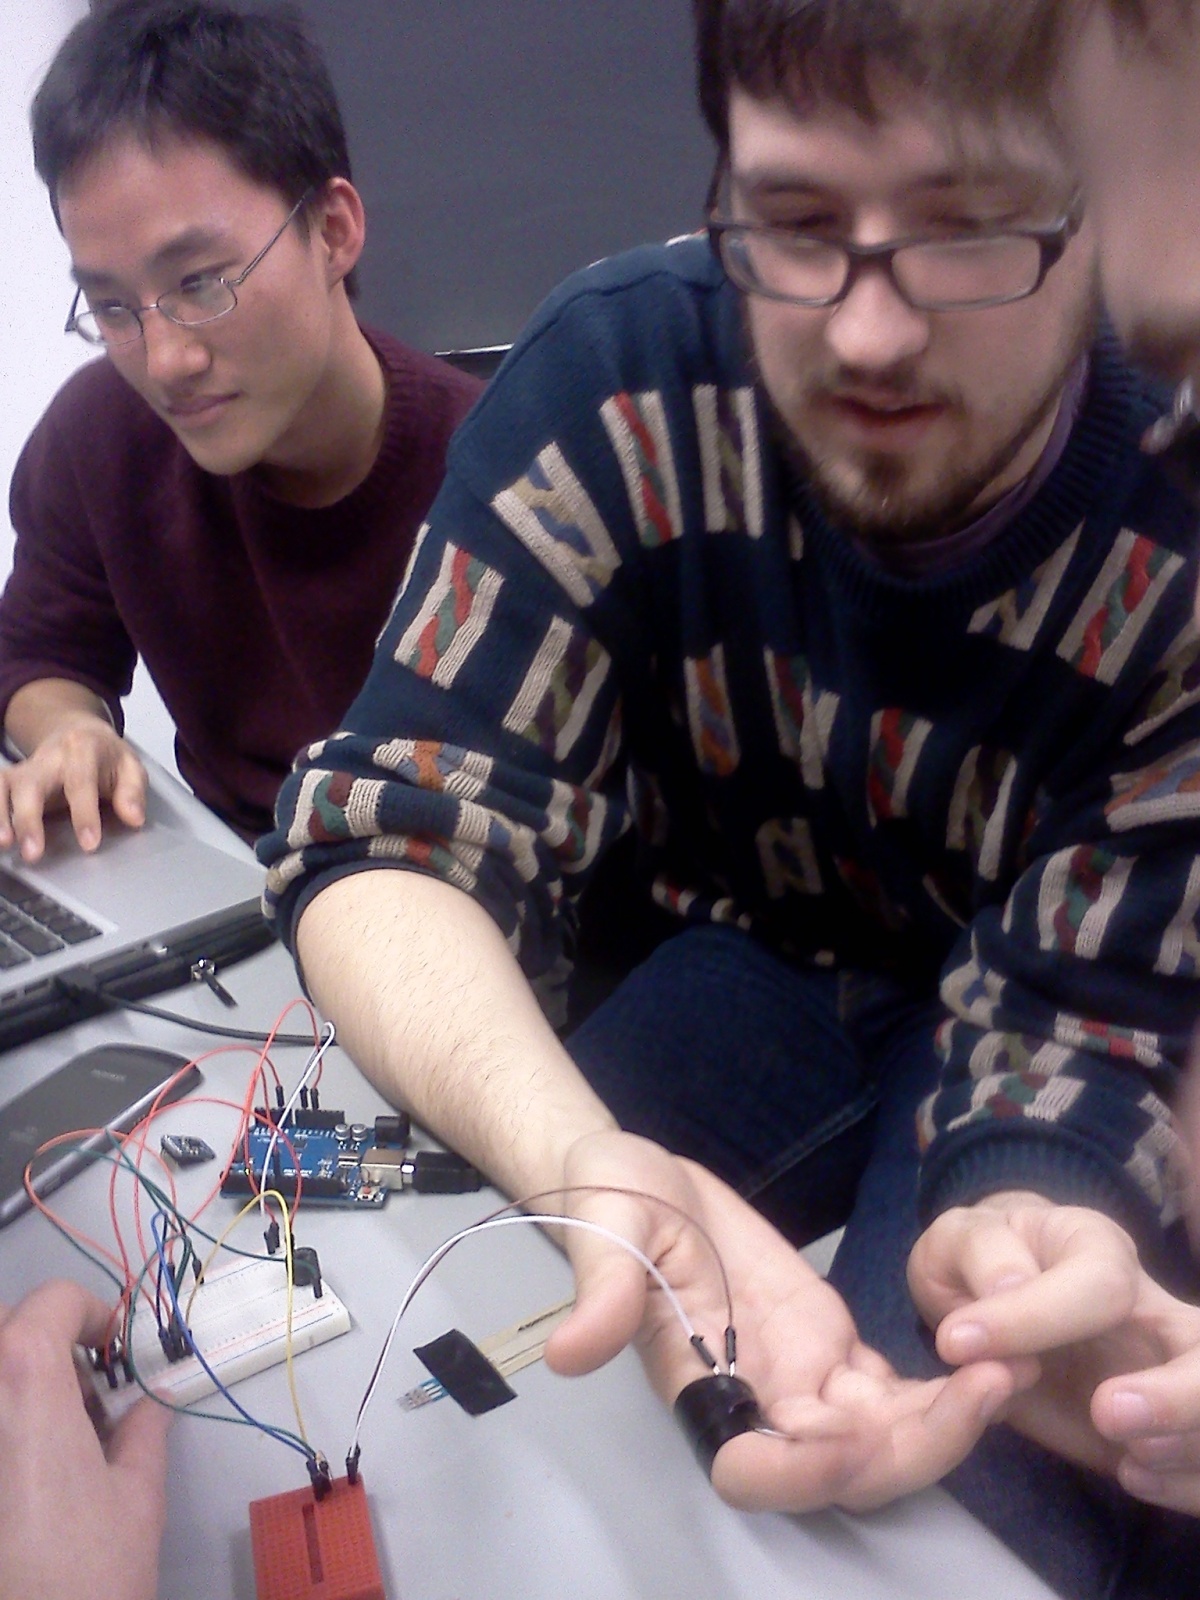
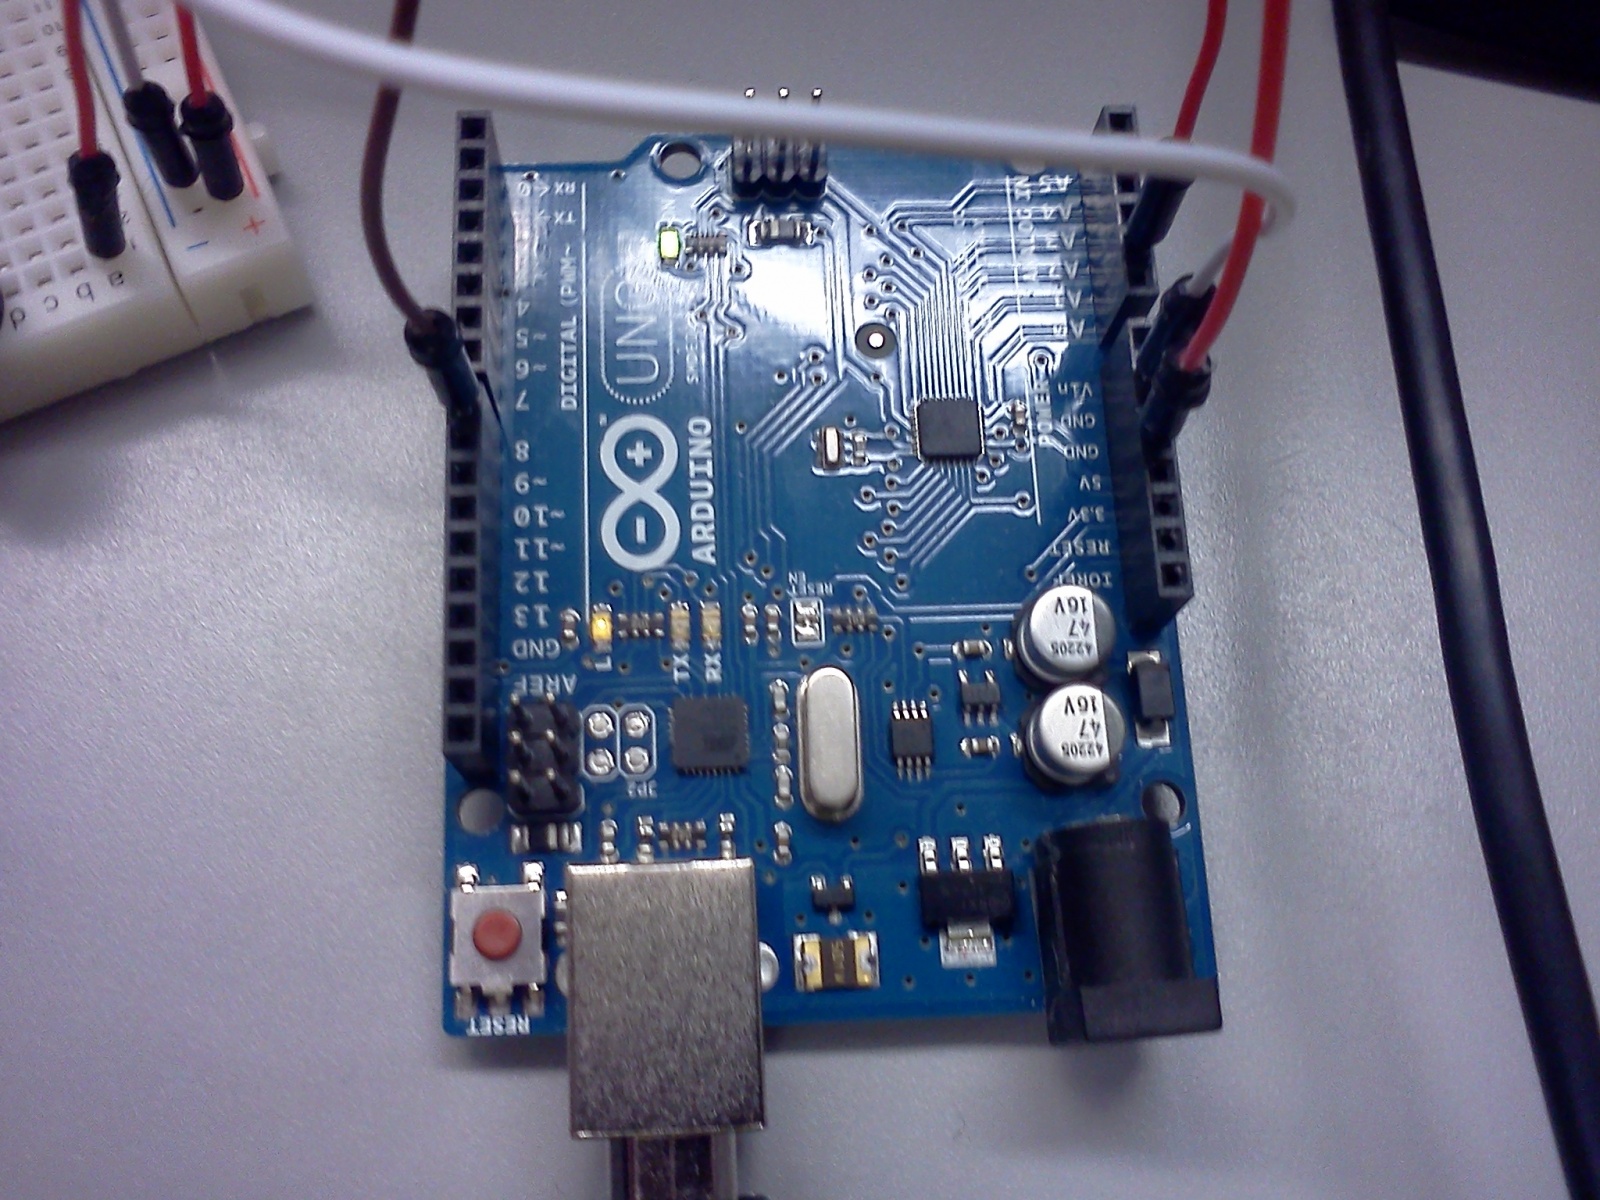
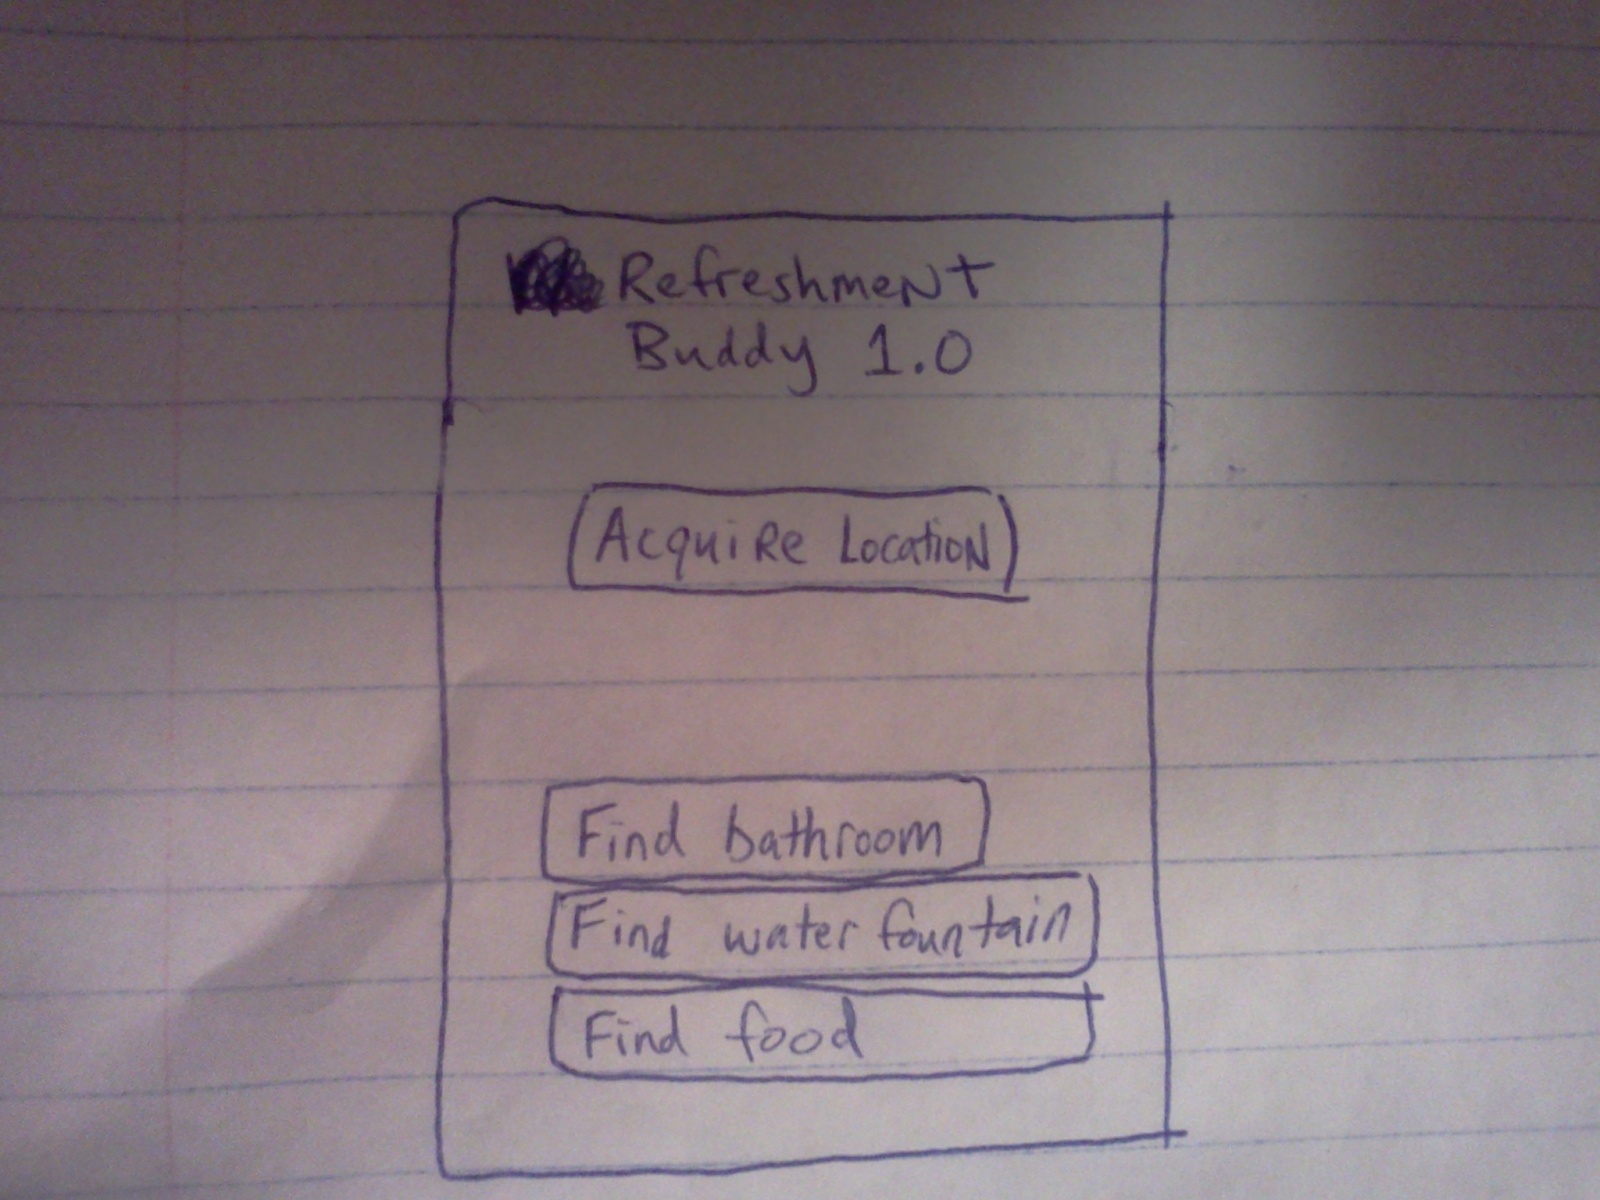
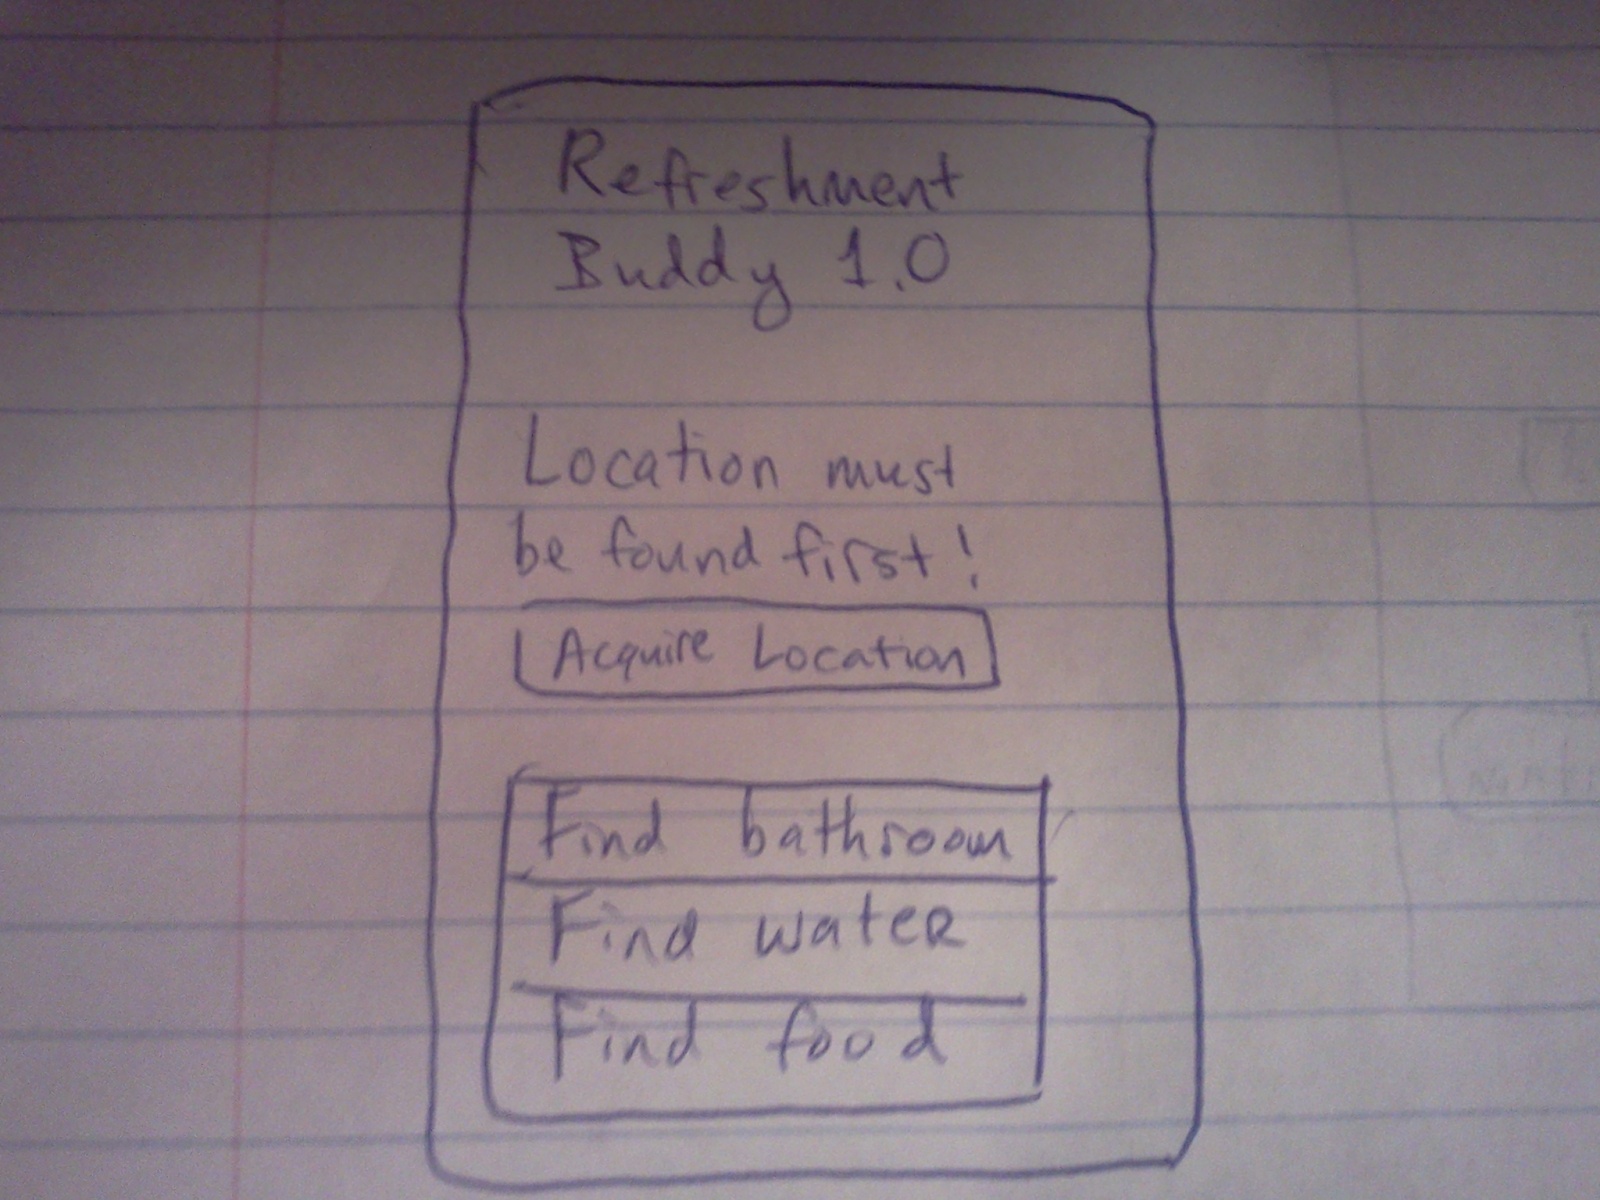
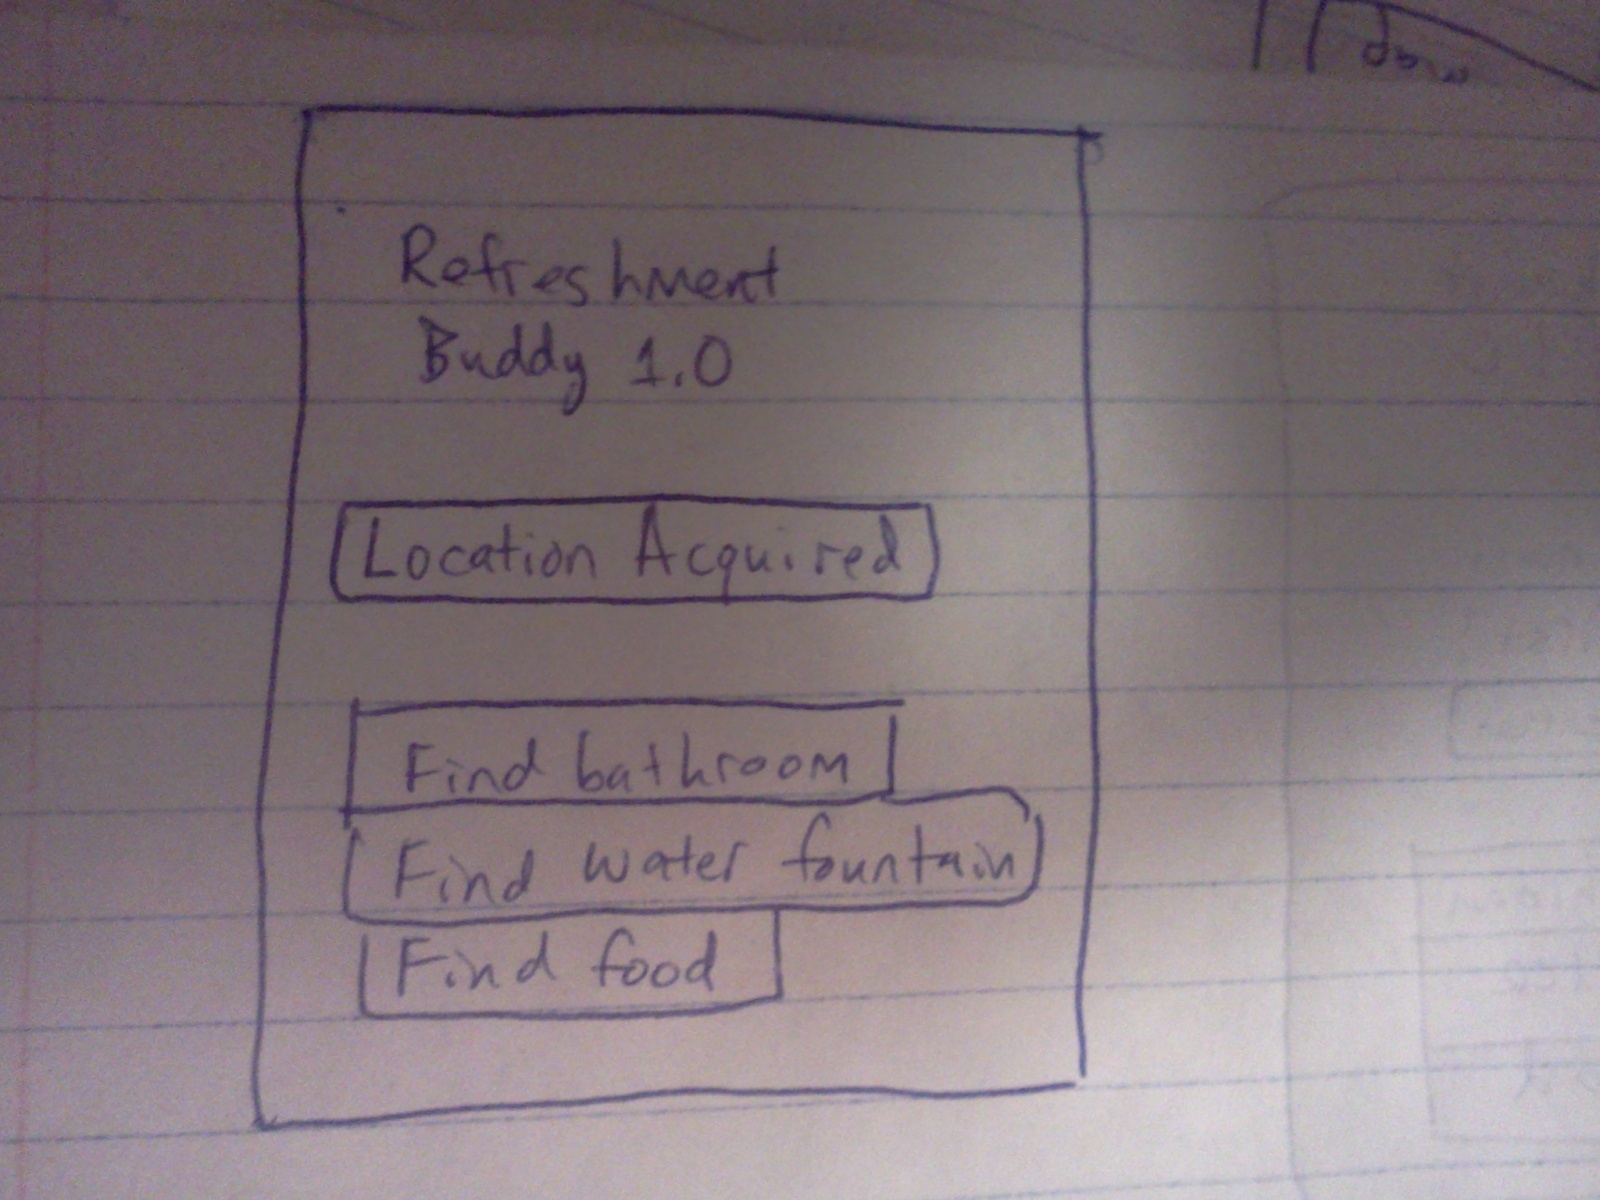
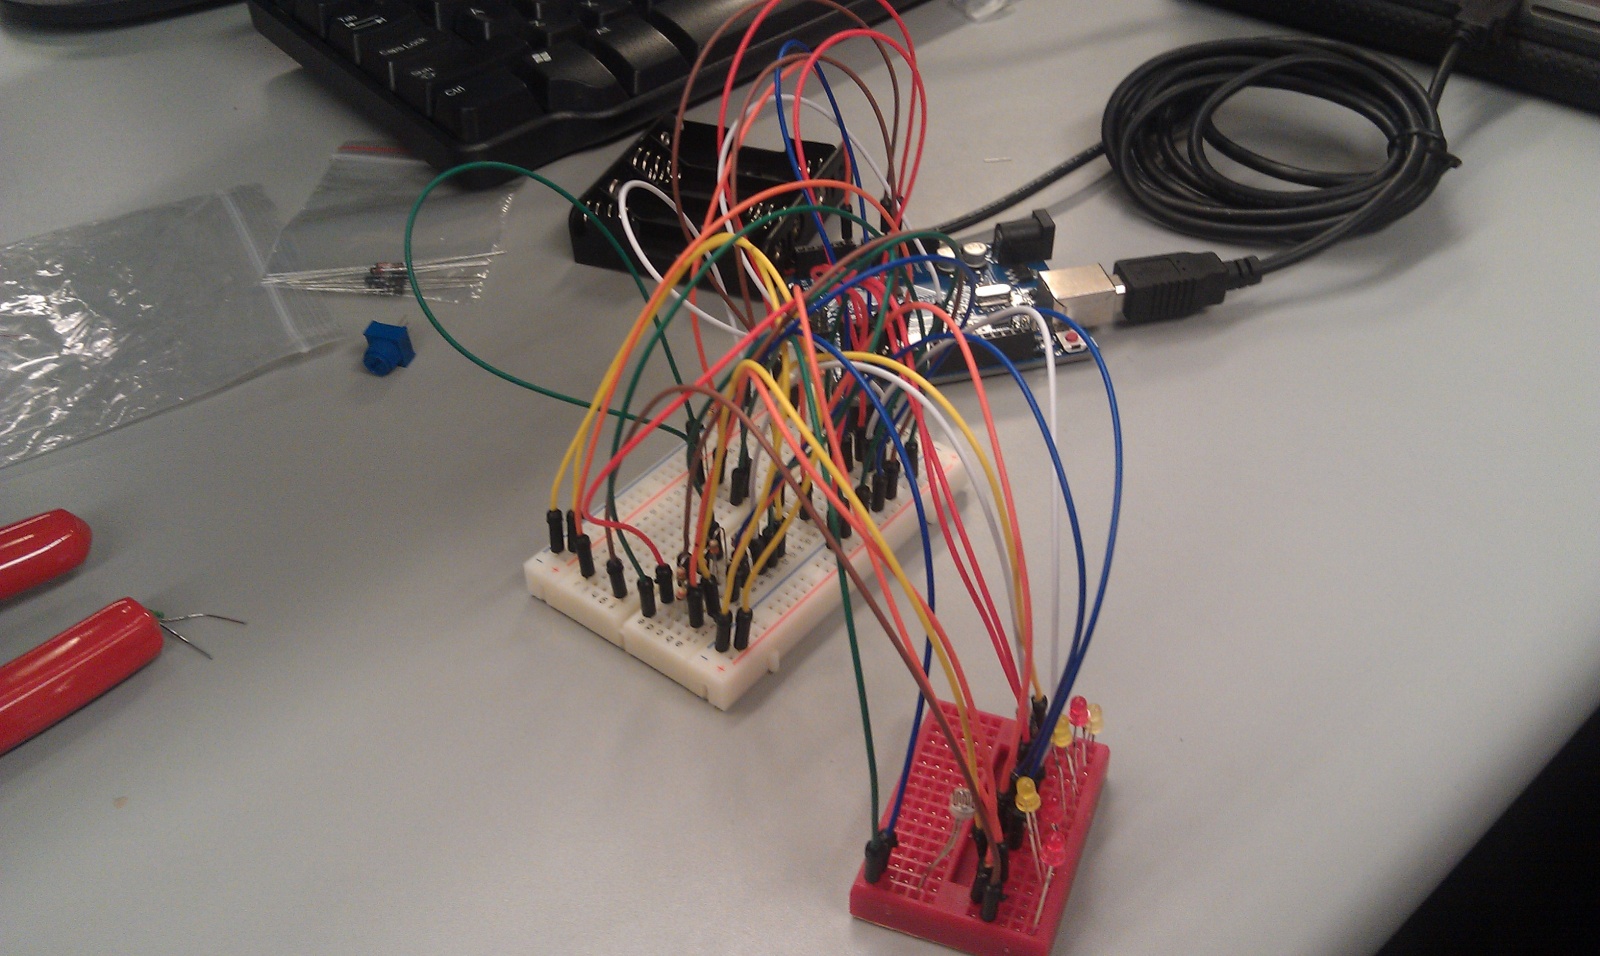
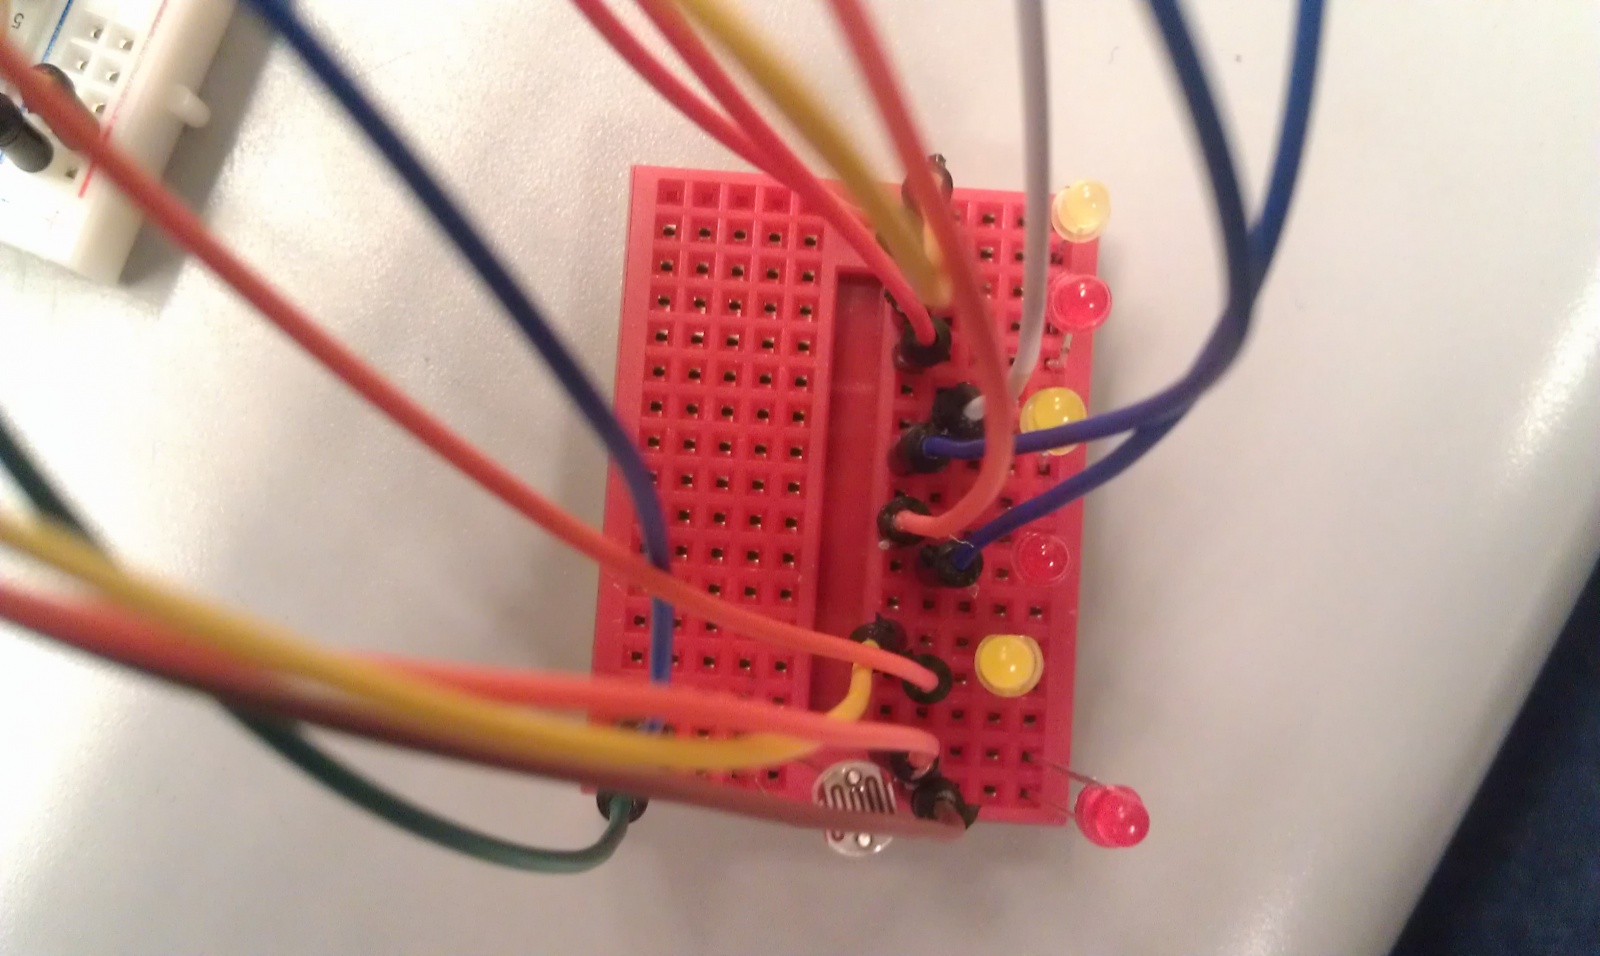
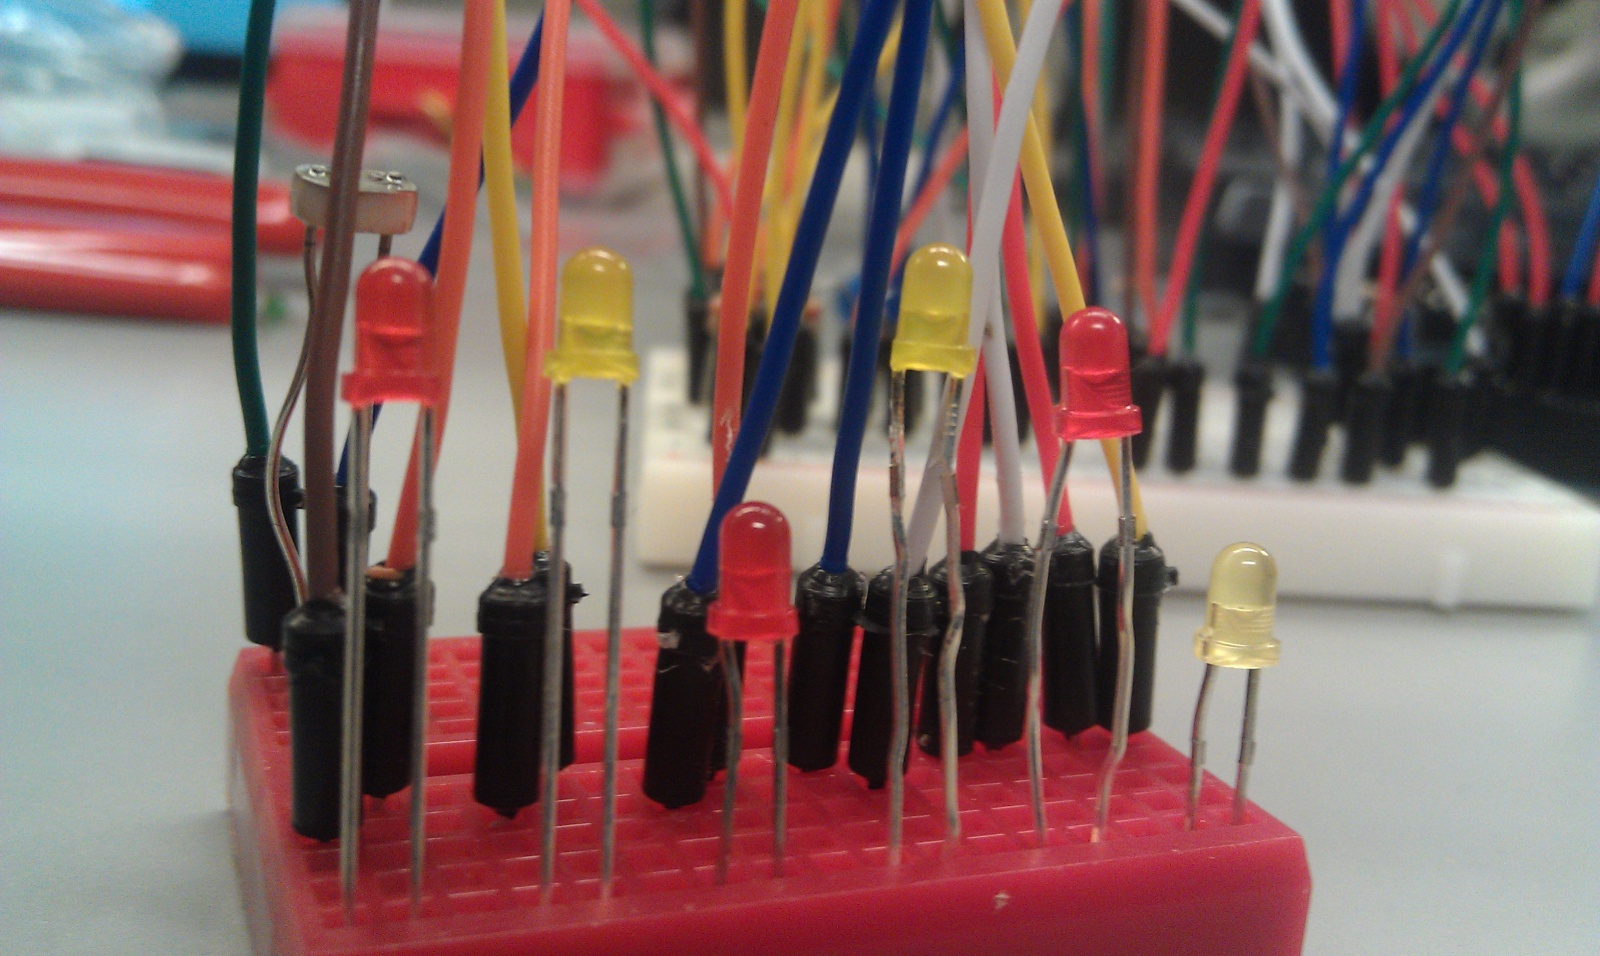
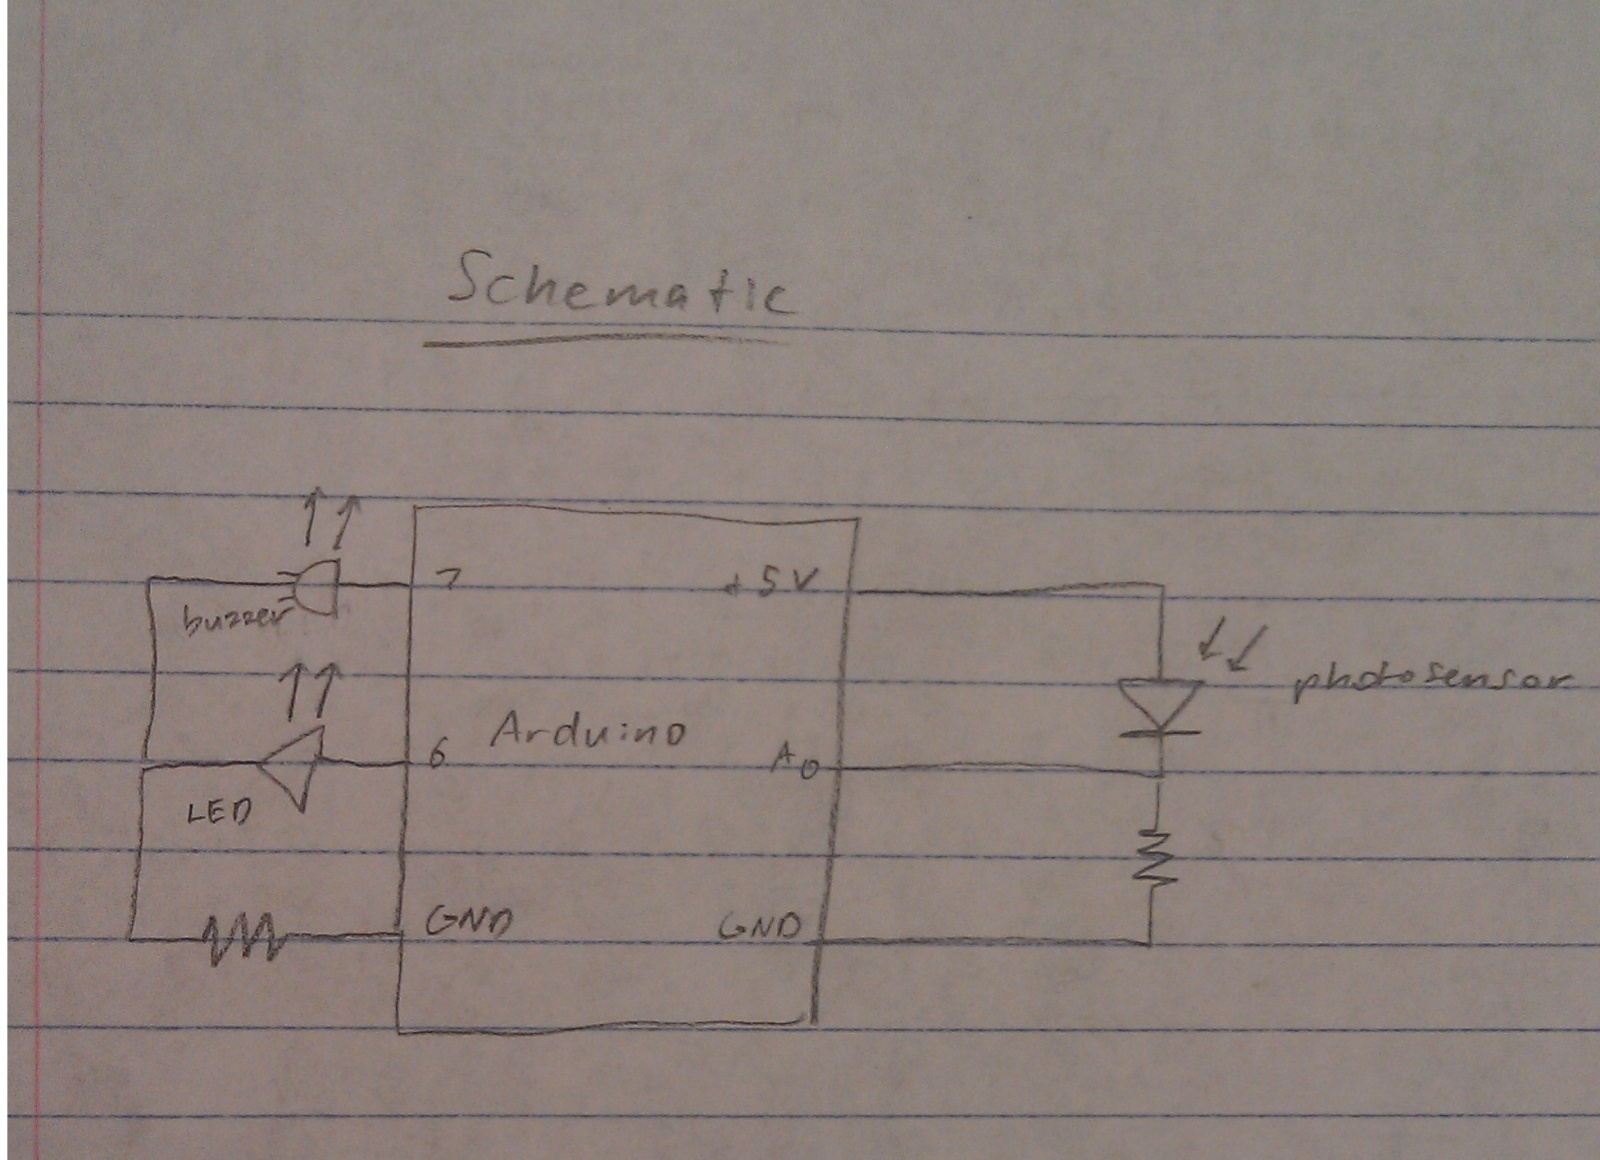
We intend to build our device around the Arduino platform. This platform seems appropriate for an automated system that is meant to be small, simple, and generally unobtrusive. Relying on a desktop/laptop/mobile app would make less sense, since such devices would be useless whenever powered down or (in the case of mobile devices) lost or left elsewhere. For sensors, RFID tags or similar devices may be suitable for short-range proximity detection. For example, the system could detect when the door is opened but an RFID tag (associated with keys/wallet) is not present.
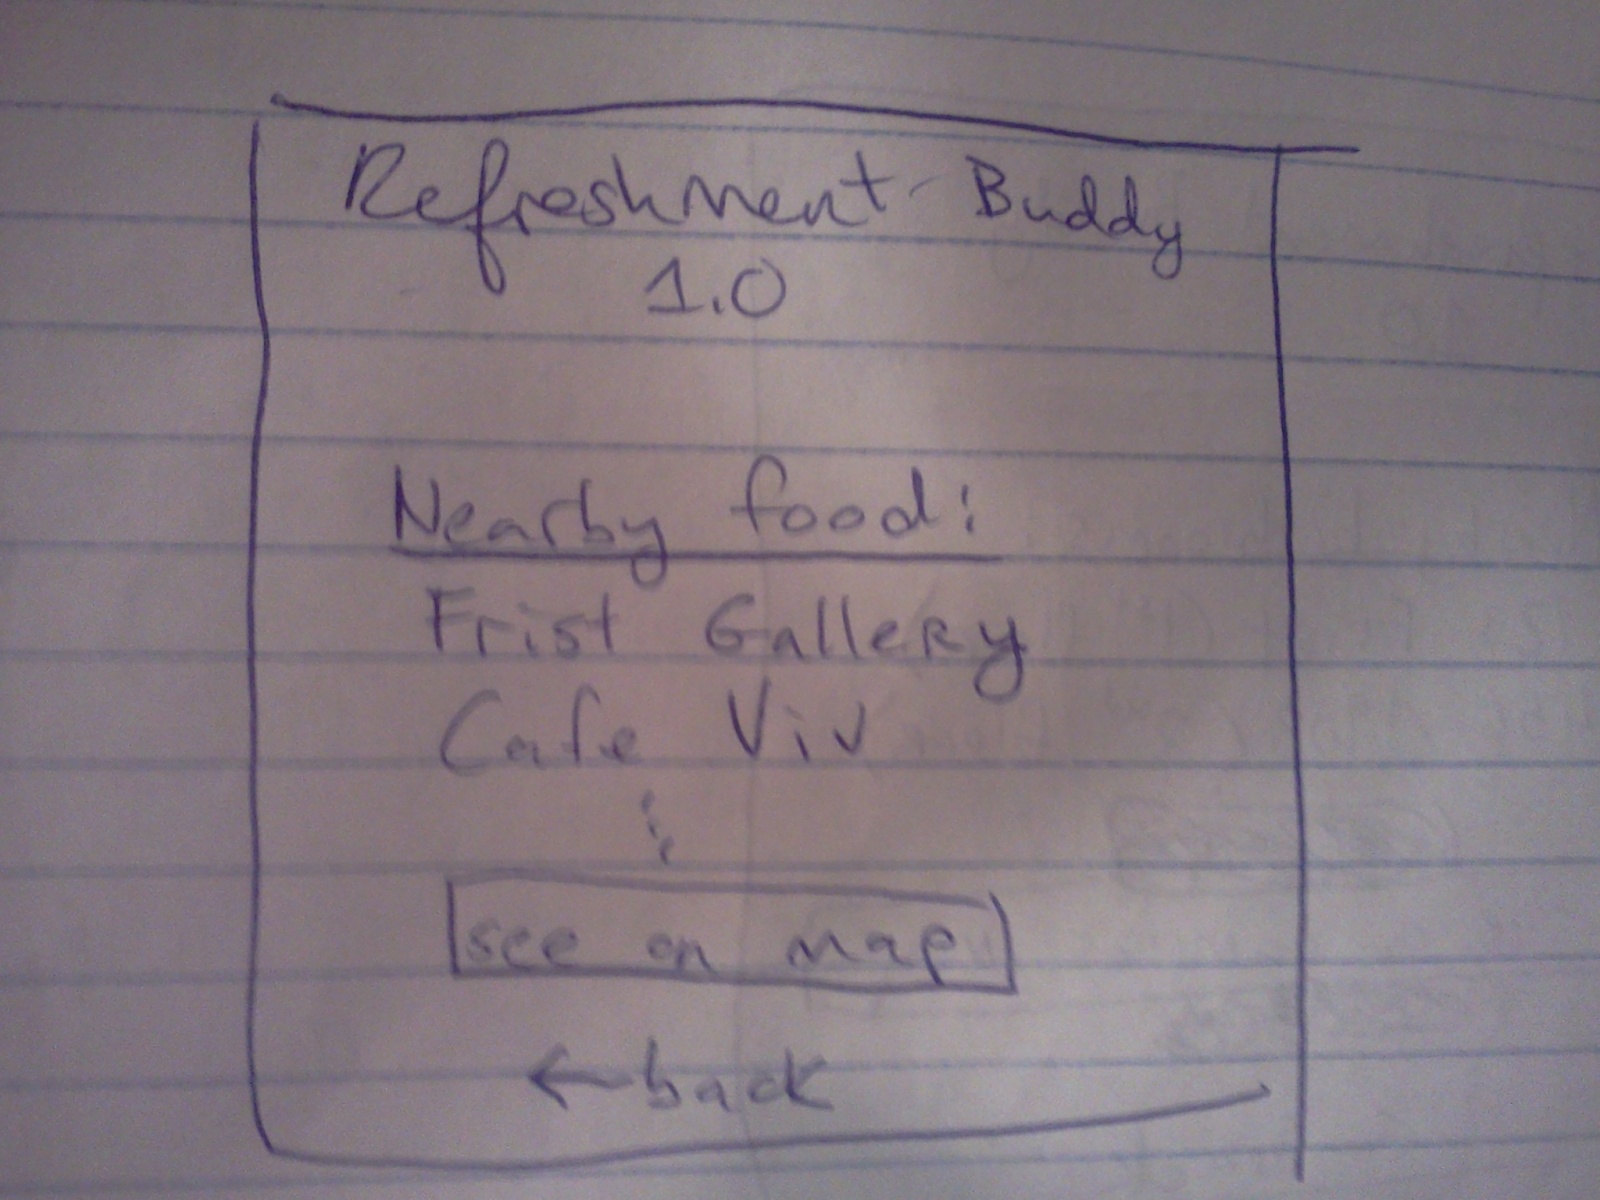
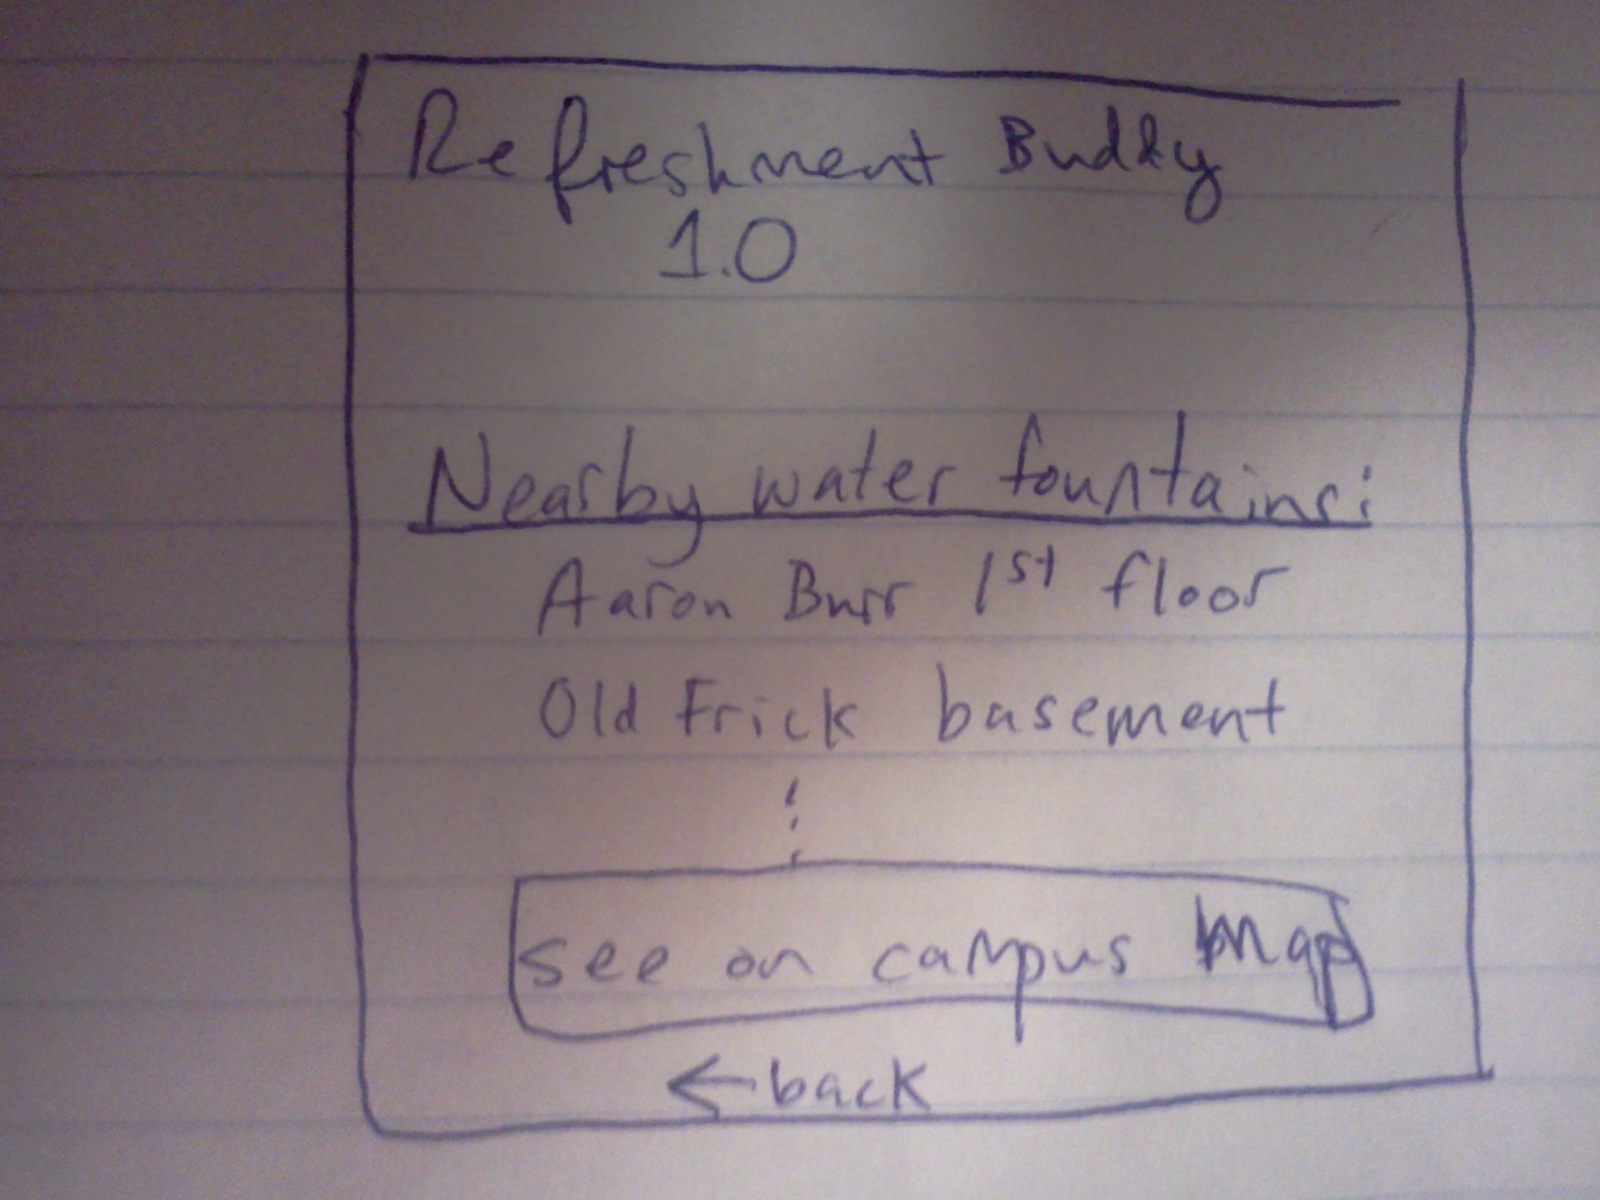
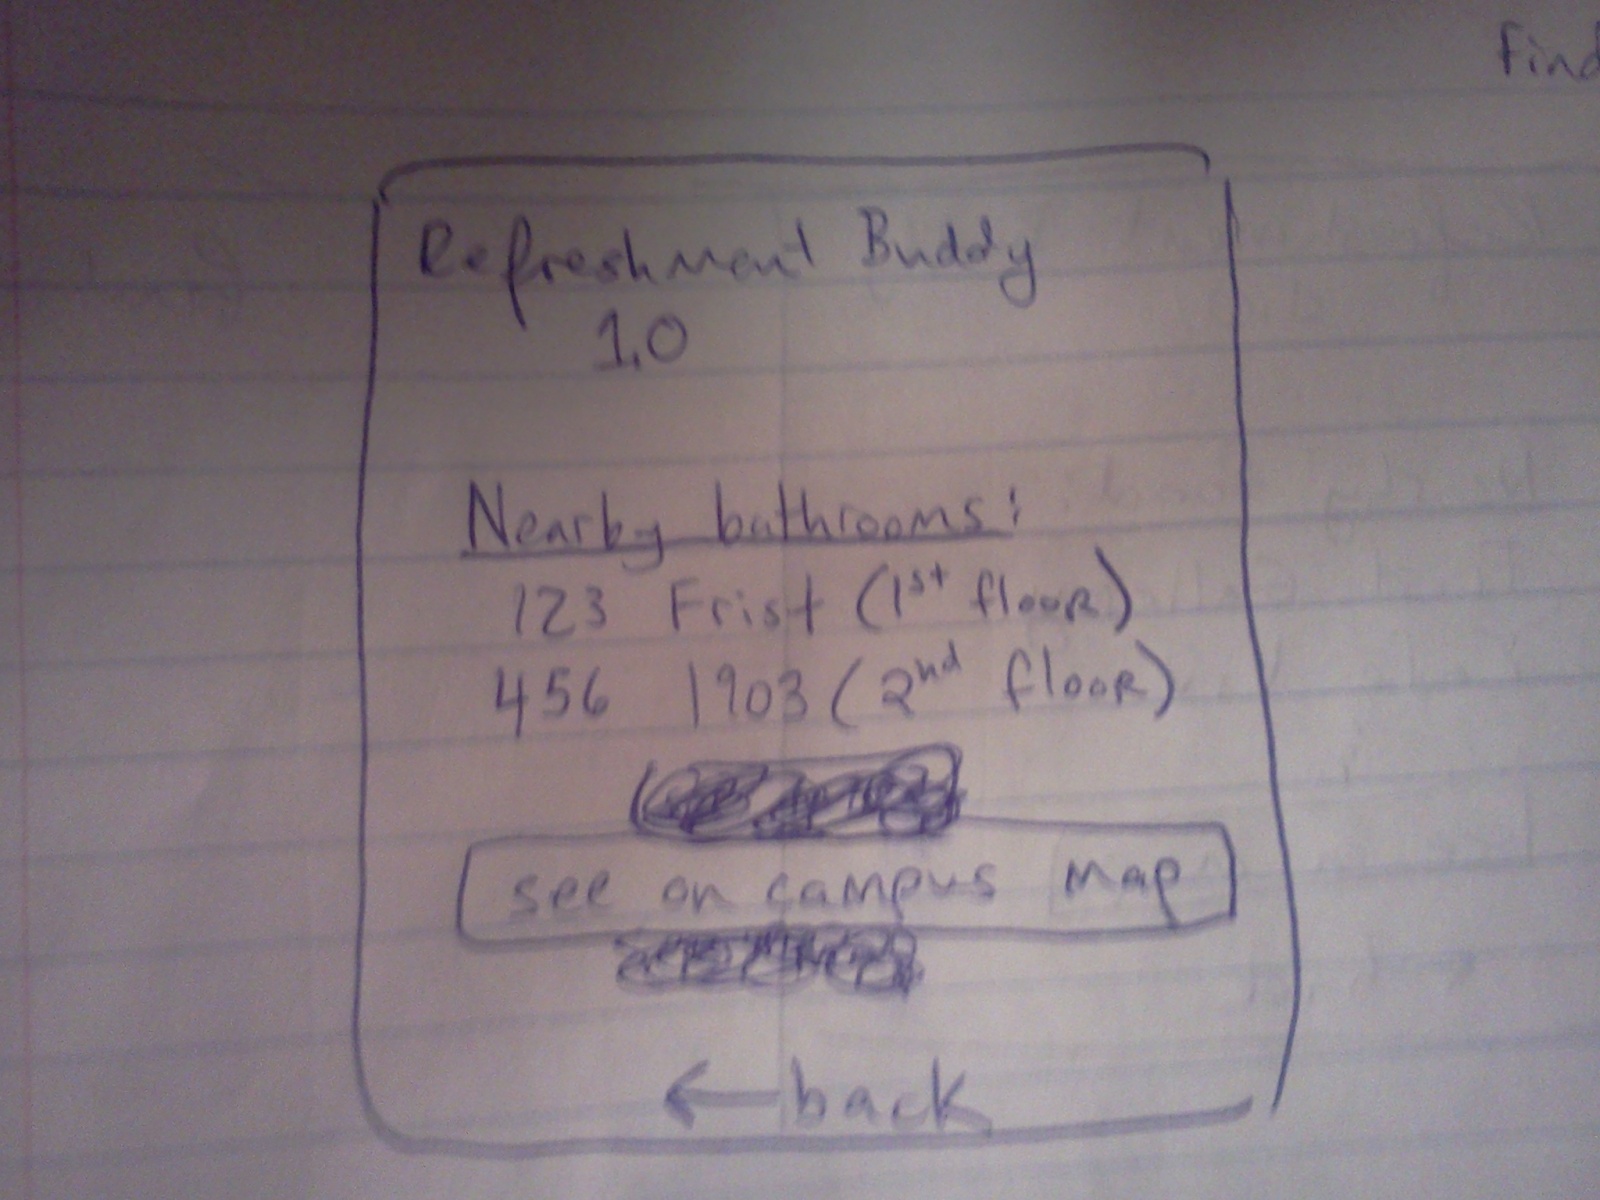
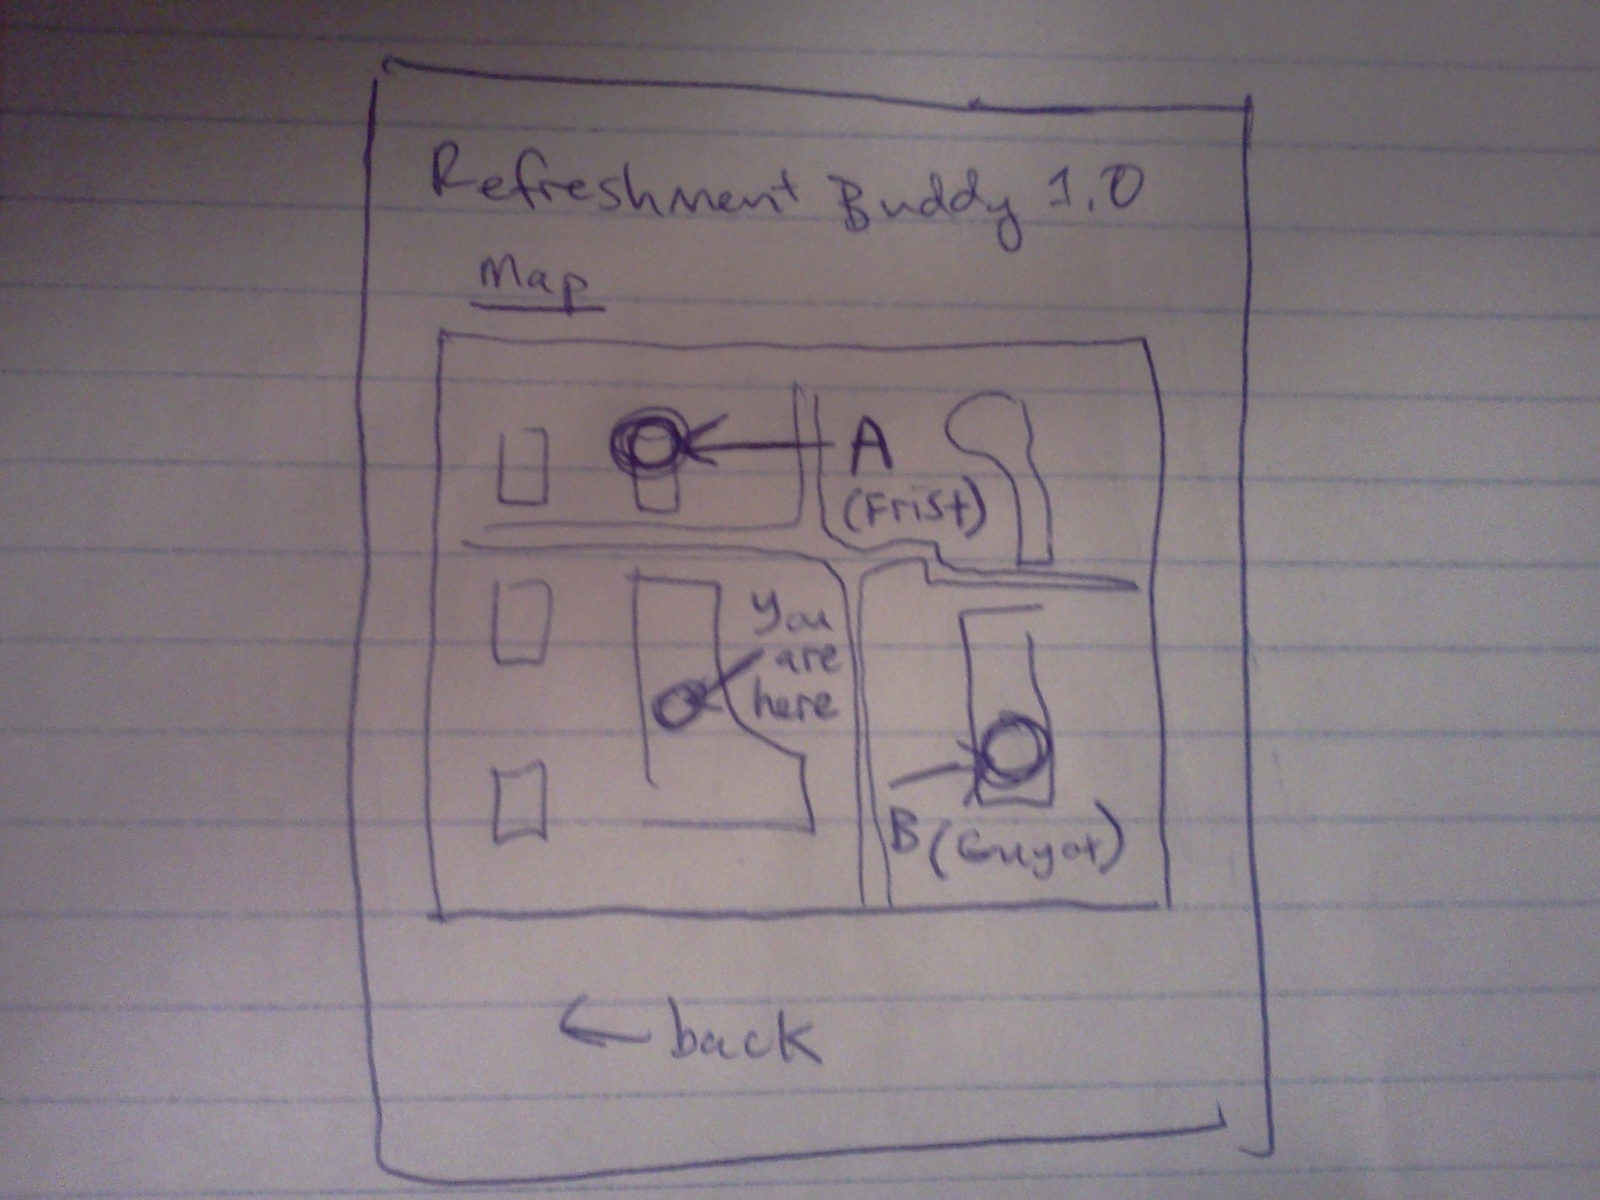
More Sketches:
doors