P5: Dohan Yucht Cheong Saha

Group # 21 : Dohan Yucht Cheong Saha


  • David Dohan

  • Miles Yucht

  • Andrew Cheong

  • Shubhro Saha


Oz authenticates individuals into computer systems using sequences of basic hand gestures.


Tasks Supported


Our easiest task is the profile selection for the users. To confirm a user’s “username” he or she will select an image from a gallery of profiles that corresponds to him/herself. The medium-difficulty task is handshake parsing, during which our system detects whether the pass-gesture is correct. The final, and most intricate, task is password reset– which involves sending an email to the user for a handshake reset link. In addition, training the system is an additional task we’re adding to this prototype. The user must perform a series of gestures to have our system recognize their hand with accuracy.


How Tasks Changed


One of our prior tasks was to detect the face of a user; however, this task’s purpose was to identify the “username” of the individual which was covered by the profile selection task. Since these two tasks have identical functionality, there was not immediate need for both. Having facial recognition would be an interesting task that could be implement in the future. Instead, we realized that procuring training data on the hand gestures is a more significant task that dictates the effectiveness of detecting hand gestures. We also did not incorporate password recovery (yet) because its purpose is not crucial to the functionality of Oz, but is in the pipeline.


Revised Interface Design


We decided to move away from the Leap Motion technology and are using a web camera to detect hand gestures. Some motivations for this change includes stepping away from a black-box technology and the ease of using openCV and scikit-learn with webcam data.  We found overall that our webcam based approach gave a higher accuracy than the Leap Motion.


As a result of our change in hardware type (Leap to webcam), we found that we must approach the box design very differently.  The Leap does not need light in order to function, as it has IR LEDs built in.  For our webcam, however, we both need a larger box and must install lights in our box.  For the first functional prototype, we elected to simply use a large, open box with the webcam mounted at the top.  Because the box is not sealed and is a similar color to skin, our first prototype also requires that the user wears a black glove so their hand can be differentiated from the background.  In the future, the inside of the box will be black, so no glove will be necessary.


Updated Task Storyboard


Sketches for Unimplemented Features


Overview & Discussion of New Prototype


In this prototype, we have advanced our previous prototype by turning the paper model into one that the user interacts with on the screen. In addition, in the background, we’ve made advanced in our underlying technology by developing the proof-of-concept for hand recognition with a regular webcam. Because we haven’t integrated this proof-of-concept into a browser-based plugin, however, we still require a wizard-of-oz routine to ensure test users have entered their handshake sequence correctly


There are mainly two things we left out of this prototype. The first is the browser plugin that will allow the user to use handshake authentication on a web site like Facebook. We left this out because we need more time to learn about browser plugins and require the back-end system with hand recognition to be complete. The second functionality left out is the integration of the hand-recognition technology that we have completed at an experimental stage (see above). Though the experimental results give us confidence in the proof-of-concept, we have yet to polish the software into something that can be integrated with the browser plugin.


There are two wizard-of-oz techniques required to make the prototype work today. The first is on the user-interface side, where someone needs to press an arrow to proceed the slides. The user can still tap the screen in a touch-screen style interface to proceed. The second wizard-of-oz technique is on the hand recognition side. Though we have a proof-of-concept complete for hand recognition, it has not yet been integrated into the prototype, but may be complete by P6.


We fully implemented the detection of basic hand gestures to demonstrate a proof of concept. We also implemented the training of the hand gestures using the webcam and the APIs explained. Because this training data is necessary for the detection of hand gestures, we implemented this task as well. We believe that these two parts are the most important part of our prototype to implement immediately because they will require the most work to refine.  We must both devise a novel algorithm for classifying hand shapes and provide an intuitive way of training it for use by multiple users.


The two outside code sources that we used were the opencv, numpy (to handle the opencv data structures), and scikit-learn APIs. The opencv API allows us to obtain still images from a webcam, threshold the hand, find the contour of the hand, resize the image to fit the hand, and to save the images to disk. Scikit-learn was used to create a support vector machine object, to train it using data taken from a webcam, and based on the data from the webcam predict the label for the current hand.


Video capturing proof of concept hand recognition:

https://www.dropbox.com/sh/nb91flk0v2fmml4/F7RhHS2sjN/p5?lst#f:classifier.mp4


PDF capturing user-interface screens to use during prototype testing:

https://docs.google.com/file/d/0B9RlBTXdYjXMQlBDXzJwa1ZsbzA/edit?usp=sharing


Proof of Concept Git Repository:

https://github.com/dmrd/oz/tree/master/camera


L3 — All Terrain Strugglebot

Members of the Illustrious Group #21: “Dohan Yucht Cheong Saha”

  • Miles Yucht

  • David Dohan

  • Andrew Cheong

  • Shubhro Saha


Short Description

This week we were in a Southern mood in anticipation of Spring Break, so we initially decided to build a LassoBot. This robot throws a lasso in a circle until an object in the lasso’s path is grabbed on to. At that point, LassoBot reels itself closer to the object it caught. Late in development, we realized that making LassoBot hook itself onto stationary was extraordinarily difficult given the weakness of the DC motor. At that point, we switched to building a StruggleBot that constantly rotates a lasso in an effort to move forward in a particular direction. The final product was a great success. The StruggleBot is amusing to watch, as it struggles, and it’s a creative means of locomotion. There were a few initial difficulties while creating our robot.  Our initial plan to create a lasso bot did not work because the DC motors are too weak to reliably pull the robot along (although it did work in some cases).  Additionally, it was difficult to spin up the lasso without it tangling with itself.  Other plans for the “tumble weed” robot fell through because we found that the Arduino is incapable of adequately powering four servo motors simultaneously as required.


Idea Brainstorm

  1. A snake like robot that moves by curling and uncurling

  2. Attach random objects to it and watch it go berzerk

  3. Flying robot that has rotor blade attached underneath

  4. Moves with caterpillar treads made of… banana peels? Newspaper?

  5. Two-wheeled robot, kinda like a segway, but without the balancing complexity

  6. A robotic “hand” that drags itself across the table, as in Toy Story

  7. A robot that throws a lasso rope and rolls the rope to pull itself closer to the hitched destination

  8. A motorboat! Moves across water, obviously

  9. A robot that pulls itself up a table/wall by raveling a spool of rope hanging from a point… like a cliffhanging robot… even attach a person to make it look creative

  10. Slinky robot, that can move up a staircase by throwing a hook onto the next stair

  11. Window-climbing robot… give it suction cups to go up a window

  12. Shufflebot… by design, it rolls 2 steps forward, 1 step back

  13. Tumbleweed bot.  Looks like a hamster wheel, but has servo motors attached around the edges to roll it forward.  Alternatively, have a single servo motor and a counterweight at the center.


Design Sketches


Final Schematic of Strugglebot


Final System Video


List of Parts

1 AC motor

1 330-ohm resistor

1 potentiometer

1 zener diode

1 PN2222 transistor

2 jumpers

1 6-inch length of string

1 inch of wire

1 Arduino UNO

Electrical tape


Assembly Instructions

1. Set up the potentiometer element to control the rate of rotation of the motor. Connect pin 1 with +5V, pin 2 with A0 on the Arduino, and pin 3 to ground.

2. Set up the motor circuit. To pin 3 on the Arduino, connect a 330-ohm resistor, and connect this to the base on the transistor. Connect the emitter to ground. Connect the motor in parallel with a Zener diode, and connect both of these elements in series with the collector.

3. Mount the motor on the bottom of a circuit board using electrical tape, and use two jumpers in the circuit board to elevate the circuit board off of the ground, face down. Make sure the motor is inclined at 45 degrees.

4. Attach a thread to the motor using tape, and to the other end of the thread attach a piece of wire bent into a hook shape.

5. Upload the code, and use the potentiometer to control the rate of rotation.

Final Source Code

int motorPin = 3;
void setup() {
pinMode(motorPin, OUTPUT);
analogWrite(motorPin, 255);
}
void loop() {}

P3: Dohan Yucht Cheong Saha

Group # 21: “Dohan Yucht Cheong Saha”


  • Miles Yucht

  • David Dohan

  • Shubhro Saha

  • Andrew Cheong


Mission Statement


The system we’re evaluating is that of user authentication with our system (hereon called “Oz”). To use Oz, users make a unique series of hand gestures in front of their computer. If the hand gesture sequence (hereon called “handshake”) is correct, the user is successfully authenticated. This prototype we’re building attempts to recreate the experience of what will be our final product. Using paper and cardboard prototypes, we present the user with screens that ask him/her to enter their handshake. Upon successful authentication, the Facebook News feed is shown as a toy example.


Our mission in this project is to make user authentication on computers faster and more secure. We want to do away with text passwords, which are prone to hacking by brute force. At the same time, we’d like to make the process of logging into a computer system faster than typing on a keyboard. In this assignment, David Dohan and Miles Yucht will lead the LEAP application development. Andrew Cheong will head secure password management. Shubhro Saha will lead development of the interface between LEAP and common web sites for logging in during the demo.


Description of Prototype


Our prototype is composed of a box and a Leap Controller. The box is shaped in a way so that more volume is covered at the top of the box. The Leap Controller is placed at the bottom of the box so that it will be able to detect the handshake gestures. The motivation behind the particular box design is to promote uses to place their hands slightly higher. With more volume being covered at the top, people will place their hands higher up as well. For initial authentication, the user will select his or her profile either by selecting a profile or via facial recognition. They can also reset their password through their computer.


Here is the box with the Leap Controller at the bottom. More volume is covered at the top of the box; therefore, the user naturally places his/her hand higher up in the box.


Using the Prototype for the Three Tasks


Task One: User Profile Selection / Handshake Authentication — In this scheme, most applicable to students at a university computer cluster, the user approaches the system and selects the user profile he/she wishes to authenticate into.


Our sample user is prepared to log in to Facebook


The user selects his/her account profile


Oz asks the user to enter their handshake


The user executes his/her handshake sequence inside a box that contains the LEAP controller


Our user is now happily logged in to Facebook.


Task Two: Facial Recognition / Handshake Authentication — As an alternative to user profile selection from the screen, Oz might automatically identify the user by facial recognition and ask them to enter their handshake.


The user walks up to the computer, and his/her profile is automatically pulled up


From this point on, interaction continues as described in Task One above.


Task Three: Handshake Reset — In this task, the user reset his/her secret handshake sequence for one of usually two reasons: (1) they forgot their previous handshake or (2) they seem to remember the handshake, but the system is not recognizing it correctly.


At the handshake reset screen, the user is asked to check their email for reset instructions


Upon clicking the link in the email, the user is asked to enter their new handshake sequence


Prototype Discussion


We grabbed a file holder and made paper linings for the sides. Because this box is aimed to prevent others from seeing your handshake, we had to cover up the holes along the sides of the file holder with the paper linings. These were taped on and the Leap Controller was placed at the bottom of the box.


No major prototyping innovations were created during this project. The file holder we found had a pretty neat form factor, though.


A few things were difficult. We had to procure a properly shaped boxed for Oz users to put their hand in and accommodating of the LEAP motion controller. Out of convenience, our first consideration was a FedEx shipping envelope (1.8 oz. 9.252”x13.189”). In short time, this solution was ruled out because of the odd shape. Second, we found a box for WB Mason printing paper. This too was ruled out, this time because of bulkiness. Finally, we found a plastic file holder in the ELE lab that had an attractive form for our application. This solution was an instant hit.


Once we found the box, it worked really well for our application. In addition, putting the LEAP inside it was relatively straightforward. Black-marker sketches are always an enjoyable task. All in all, things came together quite well.


A3 Dohan Yucht Cheong Saha

Assignment 3: Heuristic Evaluation

Group Members


  1. Andrew Cheong

  2. Shubhro Saha

  3. Miles Yucht

  4. David Dohan


Some of the most severe problems in SCORE include lack of address authentication and inability to login to SCORE for a certain amount of time and having terse and unhelpful error messages which did not facilitate recovery whatsoever. While SCORE does ask for the user to double check if his/her address is correct, SCORE itself will not check if the address is authentic. This error would fall under H5 (error prevention). SCORE should be capable of detecting obvious bad input such as “hodge podge” with simple (or complex) regular expressions. Also the inability to login would fall under H9 (help users recover from errors). This was further compounded by lack of helpful messages. One proposed solution was to provide more helpful error messages that would allow the user to have an approach to recover from this message. Either by providing a list of steps to check the user’s situation.


I think that one good final exam question might be: develop a set of heuristic that you might use to evaluate an interface. The Nielsen heuristics are absolutely helpful in parsing the components of an interface and checking that it works in a way that is helpful and useful, but if you don’t think in that way or perhaps if you think that some of the heuristics are necessary or should be evaluated in a different way, you might want to use a different set of standards to judge an interface by.


One other suitable question that could be posed on an exam might be something like the following: some components of the heuristic evaluation are arguably more important than others in terms of the overall experience (the inability to undo in a text-editing program might be a much more egregious flaw than a bogged down interface). Which heuristics would you consider to be the most significant or important when evaluating a couple sample interfaces, such as:


  • Email client,

  • Text editing software,

  • Image design software, or

  • File explorer?


While there are many elements of the list of heuristics that would surface while exploring an interface without an explicit list, Nielsen’s list of heuristics makes it more likely that you will explore parts of the program that one might not have otherwise looked at.  H9-help users recognize, diagnose, and recover from errors-, for example, makes it far more likely that we will try to deliberately break the software.  This goes beyond finding situations that confuse us to actively trying to confuse the software.


H10, help and documentation, is also something that evaluators don’t usually think about when assessing the usability of the program. We tend to assume that help documentation is a section to be avoided because users go there only if they’re confused. Nonetheless, many applications get to the point of complexity where not everything can be understood at first glance. Help documentation is key in these cases.


This could just be a derivative of H8 (Aesthetic and minimalist design), but we’d like to draw attention to fact that color scheme and element decoration in an application’s design is super-important. No doubt, SCORE is an eyesore. Students want to log out as soon as possible so spare their inner design conscience. The choice of various shades of blue is sickening. The occasional burst of sea green in the buttons does not help much.


Links to Original Observations:


P2 – Dohan Yucht Cheong Saha

Group # 21

Group Members & Contributions

  • Shubhro Saha — Blog Post, Interviews
  • Andrew Cheong — Blog Post, Interviews
  • Miles Yucht — Blog Post
  • David Dohan — Blog Post


Problem & Solution Overview


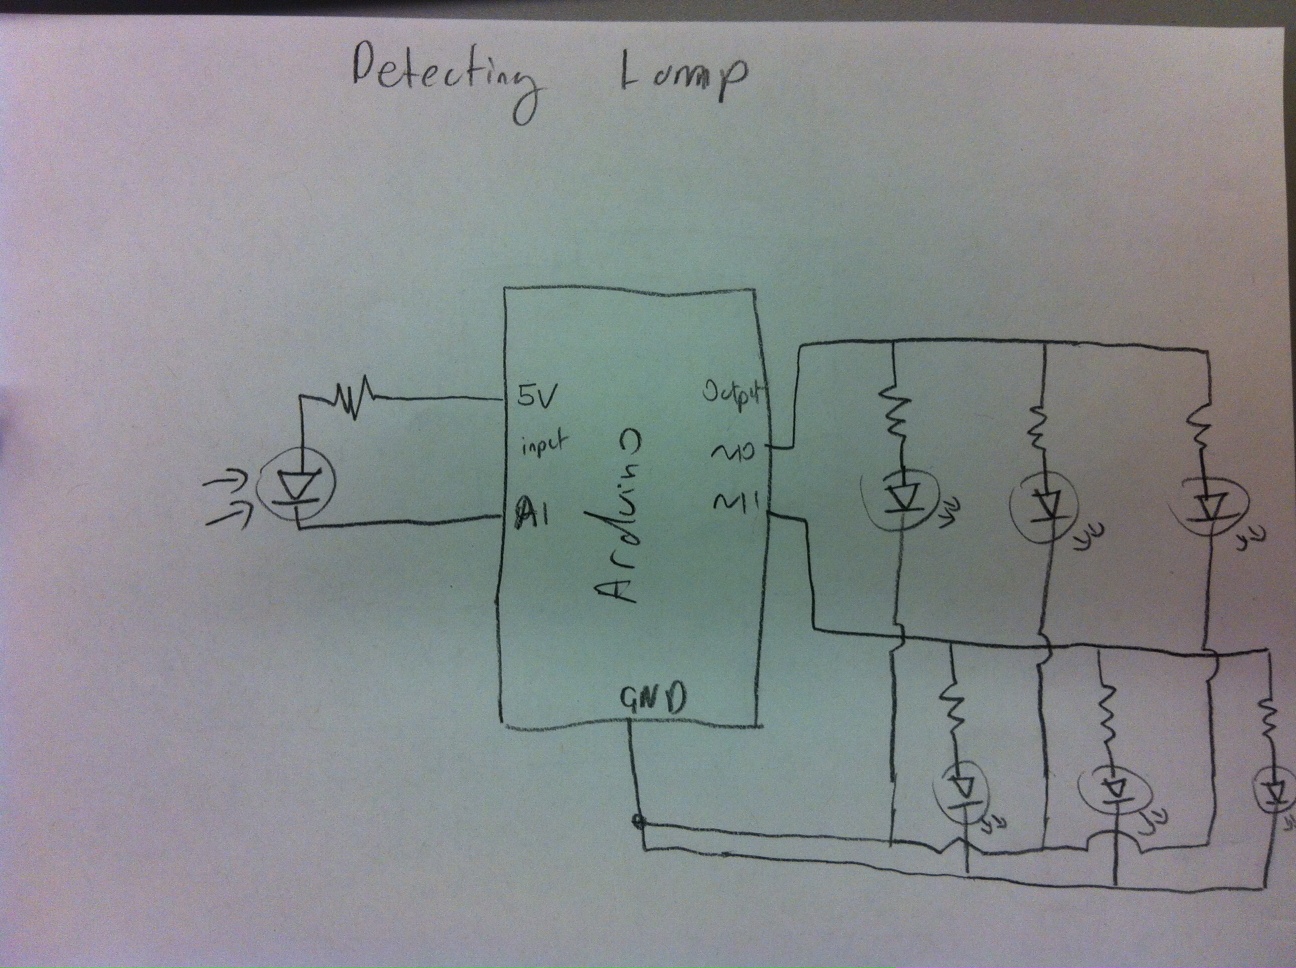
The problem we aim to solve is that of computer user authentication: verifying credentials when logging into a database, a web application, or a touch-screen cash register, for example. The prevailing solution has been to prompt users for a username/password combination. But such a solution, while dominant, is limited to keyboard-based human-machine interaction. As interfaces gradually migrate to touch-screen and voice-based interactions, the keyboard is becoming less important as an input device. From an accessibility point of view, some individuals find learning to type on a keyboard extremely difficult. Security-wise, passwords can be cracked by brute force input methods. Our solution is to authenticate by means of a combination of hand gestures performed in a “black box”, detected by LEAP motion. This solution is more difficult to hack by algorithmic methods because it requires a human hand, and is more natural and potentially a faster method of authenticating than typing into a keyboard.


Description of Contextual Inquiry Users


Our target user group would be composed of individuals are are required to sign in and out of accounts on a regular basis. Usually, signing in and out requires the user to type in their username or swipe a card to verify their id and then they follow that up with typing in a password or a providing a user PIN number. The student uses her laptop for many different reasons such as academic studies or social purposes. Being at a university, the student tends to carry her laptop around in public. While she expressed irritability for complex passwords for internet accounts that she visits less frequently,  she appears to be content with her current passwords. She expressed concern for public acceptance of carrying a box for verification or to provide hand gestures at a computer. This provides insight into why HandShake might be appropriate for stationary computers. For a cashier, they use an id card to swipe into a cash register. Her primary concern was to ensure the security of the register and that only people allowed can access the register. She expressed concern about keeping track of her id card since it is so valuable for her work. HandShake removes the necessity of maintaining a physical key/card while ensuring the security by identifying one’s hand as well as the gestures.  Even from a librarian standpoint, who must access the library network frequently when checking in/out books as well as including new resources to the library, they must provide long passwords to authenticate themselves each time. Handshake helps remove the necessity to memorize long passwords and eases the tasks in hand for the librarian.


Contextual Inquiry Interview Descriptions

Procedure. In pairs, we scouted out interviewees in their “natural habitats”. Generally, we asked them all the following questions to understand their experiences and openness to the idea of alternative authentication schemes:


  1. On a day-to-day basis, how often do you login into a computer system?
  2. Do you find keyboards logins annoying?
  3. Do you find it annoying that passwords require so many special characters?
  4. Would you consider an alternative approach to logging in?
  5. In the ideal world, how would YOU like to login to such a system
  6. Would you appreciate coming up to the computer system and it logging in for you automatically?
  7. Go into talking about our product being a derivative of that
  8. Do you see problems in using our product?
  9. Would you feel comfortable using the product?
  10. Would you find a handshake easier to remember than a text password?


Common themes. Most of our interviewees found text passwords in the status quo to be frustrating when they require a set number of letters and symbols. They all value speed of authentication, and were all willing to consider alternative methods like HandShake. However, some common concerns included uniqueness of the handshakes generated.

Student: The most common purpose for the student to sign in or out of an account is when she uses her laptop and when signing into internet accounts such as Facebook. She estimates that she signs into her laptop approximately three times a day and signs into a total of three different internet accounts. When asked about current day username/password approach and the complexities of special characters, numbers, and cases, she did mention that it annoying especially when she signs up for accounts that she enters less frequently and often forgets the password. She also explained that she would be totally open and willing to try a simpler technique to signing into an account. When describing the hand gesture approach, she initially expressed concern about the unusualness to make gestures at one’s computer but was comforted that the individual would do these gestures inside a box thus providing more security as well as not being out of place. While transportability and use of HandShake while on the go proves to be a problem for a student, she believes that this could be very appropriate for stationary desktop accounts such as home computers.

Cashier : She has her own ID card that she can use to swipe into her cash register. She does it at least three times a day during her 8-hour daily shift. Her manager gave permissions for her to access that register and no other registers in Frist. She feels “50-50” about the responsibility of having to carry a card. While she understands the security protocol, she sometimes worries about losing it and being “written up” for a replacement. When asked about her openness to alternative authentication schemes, she gave a positive response. With regards to gesturing to a cash register to authenticate, she was OK with it as long as the hand could be recognized specifically. Specifically regarding the idea of HandShake, she liked the idea as long as the system identifies individuals reliably. Reliability seems to be a dominant theme. When asked about other concerns regarding HandShake, she stated she said she had none and that she would find hand gestures easier.

Librarian. We spoke to biological sciences librarian. She purchases science materials, speaks to students one-on-one and primarily to support research and learning. In this effort, she does find herself having to login to resources often, but anything that the library owns or the university subscribes to are automatically authenticated based on access through the Princeton University network. She finds it annoying to find passwords of a longer length, as they are harder to remember. She would definitely consider alternative methods of authentication. Anything not requiring numbers or symbols is great– she loves using a phrase in her textual passwords. When presented with the idea of HandShake, she was open to the idea, but had concerns about the uniqueness of passwords created. From her perspective, there’s “only so many gestures you can make”.

Answers to 11 Task Analysis Questions


  1. Who is going to use system?

    • HandShake would be used by individuals who are required to sign in and out of accounts frequently such as librarians, cashiers, as well as student to access public computer accounts.

  2. What tasks do they now perform?

    • Most if not all forms of signing and out require individuals to enter a username and password pair and the system would verify accordingly.

  3. What tasks are desired?

    • We want to device an approach that allows users of this product to sign in and out with less time, less effort, and more security. After identifying that the user is the correct user (either through facial recognition or selecting an option) HandShake allows the user to present different hand gestures inside a blackbox as his/her password. This requires no typing of a password, clicking, just simple hand motions. Hand gestures are so primal and innate that humans had such gestures since way back when. This innate behavior may facilitate a common practice such as signing in and out of an account.

  4. How are the tasks learned?

    • When HandShake is adopted, rather than simply presenting the username and password text file, they can be prompted to identify themselves by either selecting from a list of ids and prompted to insert their hand inside HandShake and provide the necessary gestures to verify themselves. A simple tutorial can be provided for first time users and the tutorial will no longer appear for users who are comfortable with the tasks.

  5. Where are the tasks performed?

    • The tasks are performed in front of systems where authentication is required. This depends on the user, but for our focused cases: a librarian might authenticate at a computer to access a database, a cashier would authenticate at a register, and a student would authenticate at a computer cluster terminal.

  6. What’s the relationship between user & data?

    • Anyone with potential access to the system should be able to submit a handshake (ie, they have a valid username). The username can be selected by tapping on-screen (works well for a list of recent users on the same computer) or facial recognition can identify the individual when he/she approaches HandShake, and issue a handshake prompt to authenticate.

    • The data the users access after authenticating is outside the scope of our problem. We’re concerned up to the point of successful authentication. Indeed, much of the data and privileges obtained after authentication may be sensitive and/or personal.

  7. What other tools does the user have?

    • Users usually have cell phones and PCs. The PC is probably what is going to be authenticated into. The cell phone would be a useful tool in the handshake reset verification process (see below.)

  8. How do users communicate with each other?

    • In the authentication process, users usually do not communicate with one another.

  9. How often are the tasks performed?

    • Users might perform the same tasks multiple times a day, depending on how often he/she authenticates with the systems concerned. For example, a cashier needs to authenticate with his/her employee credentials every time he/she changes registers. On the other hand, a student logs into Facebook much less frequently because the system leaves the user authenticated for some period by default.

  10. What are the time constraints on the tasks?

    • Usually, users are authenticating a system to obtain privileged access to data and actions. Authentication should take no more than 10 seconds– ideally, performing a handshake is faster than typing in a username and password

  11. What happens when things go wrong?

    • If the user forgets his/her handshake, the system provides a means of “resetting” the handshake after authenticating a different way (Mother’s maiden name, text message confirmation, etc.)

    • If the correct handshake is performed, but the system does not recognize it, the user should reset their handshake to a clearer one.


Description of Three Tasks


The three tasks users might perform are the following (in ascending order of difficulty):


Current method for first two tasks: users currently authenticate by typing a username/password combination. The current difficulty level of this varies widely by individual and application device. For example, new computer users find difficulty typing into a keyboard, so authentication takes some time. On the other hand, most mobile phone users could probably relate to the annoying experience of authenticating into mobile apps and web sites with a tiny keyboard.


  1. User Profile Selection / Handshake Authentication — In this scheme, most applicable to students at a university computer cluster, the user approaches the system and selects the user profile he/she wishes to authenticate into. This can happen in one of two different ways: (a) the profile is automatically detected by facial recognition, or (b) the profile is selected from a list of possible/recent users on the screen. Then, the user proceeds to perform his/her secret handshake sequence in a “black box” of sorts that contains a LEAP motion detector. If the handshake is correct, the system will login. Otherwise, the user will be given another try. We anticipate that performing a secret handshake will be easier and faster for users, especially for new computer users and individuals on mobile devices.

  2. Card Swipe / Handshake Authentication — As an alternative to user profile selection from the screen, some contexts might find it appropriate to select user profiles by swiping an identification card. This is especially true and supermarkets and convenience stores where users already have such cards to perform common authentication tasks around the store. As a means of confirming the cardholder’s identity, the user can proceed to perform a secret handshake as described in Task #1 above. From the cashier’s perspective, we anticipate the authentication process will be faster with a handshake– time is of the essence when serving other customers in this context.

  3. Handshake Reset — In this task, the user reset his/her secret handshake sequence for one of usually two reasons: (1) they forgot their previous handshake or (2) they seem to remember the handshake, but the system is not recognizing it correctly. For both of these cases, the user must proceed to reset the handshake by verifying their identity through other means. For example, the user might receive a text message containing a secret code they should type into the system. Or, the user will be asked for personal information previously set during the user creation process (mother’s maiden name). A combination of these secondary authentication schemes would be the best solution. Though seemingly cumbersome, we want this reset process to be as robust as possible. These procedures are something users are already familiar with from using other web applications.


Interface Design

Text Description of System Functionality
When the user uses the system, it will be able detect the identity of the user who approached the system by facial recognition. Then, it will confirm this identity by presenting the propose the identity, offering the user to change it, and asking the user to enter his/her handshake. If the handshake is correct, the system authenticates. Otherwise, the user can try another handshake for a limited number of times. This idea differs from existing systems because, for many people, a hand gesture can be easier to remember, and it’s also more secure than existing text passwords because it cannot be broken by brute-force algorithms. Other security systems have different modes of verification such as inserting a physical key, using biometrics, or providing a password of some sorts. By allowing a sequence of hand gestures, it combines the concept of a physical key as well as incorporating one’s biometrics. Physical keys are often difficult to manage because one must always carry it around, while it can be safely assumed that most people will have hands. Password have become difficult to manage with increasing safety precautions requiring more complex passwords with special characters, both cases, and numbers.

Three Storyboard for Our User Tasks

Sketches of System Itself


A2 Shubhro Saha

Conducting Observation Description

I caught three students from my MAE 305 class as we were walking out of the Computer Science building and towards our next class. The prototype I tested was for a mobile app that asks users questions for psychology studies in return for monetary compensation when studies a completed over the course of a week. During the interviews, I noted that all the users navigated the user interface quite easily. Each screen flowed to the next, and most users had no problem understanding the questions. Two of the users suggested the application intelligently draw data from the mobile device’s behavior over the course of a day. For example, it should send notifications only when it knows the student has a free class schedule. In addition, it can draw from information like dining halls and geolocation to infer best responses and suggest them to make getting through the pscyh study much easier. The final user suggested I add colors to the application to inrease the appeal factor with end users.

Idea Brainstorm — Collaborated with Andrew Cheong and David Dohan

  1. Students should complete psychology studies in a piecemeal fashion to earn monetary compensation
  2. Late students should lose money to charity every time they’re late to class, creating concrete motivation to be on time
  3. Students should play a game of memory on the projector to pass the boredom
  4. Teachers should play review questions on the projector in the same way movie theaters show previews before the feature film
  5. Students should play laser tag across the classroom with their iPhones to solve boredom
  6. The Daily Prince should conduct polls to everyone in the classroom, especially if they’re tring to target a certain demographic of the student population
  7. Students should have questions related to the class answered by their peers, and the teacher should kick off with the ones the students could not answer amongst themselves
  8. Local restaurants should come give sample food to passers by students to promote their wares and excite the student customer base
  9. Students should stand up in front of the classroom and be student ambassadors for corporate brands like Microsoft, and convince their peers to adopt the company’s services
  10. Teachers should have a lounge where they socialize in between classes
  11. The dining hall should provide free samples to get student feedback on new dishes
  12. Campus Fitness should conduct free exercise activities while students are waiting for class to begin. Nothing like Zumba to get the mind ready for class
  13. Students should give each other job interview questions so they’re better prepared for their upcoming interviews
  14. Students should give mini-lectures in the time before class begins to share interesting things they’ve discovered about the class subject
  15. The teacher should conduct a game of Jeopardy to review class material


2 Favorite Ideas

  1. Students should complete psychology studies in a piecemeal fashion to earn monetary compensation. I like this idea because it kills two problem birds with one stone: student boredom and the struggle to elicit responsive psychology study subjects
  2. The teacher should conduct a game of Jeopardy to review class material. Similarly, this idea helps to review class material and kills student boredom at the same time.


Photos & Descriptions of Prototypes

In this first prototype, we see a sample user workflow for a mobile app that asks psychology study questions to students waiting in between classes. The app asks for the student’s mood, eating, and energy levels at the moment.

In the second prototype, we see the user experience for a student sitting in class, where the teacher conducts a game of Jeopardy on the board to review previous class material.

Photos & notes from user testing

A live test subject using my prototype!


  • Initially, my first user didn’t understand the context of the application, so I started to give background information about what this study was for and what this prototype intended to model
  • After initial background information, users navigated the prototype’s flow quite easily
  • When asked, all of them responded that they would be willing to complete these short studies in-between class for monetary compensation. One out of the three said they would do it for free.


Insights From Testing


  • Give more background information on the home screen to set up users for what they’re about to do
  • Perhaps take advantage of the phone’s geolocation abilities to customize responses to the psych study questions
  • Monetary compensation seems to be a requirement for user engagement

Dohan Yucht Cheong Saha (DYCS) L1 Blog Post

Group #21 Members

  • Shubhro Saha
  • David Dohan
  • Miles Yucht
  • Andrew Cheong

We built a quite advanced drumkit with the force-sensing resistor. By toggling the input mode on an input button, the user changes the drum instrument sample. Then, he/she taps a drumbeat into the FSR. The drumbeat is recorded into processing and other samples can be recorded by cycling through samples with the input button. At the end, the final mode allows the user to play back all the recordings in unison, using Processing and our computer speakers. We chose this project because all of us are musically inclined; Shubhro is a musician, both David and Miles are singers, and Andrew is a dancer! Altogether, making a drum machine is really fun and awesome. The end product turned out to be a great success! We had some technical challenges, but at the end we pulled through. In the final result, we like that the machine manages to overlay recordings from different sound samples. Among the things that didn’t work, Processing wouldn’t play all the sounds we wanted it to on the Arch Linux machines. Everything worked OK on Shubhro’s Mac, though. Also, delays in sound playback were a difficult annoyance.


In these schematics, we’ve drawn the wiring for our drum kit, strength tester, and morning room lighter, respectively.


In this storyboard, we see a user previously fed up with music product software celebrate the ease-of-use in our drumkit.

Video of System in Action

Parts Used

  • Arduino
  • Button sensor
  • Two 330-ohm resistors
  • Force-sensitive resistor
  • Potentiometer
  • Various wires


Assembly Instructions

  1. To a breadboard, attach a force-sensing resistor (FSR) in series with one of the 330-ohm resistors in the pull-down configuration. Also attach the potentiometer in series with the other resistor, also in the pull-down configuration.
  2. Connect the second pin of the potentiometer to pin A2 in the Arduino.
  3. Connect pin A0 on the Arduino in between the FSR and the 330-ohm resistor.
  4. Attach the button to pin 2, the voltage source and ground from the Arduino.


Source Code

import processing.serial.*;
import cc.arduino.*;
import ddf.minim.*;

/*Drumkit for Princeton COS436 - HCI Lab 1.  David Dohan*/

Arduino arduino;
Minim minim;


/*Pins*/
//Analog in
int drumFsr = 0;
int volumePot = 2;
//Digital in
int modeButton = 2;
//Digital out
int beeper = 3;

/*Beat information*/
int numTracks = 10; //Number of tracks
int cTrack = 0;
int trackSize = 10000; // Most possible ticks
int lastBeat = 0;      // Last current tick before looping
int[][] tracks = new int[numTracks][]; //All the tracks
AudioPlayer[] sounds = new AudioPlayer[numTracks]; //Sounds to play for each track
String[] names = {"kick", "tss", "cymbal"};

/*state*/
int numStates = 5; //0,1 record/hold
int state = 1; //0:play 1:hold 2-4:record drum types
int beat = 0;
int cutoff = 20;
double delayms = 1;
int lHit = 0;


void setup()
{
    println("Serial ports: ");
    println(Serial.list());
    arduino = new Arduino(this, Arduino.list()[6],57600);
    arduino.pinMode(drumFsr, Arduino.INPUT);
    arduino.pinMode(volumePot, Arduino.INPUT);
    arduino.pinMode(modeButton, Arduino.INPUT);
    clearTracks(); //Initialize tracks

    minim = new Minim(this);

    //Load sounds
    sounds[0] = minim.loadFile("drums/kick.mp3");
    sounds[1] = minim.loadFile("drums/snare.mp3");
    sounds[2] = minim.loadFile("drums/cymbal.mp3");
    sounds[2].setGain(-10);
}

void cleanTracks() {


}

void nextState() {
    beat = 0;
    state = (state + 1) % numStates;
    if (state == 1) { 
        lastBeat = 0;
        clearTracks();
    } else if (state == 0) {
      cleanTracks();
    } else {
       println(names[state-2]); 
    }
}

void clearTracks() {
    for (int i = 0; i  cutoff && lHit < cutoff) {
      tracks[cTrack][beat] = hit;
  }
    //println(hit);
      beat -= 1;
      play();
      beat += 1;
    if (state == 2) { lastBeat = max(beat,lastBeat); }
    lHit = hit;
}

void play() {
    //Cheap edge case avoidance...
    if (beat <= 0 || beat == trackSize - 1) { return; }
    for (int t = 0; t  0 && tracks[t][beat] > tracks[t][beat-1] &&
        //tracks[t][beat] > tracks[t][beat + 1]) {
        if (tracks[t][beat] > 0) {
            //print("Play");
            //println(t);
            sounds[t].play(0);
        }
    }
}

void draw()
{
    /*
     * Check button - mode change?
     * If play, then play current tick. Advance.  Read potentiometer to get tempo
     * If hold, do nothing
     * If record, then record fsr to current track/tick.  Play other tracks as
     *      well.
     */
    
    if (arduino.digitalRead(modeButton) == arduino.HIGH) {
        //Manage debounce
        while (arduino.digitalRead(modeButton) == arduino.HIGH) { print("") ; }
        nextState();
        print("Debounced: ");
        println(state);
    } else {
        
        switch (state) {
            case 0:
                play();
                break;
            case 1:
                hold();
                break;
            default:
                record();
                break;
        }
    }
    beat = (beat + 1) % trackSize;
    delay(arduino.analogRead(volumePot));
}

Yucht Dohan Saha Cheong Project 1

Team Members

Miles Yucht

David Dohan

Shubhro Saha

Andrew Cheong

Brainstorm

  1. Digital flute powered by light sensors for people who have limited lung capacity but still would like to learn to play. Varying aperture can modulate tone volume, and it could also could teach you to play interactively.
  2. For young, urban professionals who don’t carry mice with their laptops, one could have a credit-card format mouse that is thin enough to fit in your wallet.
  3. I want a computer I can wear around my neck and interact with by holding up my fingers, a la Sixth Sense, if you work in the field where it’s difficult to set up your laptop.
  4. For people who can’t control a mouse with their hand, they could move a ball with their feet to control their cursor.
  5. For more effective group meetings, a giant electronic collaborative whiteboard with physical interface such that everyone could edit it simultaneously. At one time, everyone would have the same view.
  6. If you want a copy of notes from today’s lecture if you couldn’t make it, a device that records a teacher’s notes on the blackboard and processes them into a PDF which would be available right after lecture
  7. If I’m paralyzed or shopping from home, I want to be able to try on virtual clothing to see what I would look like without having to actually put the clothes on my physical body.
  8. If I have no fingers, I could still control my TV with Kinect gesture/voice
  9. Learning to jump rope is hard. It would be easier with a jump rope that gives you feedback on what you need to adjust to become better, and it could teach you new tricks and save scores/records.
  10. Instead of hiring a personal trainer, you could instead buy a device that would record you exercising and give you feedback, such as squatting or golf swing, to improve your technique and lower your chance for injury
  11. Markov-based model for predictive typing to guess the next word you’re going to type in your phone/sentence so you can text faster, for those of us that are horrible spellers.
  12. If you want to learn how to dance, but the DDR style doesn’t appeal to you, pads on the ground could light up, playing back a dance step tutorial, to teach you and perhaps a partner how to dance.
  13. Learning to skateboard is hard, so my skateboard could detect foot placement to give feedback when learning to ride the skateboard.
  14. I want my mirror to sympathize with me. By analyzing my face, my mirror should give me words of encouragement if I look like I’m feeling down in the morning.
  15. Use gestures to control the multitude of lights in large rooms or in rooms where light controls are not easily accessible, for handicapped people or those interested in making dramatic entrances/exits.
  16. For parents who want to introduce their young children to instruments, one could use a plant as a musical instrument by measuring flexing in the plant. This would require minimal technical skill and would also have the performer interact with nature.
  17. For those college students that have a hard time waking up in the morning, a wake up alarm that won’t reset unless subject to the most violent conditions, like throwing it or slamming it
  18. Use Xbox Kinect to give feedback on how to improve your posture if you have posture-related health issues.
  19. For someone who can hold objects but has trouble typing, one could use physical gestures or general input device motion as passwords, as opposed to a typed text string.
  20. For someone who has no motor control in their hands, a phone-like device could speed-dial numbers and interact with the user according to patterns of blowing air.
  21. Device should detect butt location to infer how well someone is paying attention in an audience. More complicated: body language inference from camera at front of room (the inference step might even be doable with the same seat sensors as well)
  22. Authenticate based on a laser key based on uniquely-shaped objects in a 2D/3D laser field. Stick your hand in there if you want
  23. Create a sensor in bed that turns the lights off when there’s someone laying down… or two. Could trigger many possible actions such as arming house alarm etc
  24. Devise a sensor in the bathroom that makes you aware of the number of bacteria on your hands as you wash them
  25. Flush a toilet by blowing air into a sensor, reduces germs on contact
  26. Enable computers to teach and/or read sign language, perhaps with XBox Kinect
  27. Create a system that detects facial emotions so they can be used in focus groups to more conveniently collect data
  28. Blowing air into a sensor to create a beatbox drumkit that people with disabilities can use
  29. An algorithm can analyze keyboard typing sound patterns to infer what type of activity is being performed, use to evaluate student attention levels in lecture
  30. For people who can’t speak loudly, voice-interaction systems should try to read their lips
  31. Rubbing your pocket to change tracks on iPhone on a cold day
  32. Utensils/containers that tell you if your food is too hot to eat… alternatively, containers that automatically heat up food that is too cold
  33. For people who use the same computer over the course of the day/night, a program that takes into account ambient light and current display (maybe even type) to calculate the best values for brightness and other display parameters (gamma, contrast, etc.)
  34. Music playlist that automatically changes to suit you as you change tasks
  35. 3D manipulation of models and visualizations (think molecules / proteins) with Leap, this is a much more natural gesture
  36. Use LEAP motion as an effective, cost-effective way to scan faces for authentication
  37. Play Rock, Paper, Scissors with LEAP to provide companionship for children
  38. Direct a virtual live orchestra using baton movements captured in LEAP. This can be used to train amateur conductors
  39. Integrate LEAP into clothing to make convenient computer gestures right in front of your body
  40. Control a quadricopter with tongue movements so disabled individuals can go beyond joystick interaction
  41. Violin that lights up on the frets to teach novices how to play songs
  42. Computer in backpack with projector on chest to make a virtual piece of paper you can write on with a stylus (convenient, mobile notetaking)
  43. Reconstruct ping pong game based on sounds from microphone (triangulate landing and where it is hit)
  44. Control quadcopter or another electronic device with LEAP motion… it’s a far more convenient and natural gesture than joystick
  45. When you’re working out and don’t want to change your music player for fear of covering it with sweat or taking time off of exercise, your music player could measure your heart rate and the speed of the repetition of the exercise and generate a playlist of appropriate songs.
  46. Use Xbox Kinect to obviate human labor in semaphore training
  47. Billiards table that visually augments your game interaction, suggests ball movements to make the game easier for novices
  48. Control quadricopter by measuring movements in a 3D point cloud with an accelerometer… much more natural gesture than joystick systems.
  49. Eye-tracking system will move a vehicle (quadricopter) to the desired location being looked… for people with limited limb movement
  50. Teach children motor skills with a colored grid on the floor where they can play Simon Says with their feet

Sketches During Brainstorm

photo 1

Project Choice Justification

LEAP-based Authentication

One of our ideas was to use LEAP as a means of authentication using one’s face, a gesture, or a physical object. To us, the most clear application of this is for authenticating web services, such as for logging into one’s email or social media accounts. However, this kind of authentication is easily extendable to systems beyond web applications: for instance, one could use this to unlock doors or to control who can drive your car. Furthermore, the flexibility of LEAP means that any small, handheld objects could be used to identify you, such as a small tchotchke. With facial recognition, the username/password pair becomes obsolete because it is exceedingly expensive and difficult to recreate someone’s face to the precision required if you wanted to gain access to their accounts. The downside to this is that you’re exposing your credentials to everyone you walk past, so perhaps identity theft could become a real issue. However, this can be easily rectified by using a hand signal or handheld object to confirm your identity, like a password, that would be easy to keep hidden or hard to replicate. All in all, this seems like a very useful device with broad applicability that would allow people to spend more time going on with their lives and less time worrying about lost passwords and keys or simply taking time to login to sites, all in all with a high level of security.

Dance Dance

Games are generally really fun to play but often have no real-life applicability, such as the Guitar Hero franchise, whereas some tasks in real life can be somewhat droll to learn. Enter the digital dance floor, which could teach you to dance by lighting up tiles for you to step on in time to music. Here, the idea is that you would stand on a dance floor, which is composed of a set of transparent, square tiles. Each tile would be controlled by a single light source, the set of which would be managed by a computational device. By storing and replaying a pattern of lights over time, one could effectively recreate the steps of many dances. Then, using force-sensitive resistors underneath each tile, the accuracy and timing of one’s responding dance steps could be measured and quantified into a score, which would then be recorded at the end of the game. Additionally, multiple panel colors could allow for more than one player to participate in the game at once. This idea is also extendable, as there are many other modes for operation one could conceive of: for instance, you could have the lights respond to pressure, creating a dance floor that tracks how people move along it and lights up squares beneath people on the dance floor, or you could play a full-body version of Simon Says.

Detailed Description

Problem Description & Context. Reliable user authentication has been a perennial problem in human-computer interaction. How can a system verify that the user is who he/she claims to be? The prevailing solution varies on and off the computer screen. Inside the web browser, username/passwords systems ensure that the desired user is the only individual who knows the correct combination of inputs. Outside the computer, locks, keys, and RFID cards dominate the physical world to open doors and grant physical access. These solutions are not without challenges of their own. For example, what happens when a user forgets his/her password? The password recovery process is prone to hacking by email and phishing attempts. In the real world, physical keys and cards are liable to misplacement. We’ve all had a time we lost a key during our day-to-day bustle. Finally, an underserved segment of our population are those disabled individuals who cannot easily use existing forms of authentication. Consider individuals who have difficulty typing– username/passwords are a nuisance. Similar challenges are presented to individuals who have difficulty with traditional locks and keys. Our overall goal is simple, fast, reliable, user authentication.

Target User Group. Our target user group boils down to two types:

  1. Disabled Individuals– For reasons related to limited finger movement or arm motion, these individuals experience difficulty using locks/keys or username/password typed into web sites. They desire access to their favorite web sites and physical rooms behind locked doors.
  2. Public Computer Users– Institutions like a university are full of public computers that require username/password authentication. The time spent authenticating by keyboard could be better spent serving another user, thus reducing the overall demand for computing resources over time. These institutional users desire speed– whether its university students trying to print a paper before class or a business professional trying to get a meeting started as quickly as possible.

Technology. Leap is a sensor that is capable of detecting 3D motion for 3D objects. While photos and videos are a 2D mapping of the 3D world, Leap is able to capture the full scope of 3D reality. This benefit allows our idea to become more viable. In the case for facial detection, the Kinect or a photo app would not suffice because authentication can be thwarted by simply placing a picture of a certain individual in front of the sensor. However, this wouldn’t be a problem for the Leap since the 3D would take into consideration the depth of the image. For a 3D object, due to the sensitivity and precision of a Leap, other systems may not be able to detect the subtleties of our authentication object.

Sketches.

photo 2

Lab 0: Groovy Lava Lamp

Group Members

  • David Dohan
  • Miles Yucht
  • Andrew Cheong
  • Shubhro Saha


Description
In a moment of ‘70s nostalgia during our lab brainstorming session, we decided to build a lava lamp. Not only did we want to reproduce the brilliance of the original lava lamp, but also our objective was to creatively extend its capabilities. In particular, our innovative lava lamp allows the owner to change the lamp’s color/brightness with an interactive slider and switch between color/brightness modes witha push button. The milk and oil lava produced a unique texture of very fine bubbles which act as an excellent light diffuser. Our final product turned out to be a great success. It’s not perfect, but it changes color according to the user’s input and turns on when the room lights are turned off. The code written for this interactivity is our proudest feature, and there are several areas of improvement. The lava lamp is hardly robust—electrical connections inside the test tube had to be completed with paper clips because alligator clips were too large. With more time, we would’ve made it less obvious that the lamp is a crude Princeton water bottle with a test tube dropped inside of it. However, it demonstrates a proof of concept, and it is easily expandable in the event that one would like to use more LEDs or add more modes. Additionally, we could improve the smoothness of the mapping from linear values (from the soft pot) to the color wheel.

Photos of Sketches


We considered making a reaction time game with Arduino.

We considered making an LED change brightness in response to ambient light levels.

photo


This is our final schematic for the lava lamp.

Video

Here’s a YouTube video of our final system in action.

Parts

  • Arduino Uno
  • Small water bottle
  • 12 mL test tube
  • Tricolor LED
  • 5 330-ohm resistors
  • Photoresistor
  • Button
  • Softpot
  • Vegetable Oil
  • Teaspoon of milk


Instructions
There are four components to this build: the lava and its container, the tri-color LED light source, the interactive controls (i.e., the softpot, photoresistor, and button), and the Arduino with associated code. We first built and tested the light source with the Arduino before putting it into the test tube. When building the light source, make sure that the way you connect the LED to the rest of the circuitry makes a difference: it needs to be slim enough to fit inside a test tube. To build the light source:

  1. Connect pin 9 on the Arduino to a 330-ohm resistor, and in series connect the cathode on the tri-color LED corresponding to the red LED. For the second connection you will want to use longer cables so that they can reach from your breadboard to the LED once it is suspended in the lava lamp.
  2. Repeat step 1 with pin 10 on the Arduino to the green cathode and pin 11 on the Arduino to the blue cathode.
  3. Connect the tri-color LED anode to ground, again using a long cable.
  4. Because these wires all have to be very close to one another inside of the test tube, we recommend using a small amount of electrical tape between connections so that you don’t short out any connections.

To build the interactive component (softpot and button):

  1. Connect the softpot to the breadboard with pin 1 at 5V+, pin 2 to A1 on the Arduino, and pin 3 to ground.
  2. Connect the button using a 330-ohm resistor according to the Arduino Button tutorial (http://arduino.cc/en/tutorial/button).
  3. Connect the 5V+ to a 330-ohm resistor in series with the photoresistor. Connect A0 on the Arduino to the conductor between these two resistors, and connect the other end of the photoresistor to ground.

To build the lava lamp:

  1. Fill the bottle with half water, half vegetable oil up to about ⅘ of the way.
  2. Add in approximately a teaspoon of milk.
  3. Shake vigorously.
  4. The resulting mixture should have a slightly yellow/white color but also have a large number of small bubbles (resulting from the mixture of water and oil).

Assembling the final product:

  1. After finishing the LED assemblage, insert the LED into a test tube such that, when the test tube is lowered into the bottle, the LED will be approximately half-way down the bottle. The point of the test tube is to keep the LEDs dry and away from the oil-milk lava. If you’re having trouble (as we did), you can try a larger test tube.  Ideally, you should solder and insulate the leads, but since we are not allowed to solder, our makeshift solution was to use paper clips to extend one of the cathodes so that we could connect to it using an alligator clip. Also, a small amount of oil on the inside of the test tube acts as a lubricant, so it is then a bit easier to slide the LED assembly inside.
  2. Lower the test tube into the lavalamp, and use tape to hold the test tube in place inside the bottle.
  3. Play!

Usage
There are 4 basic modes: one to set the color of the LED and one to set the brightness. Switching between modes is accomplished using the button. In the color mode, the softpot controls only the color of the LED along a color wheel. In the brightness mode, the softpot controls the brightness of the LED without affecting its color. The third and fourth modes are for cycling through different colors By the nature of the softpot, as soon as one stops touching the component, the resistance returns to a steady state. Instead of trying to identify instances when this happens, we also made a fifth mode that saves the current settings. In this mode, the softpot has no effect on the color or brightness. In the future, we might add indicator lights to identify what mode we are in at any given time, even though it is really easy to find out (just touch the softpot and see how the light changes).

Source Code

// Lava lamp code for HCI (COS 436/ELE 469)

/*
  The RGB LED has three cathodes and a common anode. Each cathode
  corresponds to a color in the LED and is independently
  controllable.
*/

//for color of the tricolor LED only. determines the size of the 
//set of values over which each color fades on/off while using the 
//softpot.
int range = 300;

/*
  In each set of variables RGBLED_xxxx and RGB_x_mid, the former
  corresponds to the pin being used for color xxxx. The latter 
  corresponds to the softpot value at which color x is at its greatest
  brightness.
*/
int RGBLED_Red = 9;
int RGB_R_mid = 100;

int RGBLED_Blue = 10;
int RGB_B_mid = 500;

int RGBLED_Green = 11;
int RGB_G_mid = 900;

//Arduino pinouts for each component 
int softpot = A0;
int photosensor = A1;
int button = 2;

//current color
int color = 0;

//current values for the intensities of each LED color
int rgb_r, rgb_g, rgb_b;

// brightness ranges from 0 to 1
double brightness = 1.0;

// mode is:
//   0: set color
//   1: set brightness
int mode = 0;

// psthreshold is the least amount of light needed to activate the lights
int psthreshold = 850;

// state variable is:
//	0: off
//	1: on
int state = 1;

//calculates the intensity of a color based on the current value of
//the softpot, the color’s RGB_x_mid value, and the range variable.
int getBrightness(double mid, double cur) {
  int t1 = abs(mid - cur);
  int t2 = abs(mid - (cur - 1024));
  int t3 = abs(mid - (cur + 1024));

  int test1 = min(t1, t2);
  int minimum = min(test1, t3);

  if (minimum > range) return 0.0;

  return 255 * (range - minimum) / range;
}

//sets the color for all three colors in accordance with the current
//softpot value
void setVals(int cur) {
  if (state == 1) {
	rgb_r = getBrightness(RGB_R_mid, cur);
	rgb_g = getBrightness(RGB_G_mid, cur);
	rgb_b = getBrightness(RGB_B_mid, cur);
  }

  writeToLED();
}

//sets the brightness of the LED according to the current 
//softpot value
void setBrightness(double cur) {
  if (state == 1)
	brightness = cur / 1024;

  writeToLED();
}

//actually sets the PWM pins to the values dictated by the current
//color and brightness
void writeToLED() {
  analogWrite(RGBLED_Red, rgb_r * brightness * state);
  analogWrite(RGBLED_Blue, rgb_b * brightness * state);
  analogWrite(RGBLED_Green, rgb_g * brightness * state);
}

//switch between modes
void toggleMode() {
  mode = (mode + 1) % 5;
}

//setup each LED and button
void setup() {
  pinMode(RGBLED_Red, OUTPUT);
  pinMode(RGBLED_Blue, OUTPUT);
  pinMode(RGBLED_Green, OUTPUT);
  pinMode(button, INPUT);

  Serial.begin(9600);
}

void loop() {
  // Check to see if there is light in the room using the
  // photoresistor. If so, set the output to 0. Otherwise, use the
  // softpot.
  int current_light = analogRead(photosensor);
  int current_soft = analogRead(softpot);
  int button_state = digitalRead(button);

  if (button_state == HIGH) {
	while (digitalRead(button) == HIGH);
	toggleMode();
	Serial.print(mode);
	Serial.print("\n");
  }

  if (mode == 0) {
	setVals(current_soft);
  } else if (mode == 1) {
	setBrightness(current_soft);
  } else if (mode == 3) {
	color = (color + 1) % 1024;
	setVals((int)color);
  } else if (mode == 4) {
	color = (color + 1) % 2048;
	setVals(color/2);
  }
}